I wish I had known.... F550 purchase, build and first flights..

mmurfitt

Member
Sounds like some strange and rather scary problems.

Something I do every time I've been in the Naza assistant is to re-calibrate the sticks and remember to write it to the controller.

If it's swinging wildly and acting unpredictably I'd cut down what you're using to get the simplest setup possible, make sure that works and go on from there.

In order to find the problem you need to put your methodical fault finding hat on, at the moment you have two many variables to effectively fault find.
Before you start fault finding unplug your Gimbal servo's as well as any AV TX, this will at least a possible source of interference.
So, first thing is unplug the GPS from the Naza, select Manual flying mode and ensure the erratic behaviour doesn't persist. If you have the same problems you know it's nothing to do with the GPS, so you should look at potentially removing and reseating the NAZA (something which just occurred to me, do you have the side of the NAZA with the motors plugged in pointing forwards?)
If you're able to fly for a duration which would have otherwise have seen you have problems then that's a serious step forwards as it will show your motors, your ESC's, you FC are all working and configured correctly.
Now try flying in Atti mode (still leaving the GPS unplugged). If you're flying ok then you potentially have a problem with your GPS, and it probably will need re-calibrating at least (a note about recalibrating, remove anything metallic from your person - watches, phone, keys anything. Also, ensure you do the calibration away from anything which may cause interference like power lines, houses, cars, fences. When you do the calibration leave the battery plugged in for 60 secs or so to allow the GPS/NAZA initiate correctly). You also may need to reseat the GPS away from anything else, interference etc.
Something which also may have affected the calibration is underground power lines, so you might want to consider going to a completely different area to do the calibration.
However, if you're having the same issues in Atti mode then it's likely to be the NAZA, as above, unplug it, reseat and plug everything back in again and try again


So if you're able to fly in atti and manual mode ok, but have problems with GPS mode then that at least narrows your options as it could (in all likelihood) be the calibration which is the issue, but I guess it could also be the NAZA..??
Have you selected the correct prop layout in the NAZA assistant?
And I presume the props are on correctly - 1.Anti 2.Clockwise 3.Anti 4.Clockwise 5.Anti 6.Clockwise

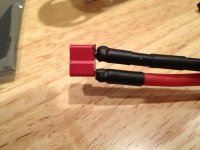
Have you soldered the bullet connectors? Or, as a very helpful earlier post on this thread suggested, heatshrink them to ensure a good connection?

That's about all I can offer for the time being.

If I can figure a way of getting my config file off my DX8 without a memory card reader then I'll email it you, does anyone else have one they could offer? Come on, share the love!
A word of warning, using a config file can be a little dodgy, I think, as you have to be 100% sure you have your RX and NAZA wired up exactly the same as what the config file is expecting, if it's not you could have some proper problems!
 

PilotHal

Real Pilot, RC's Too
Moving Right Along

Well, after a slightly long exploration in to the rigors of soldering and investing in a better soldering iron, my DJI F550 is moving right along (see image).

My question is as follows: There has been a lot of chatter on the forum about the size of the props that should be used. After much deliberation, I went with the Graupner 9x5" props. I also purchased a PULSE 6600mAh 14.8V 35C 2P ULTRA POWER FLAT PACK FOR MULTI-ROTORS. Seems like an awesome battery specially configured for multi-rotors. However, it came with an EC5 connector; the WKM power harness is all Deans. I called the online store where I purchased it from and I was told that I can just cut off the connector and solder on a deans female connector. So I did. But the wires on the battery are 10-AWG! Really thick. I think they are little too big for the Deans connector (see image). It's too bad that you can't order the WKM with a power harness of your choice. I'd hate to start tearing the included harness apart.
Any suggestions? Are my props ok with the 4S battery I chose? Is the Deans connector OK to use on such thick wires?
View attachment 8365View attachment 8366
Thanks.
 

Attachments

  • My Deans.jpg
    My Deans.jpg
    136.5 KB · Views: 393
  • My DJI F550.jpg
    My DJI F550.jpg
    137 KB · Views: 408

IMHO - Connectors can become a point of weakness, higher resistance and hot spots. The more surface area that can be achieved at the connector, the more reliable and efficient will be the connector. It is my understanding that the barrel type connectors came out after the original Deans plugs for this reason. There are also some counterfeit Deans connectors being sold that show signs of the plastic cracking and/or melting due to heat and electrons jumping the gap. And it is so much easier and safer to solder copper conductor to the inside of a gold plated barrel connector than to one side of a metal tab.
 

Tahoe Ed

Active Member
I use Dean's solder couplers. They work well but the new ones are not great for larger lipos. I prefer the older design that was a half barrel. You could lay the 10AWG wire in the side and it solderer up nicely.
 

mmurfitt

Member
Well, after a slightly long exploration in to the rigors of soldering and investing in a better soldering iron, my DJI F550 is moving right along (see image).

My question is as follows: There has been a lot of chatter on the forum about the size of the props that should be used. After much deliberation, I went with the Graupner 9x5" props. I also purchased a PULSE 6600mAh 14.8V 35C 2P ULTRA POWER FLAT PACK FOR MULTI-ROTORS. Seems like an awesome battery specially configured for multi-rotors. However, it came with an EC5 connector; the WKM power harness is all Deans. I called the online store where I purchased it from and I was told that I can just cut off the connector and solder on a deans female connector. So I did. But the wires on the battery are 10-AWG! Really thick. I think they are little too big for the Deans connector (see image). It's too bad that you can't order the WKM with a power harness of your choice. I'd hate to start tearing the included harness apart.
Any suggestions? Are my props ok with the 4S battery I chose? Is the Deans connector OK to use on such thick wires?
View attachment 10754View attachment 10755
Thanks.

Hey PilotHal,
Your F550 is looking good, damn I'm envious of your WKM, I so want one...and all the associated bits :)

I've had a nightmare with soldering the deans on to a 10AWG cable, particularly with the Zippy batteries, so much so I'd keep cutting the wire and starting again which was getting a little too close to the actual battery. Fortunately I popped in to my local hobby shop and the guy behind the desk pointed out that the cable on the battery I was using was way over the top for a multirotor and I could simply extend it with some more appropriate cable, which as it turned out was way, way easier to solder. Your deans connector looks like all of mine, so you should be fine, however if it were me, I'd not fly the 550 very high to begin with, in fact I'd pretty much keep it at or below 10ft, that way if there's any problems and your 550 hits the deck the damage is minimal.
There's a post on this thread, about 7 or 8 posts ago, which goes in to some great detail regarding prop size and over loading the motors. I use 10" props, but in all likelihood will be replacing them for either 9" or 8", so I think your choice of prop is fine for the motors and size of hexa.
The battery however, I'm not so sure as my knowledge and understanding of batteries is shaky at best. To my mind the battery seems a little over powered, I use a 5000mAh 4S battery which seems to be spot on, however I don't know what the result of you having an additional 1600mAh to play with will be, hopefully someone else will be able to answer and give some direction.


mmurfitt

Member
mmurfitt: so, what size wire did you connect to the 10awg????

I'm not at home at the moment, but when I get home I'll have a look and let you know.
The guy I'm my hobby shop said the cable on the battery, 10AWG, is designed for helicopters etc as they draw much more power.


Sent from my iPhone using Tapatalk
 

PilotHal

Real Pilot, RC's Too
I'm not at home at the moment, but when I get home I'll have a look and let you know.
The guy I'm my hobby shop said the cable on the battery, 10AWG, is designed for helicopters etc as they draw much more power.

So what should I do? Rip apart the power cable that came with the Wookong and solder-up an EC5 male? That sucks! They should offer differenct connectors for the money that I paid! :dread:
I might email their support folks.

The mAh rating is the capacity of the battery - just means longer flight time. I'm going to resolder an EC5 female on to the batter - should never have cut it!
 

I am not yet familiar with the WKM cable sets.... still waiting for mine to arrive. Basically you should only swap out the higher current connectors, i.e., those to/from batteries and motors.
The issue of substandard peripheral parts is common to Multicopters and even the automotive industry, e.g. hose clamps, muffler systems for cars etc. Opens up an entire aftermarket parts business.
Just one way these businesses attempt to remain price competitive. What counts is the quality of the critical components such as IMUs etc. I would be much more concerned if the primary components were substandard!!!
 

PilotHal

Real Pilot, RC's Too
I am not yet familiar with the WKM cable sets.... still waiting for mine to arrive. Basically you should only swap out the higher current connectors, i.e., those to/from batteries and motors.
The issue of substandard peripheral parts is common to Multicopters and even the automotive industry, e.g. hose clamps, muffler systems for cars etc. Opens up an entire aftermarket parts business.
Just one way these businesses attempt to remain price competitive. What counts is the quality of the critical components such as IMUs etc. I would be much more concerned if the primary components were substandard!!!
Which battery are you running on your F550? What connector did you use? Did you rework your power lead to your controller?

Also, what has everyone done with regards to holding down the IMU? Shall I just use plain old padded double-sided tape? Or is there a tape that you guys recommend for all the components.
Thanks!
 

Your hobby shop and some industrial wholesalers carry a double sided rubber tape that is extremely effective above and beyond the doublesided foam tape available from hardware stores. I also use it to hold the velcro to the bakc of the batteries.
 

Martyf1

Member
View attachment 8766View attachment 8767Just an update on my 550 build and a question.... Had the aeroxcraft gopro2 gimbal attached but not working (my gopro3 fit fine...just needed a little foam to fill the case), but was getting major Jello effect on the video. Bought a prop balancer, and to my surprise, some of the Graupner props were not balanced. Balanced the props and the hubs, and then moved on to the motors. Balanced the motors as best I could using the Iphone App "ISeismometer". Put it all back together and thought why am I going to all this trouble balancing, only to put these 8mm washers under the props and screw up everything up that I just did. Off to the hardware store I go and come back with some flangenuts which work perfectly. No washer, and they have a serated bottom which grabs the prop nicely ( a drop of locktite for insurance). Go fly and shazamm.....no Jello!!
Also, I'm flying over a lot of water here on the Chesapeake Bay and I'm trying to figure out how I can use my waterproof case with a gimbal. Right now I have the gopro with case mounted upside down where the gimbal should go. Anyone figure out how to mount the waterproof case on a gimbal?
 

Attachments

  • photo5.jpg
    photo5.jpg
    133.1 KB · Views: 363
  • photo4.jpg
    photo4.jpg
    138.2 KB · Views: 341

For the waterproof case hobby shops and some specialty hardware/fastener stores sell a double sided stick rubber tape that is virtually impossible to remove without cutting once applied correctly. Be careful as you cannot remove the rubber tape with a solvent without affecting the transparency of the clear acrylic waterproof case. All you need then is an adjustable bracket with at least one flat mounting face for the rubber tape. The other mounting face should be bolted to the airframe. I am surprised the Graupner props were not well balanced initially. Your are probably already aware that a reamer is required versus a drill bit for upsizing prop holes.
 

I also have the aeroxcraft and landing gear. I managed to get the gimbal seem to operate normally. But the constant vibration is not helping with the Jell-O effect. Any benefit from the auto level and tilt is definitely negated by that vibration. It also seems like the manual tilt never goes back to the same place twice which makes it difficult position the camera in-flight. So I'm also considering ditching the gimbal just going straight mount on landing gear.

I have ordered a prop balancer and I wanted to try and do the motor balancing too. How did you set up a speed control on your worktable to power the motors as you balanced? Being new to RC in general, I'm not sure the easiest way to accomplish this.
 

parkyi

Member
Great thread and good advice.

I'm pretty new to this too and have the F450 Flamewheel with Naza (no GPS, yet!) and a Spektrum DX6i.

As far as flying is concerned (and this is probably obvious to anyone with any experience at all) On my first few flights I would stay behind the quad and fly about head height. Get it away from the ground fairly quickly then you don't have ground effect. If you stay behind the quad, the controls make sense, right stick forward the quad goes forward etc...... I played around with this until I got used to it, then I did a couple of little exercises, rotate (Yaw) the quad 180 degrees so it is facing you, then try the controls, push the right stick forward and it will come towards you!, push it back and it will go away from you! now if the quad drifts to the 'left' due to wind or whatever, push the righthand stick also to the 'Left', this will make the quad go to your right! etc..... it all feels strange at first, but I'm starting to get my head around it. Next up, I practiced flying the Quad in an anticlockwise circle, push slightly forward on the righthand stick then apply left rudder, fly the quad in a complete circle until the back of the quad is facing you, now do the same again but go clockwise. Do this a few times until you are happy. Now try and combine the 2 circles and fly a figure 8!.

I'm by no means saying I've totally mastered all this yet, but I'm fairly convinced it's really helping me with orientation.

I also find, if I'm struggling and get confused I just quickly get the quad so the back of it is facing me and then I can fairly easily regain control.

These are my experiences so far, hope some of this helps other newbies like myself.

Parky
 

Martyf1

Member
I also have the aeroxcraft and landing gear. I managed to get the gimbal seem to operate normally. But the constant vibration is not helping with the Jell-O effect. Any benefit from the auto level and tilt is definitely negated by that vibration. It also seems like the manual tilt never goes back to the same place twice which makes it difficult position the camera in-flight. So I'm also considering ditching the gimbal just going straight mount on landing gear.

I have ordered a prop balancer and I wanted to try and do the motor balancing too. How did you set up a speed control on your worktable to power the motors as you balanced? Being new to RC in general, I'm not sure the easiest way to accomplish this.

Tony, I did it the hard way. Disconnected all the motors from the Naza except the one I was balancing. ESC's beeped alot, but I tuned that out. Tied my Iphone onto the arm with a nylon zip tie, and put a couple of the small zipties together with the heads about 1/2" apart and slipped it over the outside of the motor and just moved it around until it ran smooth. Then put some aluminum tape on the spot between the heads. I was a little surprised when I put the Graupners on the balancer. I didn't initially balance them because of all the talk about how great they are, but they all needed a little something.

My gimbal is ready to go. I plug the servos directly into the naza and they work as advertised. I just got a BEC yesterday, but think maybe I got the wrong kind cause I can't figure it out. What are you using for a BEC?
 

tmcmurran

Member
Anyone ever have issues with not being able to arm? Seems like once I go into the software to make a change, this messes with the esc and arming. I need to keep going back and writing to the esc over and over again till it seems to take, then just hope I never need to change anything again. :(

Is this a common issue and if so what have others done to over-come it?
 

Tony, I did it the hard way. Disconnected all the motors from the Naza except the one I was balancing. ESC's beeped alot, but I tuned that out. Tied my Iphone onto the arm with a nylon zip tie, and put a couple of the small zipties together with the heads about 1/2" apart and slipped it over the outside of the motor and just moved it around until it ran smooth. Then put some aluminum tape on the spot between the heads. I was a little surprised when I put the Graupners on the balancer. I didn't initially balance them because of all the talk about how great they are, but they all needed a little something.

My gimbal is ready to go. I plug the servos directly into the naza and they work as advertised. I just got a BEC yesterday, but think maybe I got the wrong kind cause I can't figure it out. What are you using for a BEC?

Good question Marty, I will check it out and let you know. Do you think this could cause the jitter?
 

Martyf1

Member
Your are probably already aware that a reamer is required versus a drill bit for upsizing prop holes.
Peter, haven't quite gotten that far along, as the Graupner 10 x 5's fit perfectly on the stock 550 except for the washer thingy. Clue me in here...reaming vs. drilling...always looking for good info...
 

In the case of the Graupner 9 x 5 the holes are too small for the stock 550 motor and have to be reamed out. Using a drill bit will take a large bite out of one side of the existing hole setting you up for a larger circle which will be significantly offset from the original leading then to a propeller that has to be discarded!
The reaming tool, available at most Hobby stores will evenly bite around the existing hole reducing the risk of offsetting the larger hole you are intending to create. Buy the metric reamer for the stock 550 motors which are metric.
 

Top