Group Build 2014, DJI NAZA/F450 Quadcopter!

Bartman

Welcome to MultiRotorForums.com!!
those are the battery monitors I use.

http://hobbyking.com/hobbyking/stor...2_8S_Cell_Checker_with_Low_Voltage_Alarm.html

like i said above, and like Doug probably did, break off the plastic case and just use some velcro to hold them in place.


Continuing with the build........

The computer comes first as you'll need it to check out your flight controller. The F450 Flamewheel puts the main NAZA unit inside the frame so it will be well worth it to give it some of your time before you start assembling the frame and motors.

To do this you have to have

  • The lastest version of the NAZA Assistant, this is the program that runs on your computer and allows you to interact with the NAZA so you can configure, monitor, and make adjustments to it
http://download.dji-innovations.com/downloads/nazam-v2/NAZAM_2.18_Installer.exe


  • The latest version of the NAZA and F450/550 instruction manuals
http://download.dji-innovations.com/downloads/nazam-v2/en/NAZA-M_Quick_Start_Guide_v1.22_en.pdf
http://www.dji.com/download/flame-wheel-arf-downloads/


  • When you first run the latest version of the NAZA Assistant it will check to see if the latest firmware is installed on your NAZA. Mine didn't so I updated to the latest version. Yes, this can be risky but I'm going full steam ahead here and I"m going to fly it with the latest version for better or for worse. We'll see what happens.

So, the three things we've got organized now are the NAZA Assistant (A GUI technically, check the abbreviations guide HERE ), the user manuals, and how the latest firmware will be delivered (automatically from within the NAZA Assistant)

With the NAZA V1, in order to connect it to a computer you need to wire it to your receiver and you also need to put a battery connector on your VU (Versatile Unit) so it can be powered up with a 3 or 4S Lipo. Whatever you do, don't cut any wires at this time to attach a connector, just strip a little wire back and put a connector on it. we'll cut it to length later on when we have the layout of everything all settled.

Working out some of the kinks with the flight control system now will make it easier later when we are trying to decide where to mount everything. yes there are directions and they do a good job of getting you through all of this but I'll briefly discuss a strategy for laying out the pieces while also beginning the frame assembly. These initial decisions and the process of planning takes the most time. Once everything is decided the build will go very quickly and you'll be surprised at how quickly you're going to be ready to test fly the helicopter.


So, in summary;

  1. Set up your computer with the NAZA Assistant
  2. download the user manuals
  3. put a battery connector on your VU
  4. follow the diagram in your manual to connect the radio channels to your NAZA-M (just do 1 to 5 for now with channel 5 on a 3-position switch)
  5. connect the VU to the NAZA-M (and the GPS antenna if you have one)
  6. take a break before going back over everything to make sure it's been done correctly according to the manual.

NOW IS ALSO A GOOD TIME TO TAKE A BLACK MAGIC MARKER AND PUT AN ARROW ON TOP OF THE NAZA POINTING FORWARD. PUTTING THE NAZA ON THE HELI BACKWARDS HAS BEEN THE MOST COMMON MISTAKE I'VE SEEN SO FAR AND THE ARROW WILL REDUCE THE CHANCE OF YOU MAKING THIS MISTAKE AS WELL.

Here's a good NAZA introduction video

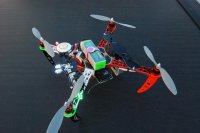
Here's the next video showing the placement of the components. If you absolutely positively must attach something to something else in order to feel like you've accomplished something, put the arms on the lower frame plate. Don't overtighten the screws!!!!! I like to use the red arms as the rear arms and the battery connect points should be at the rear of the heli also and facing up.

Here'a a good video from DJI showing the basics but I'll review this stuff tomorrow when I shoot another video

That's it for now. Don't forget to STOP and ask questions if you're following along now or in the future.

Bart
 
Last edited by a moderator:

sledge57

Member
those are the battery monitors I use.

http://hobbyking.com/hobbyking/stor...2_8S_Cell_Checker_with_Low_Voltage_Alarm.html

like i said above, and like Doug probably did, break off the plastic case and just use some velcro to hold them in place.
<<<SNIP>>>

Bart

It is the same monitor but mine came as you see it, I didn't have to remove the plastic case. It did however cost 2x as much as yours from Hobby King.

I guess I'll buy a couple more from HK and remove the case myself.

Still following this to look for ways to improve upon my build.

Thanks Bart.
 

Pleiades

Member
Have built and tested the F450 and everything works fine, but have a question
As you can see from the attached pic, Ive built a little jigger out of plastic tubes to keep the receiver antennas at 90 deg to each other


Does it matter which plane they are on? and why 90 deg?
I have a F550 and the antennas are draped along adjacent arms, and so are at 60 deg, and it seems to fly fine (although Ive not done a distance test)
It certainly would be more convenient to place the antennae along the arms of the 450 (which would be at 90 deg)
Does anyone have any thoughts?

Cheers....Jon
 

*** built a little jigger out of plastic tubes to keep the receiver antennas at 90 deg to each other *** Does it matter which plane they are on? and why 90 deg? ****

As you discovered, it will fly with the antennas in almost any configuration. Your receiver is a dual-diversity receiver which means it will use the signal coming in from the strongest side, which varies as the craft changes direction. As to the plane in which they lay, I'd say yours is close to ideal. Your transmitter antenna is vertically polarized and at any given time one of your antennas is close to vertical. Mine lay flat on the bottom plate, but also at 90 degrees.
 

sledge57

Member
For my first flight I had mine along the arms also, then I read in the manual to keep the antennas away from ESCs so I did it the way you see in my last pic.

I might make something like yours myself, Futaba however says it doesn't matter which plane they're on so long as they're at 90* I just like the looks of your setup better, except I'd use smaller tubes.

So far I'm loving this hobby, GoPro shopping today...
 

COMike93yj

Still Building!
Thanks for chiming in Bart! You were missed!

I am still trying to determine my motors ($50 a piece for the tigers is killing me....:dread:) so I am going for less cost. This will be my FIRST built quad so I know I am going to pack her in a bunch of times. I have some good thoughts but am still researching. Props are in the same boat and again research will help and I have been doing my homework hours a day for a long time :)

Frames are purchased and here....thanks ClubHeli....I also picked up some of the Tarot LED strips for $0.69 a piece! (kudos for the MRF discount Bart and ClubHeli)
Soldering station/solder are here....picked up a WESD51 (weller) and some Kester 60/40 solder from Amazon. My Harbor Freight one from years ago still works but I elected to upgrade!
Flight Controller is a KK2.1 from Hobby King ($29) and is here.
Charger was a Turnigy Accucell 6 but it arrived with a button that fell out and HK gave me a store credit for the purchase price. (MORE ON THAT LATER)
ESC's are going on order tonight.

As far as chargers go.....I plan on being in the hobby/profession/addiction (insert your appropriate word here) for a long time so I elected to go big or go home. There are TONS of chargers on the market but they usually require very powerful power supplies. Being the tinkerer that I am I decided to move out of my comfort zone and purchased some HP DPS-600PB server power supplies. I picked two of them up for under $30 and will make my power supply from them. Considering an iCharger 308 Duo (NOT inexpensive....but speaking with Gary at BuddyRC and tons of research I am most likely going this route). Should take me years before I fully realize it's capability but that is what I am going to do! WAY overkill for an initial build for folks but seeing that I will be doing this for a LONG time it was worth it for me.

I will be purchasing wire and connectors this evening.

All in all it is a slow process but I have found that "chasing rabbits" (aka...read a thread...find a link...read the link...etc) has really helped me CONSIDERABLY. I have learned sooooo much in the past few weeks it is simply amazing and at times my head wants to explode but it is certainly worth it!

I just wanted to add my 2.5 cents to the thread and I can't wait to get up in the air! NOTE: I am flying the crap out of my Nano QX and probably have 100+ flights on it. It is great fun and is helping me get the control and orientation down pat. Much easier on the wallet to crash it (and mind you I have numerous times) and it keeps on flying.

Lastly, this "Group Build" thread was the inspiration for me building my own quad. Because I discovered this thread and this forum I have met some outstanding folks who are "geeking out" (as my wife would say) on this endeavor. I have to give some huge thanks to Bart for starting this and Motopreserve for assisting me TONS of times.

Cheers,

Mike :)
 

Bartman

Welcome to MultiRotorForums.com!!
@Mike....we aim to please! thanks for the thanks, it's appreciated.

about the motors, i'm only using the Tiger motors because I had four of them sitting brand new on my shelf. they fit the helicopter so I figured I'd try to use them. I think the bullet connectors on the DJI ESC's are 3.5 mm so to use different motors (which will likely come with long wires) you'll likely need to buy some of the male 3.5 mm bullet connectors to solder onto your motor wires after they've been cut to length.

here's a little teaser about a mod at the end of the build.....we're going to make the heli into a two man rig with a three axis camera capability.......yes, with an F450! so you'll be able to take it to the park, hand the camera duties over to your kid, your friend, your coaching buddy and they'll be able to direct the camera action while you fly. All for about $15 and about 4 or 5 ounces of added weight (maybe not even that much).

Stay tuned, we're moving right along.

Bart
 
Last edited by a moderator:

COMike93yj

Still Building!
@Mike....we aim to please! thanks for the thanks, it's appreciated.

about the motors, i'm only using the Tiger motors because I had four of them sitting brand new on my shelf. they fit the helicopter so I figured I'd try to use them. I think the bullet connectors on the DJI ESC's are 3.5 mm so to use different motors (which will likely come with long wires) you'll likely need to buy some of the male 3.5 mm bullet connectors to solder onto your motor wires after they've been cut to length.

here's a little teaser about a mod at the end of the build.....we're going to make the heli into a two man rig with a three axis camera capability.......yes, with an F450! so you'll be able to take it to the park, hand the camera duties over to your kid, your friend, your coaching buddy and they'll be able to direct the camera action while you fly. All for about $15 and about 4 or 5 ounces of added weight (maybe not even that much).

Stay tuned, we're moving right along.

Bart

Thanks Bart! That makes sense on the connectors!

The teaser has me VERY interested! That additional "tease" would allow me to bring the family REALLY into the hobby...who knows I might just find an aerial cinematographer in the making!

Mike :)
 

*** As far as chargers go.....I plan on being in the hobby/profession/addiction (insert your appropriate word here) for a long time so I elected to go big or go home. There are TONS of chargers on the market but they usually require very powerful power supplies. Being the tinkerer that I am I decided to move out of my comfort zone and purchased some HP DPS-600PB server power supplies. I picked two of them up for under $30 and will make my power supply from them. Considering an iCharger 308 Duo (NOT inexpensive....but speaking with Gary at BuddyRC and tons of research I am most likely going this route). Should take me years before I fully realize it's capability but that is what I am going to do! WAY overkill for an initial build for folks but seeing that I will be doing this for a LONG time it was worth it for me.
****

I started with a Hyperion EOS1420i net3 -- but it died a sudden death. Picked up a Hitech X2 (dual charging, 400W each side) which is built a lot better. Like you say, not inexpensive, but if you are in this for the long haul, well :)
 

BR44

New Member
Bartman great thread! Just found this forum last night just to get pointers and I find the explanation of an initial build on one thread. Ordering my stuff today. Hope it won't take to long to get.
 

jfro

Aerial Fun
"we're going to make the heli into a two man rig with a three axis camera capability.......yes, with an F450! so you'll be able to take it to the park, hand the camera duties over to your kid, your friend, your coaching buddy and they'll be able to direct the camera action while you fly. All for about $15 and about 4 or 5 ounces of added weight (maybe not even that much)."

Bartman, how many beers did you have for breakfast or maybe a mid morning break. I think you are saying, 3 axis gimbal & camera with a 2nd radio or some controller for the camera person to move a camera in x, y,& z space for $15 or less. Can't wait to hear how.. LOL
 

Bartman

Welcome to MultiRotorForums.com!!
"we're going to make the heli into a two man rig with a three axis camera capability.......yes, with an F450! so you'll be able to take it to the park, hand the camera duties over to your kid, your friend, your coaching buddy and they'll be able to direct the camera action while you fly. All for about $15 and about 4 or 5 ounces of added weight (maybe not even that much)."

Bartman, how many beers did you have for breakfast or maybe a mid morning break. I think you are saying, 3 axis gimbal & camera with a 2nd radio or some controller for the camera person to move a camera in x, y,& z space for $15 or less. Can't wait to hear how.. LOL

basically, close but basically yes. there will be a need for an inexpensive second radio with a small receiver and at least four channels but those can be had just about anywhere for cheap. so maybe it won't be $15 but it won't be much more. :)

and those people using the stock motors should be fine if they want to give it a try.

forgot to say, it's a secret, don't tell anyone! :)
 
Last edited by a moderator:

Well I forgot to mention that I had my F450 built and in the air by 0900 on Christmas Day! It flys really well and I had no trouble setting it up after many hours of researching forums and asking a few questions.
I added my landing gear, gimbal and GoPro and then it wont fly too good cause it is too fat (2000g AUW) and on the 8 inch props (4S LiPo) but on the 10 inch props it gets in the sky but the motors over heat.
I have just ordered some 900kv T-motors (@$38aud ea) and will fit them as soon as I get them and then it should be all go.
Question is will the T motors fit straight on to the DJI Arms or will I need to re drill some holes?
The good part about ordering more motors is I have "Spares" to build something else with. This hobby could end up costing me a fortune.
Any way I am working tonight (NYE) and the pay is really good because of the public holiday (Tonights N/S is considered tomorrow 01-01-14) so I should be able to afford a few more toys.
Regards
Crispy
 

Bartman

Welcome to MultiRotorForums.com!!
Good job Crispy! If you bought the same T-motors that I'm using then they will screw right to the arms. Anytime you try a new motor just make sure the screws holding them on aren't too short to grab enough threads to be strong enough but also aren't too long which will put them up into the windings of the motor causing big problems when they first start to spin!! I think I'm using the stock DJI motor screws and haven't had any problems but just give it a close look when you put that first screw in with the new motors.

pics when you have a chance and we'll keep moving along while you get the New Year rung in down under.
 

(Bartman, not trying to hijack your thread, just sharing along with my first build experience)

A pitch for Anderson PowerPoles as connectors -- and a question of why is this not better ...
As a ham radio operator, I live and die by APPs. Practically everyone in the emergency services area of ham radio especially does. These are commercial/industrial/military grade connectors. See the PowerWerx site.

You crimp them (need the special tool to do the 45amp correctly) and not solder. Yes, it's expensive but it works reliably every time and is a LOT faster and IMHO gives a more secure electrical connection than a soldered connection. While the contacts are rated 45A there is much anecdotal evidence that they routinely carry twice that reliably, and "I've read" that Anderson says they're good to 200A.

Here is a good thread on Helifreak discussing them. Another major advantage is that they "snap" together to make a very positive connection yet pull apart easier than the deans, xt, etc plugs.

Here is a heads up test of Deans vs. APP connectors. Ran them up over 300A. Look especially at the 5:20 point where he discusses the 75A PP -- it also shows how nicely they connect and disconnect. If you have any doubts, use the 75A but I'm sticking with the 45A. A more detailed review goes into the assembly and usage.

My 2 cents, hopefully of use to some of you/us. And here is the final (for now) configuration of my F450 with the two Batwings, GoPro Hero2, and IrisAerial legs (front ones painted) and LEDs for orientation.

View attachment 15406
 

Attachments

  • F450 profile.jpg
    F450 profile.jpg
    142.8 KB · Views: 326

Bartman

Welcome to MultiRotorForums.com!!
Looks good Captain and thanks for chiming in. Anderson PP are an option, just not one that I've acted on as the solder connectors continue to work for me. You reach a point with certain things where you ask if what you're doing reaches a certain level of reliability and usability and I think that the masses have proven that the solder connectors are indeed reliable and usable. They are also lighter and smaller (allowing for shorter wire runs) so I see how the Anderson's are going to be better but I think that the connectors I'm using are already more than good enough and, not to sound like I'm settling for an inferior option but, so far I've been free of failures or flaws. At some point that has to count for something so I'm comfortable recommending them to others.

If anyone is curious about Anderson connectors there's Google or one of the many threads in the forums where they've been discussed. You'll find I am inclined to defend solder connectors, not because I think they are without flaws but because I think they are suitable for what we're doing. For people that are starting out, if you question everything being done to such a degree that nothing is good enough, then nothing will get done. If we searched the entire aerospace landscape I'm sure we'd find superior alternatives to almost everything we're doing but that doesn't mean everything we're doing is wrong.......moving right along.

edit......FWIW, looking at the video you posted the Deans connector went to 350A and the wire around it was failing as it failed. that isn't exactly a bad performance considering the contacts and casing were still intact and unchanged. i've been moving away from Deans but it might explain why Deans were so successful in the first place.
 
Last edited by a moderator:

Bartman

Welcome to MultiRotorForums.com!!
Next video is up.....

Here's the latest video. In it we look at some basic considerations to factor in when laying out your various pieces.

Not in the video is the discussion of thread locking chemicals like Loctite. Loctite is great on steel threads but is corrosive/reactive with a lot of plastics. For this reason I didn't mention it in the video, besides, it was already long enough! If you decide to use Loctite or something similar, use it sparingly and don't let it touch any plastic unless you've really investigated if it will melt or react with the specific plastic you have. We are using very small hardware so too much Loctite and the small allen sockets that are typical for our connectors will strip and you'll be drilling out screws and making a mess of things. Use it sparingly!! :)

Sorry it's a long one but the coffee got me going!

Some of you that might watch it know what you're doing so please correct me if you see me doing something incorrectly! I'm willing to learn from all of this as well!

 
Last edited by a moderator:


Good job Crispy! If you bought the same T-motors that I'm using then they will screw right to the arms. Anytime you try a new motor just make sure the screws holding them on aren't too short to grab enough threads to be strong enough but also aren't too long which will put them up into the windings of the motor causing big problems when they first start to spin!! I think I'm using the stock DJI motor screws and haven't had any problems but just give it a close look when you put that first screw in with the new motors.

pics when you have a chance and we'll keep moving along while you get the New Year rung in down under.
Here are some photos of my F450 at the moment.

The top plate you can see the EZOSD and the Naza IMU.

Here you can see the temp camera and the Vtx

The Rx and current sensor for the OSD

Another view of the camera and Vtx

Another view of the Rx and Current sensor.

These photos have a fair bit of temporary wiring and set ups. When I am happy with everything then I will tidy it up.

Regards
Crispy


Top