Vulcan black widow X8 build

min0nim

Member
I've been pulling together components to lift my stills SLR and wide angle lens (14-24 Nikkor). I am trying to get shots from the 14mm as level as possible, and without cropping out the props if possible. Stability is important to get lower shutter speeds and keep ISO down and f-stop up.

Components:

Vulcan black widow frame (4x mantis arms, foldable)
Vulcan quick-release anti-vibration plate
s800 retracts
8x KDE 4012-400 motors
8x KDE 35amp ESC's
8x KDE 3 prop blade adaptors
24x DJI 1552 folding prop blades
Hoverfly pro + GPS FC
FrSky x8r RX
DPCAV Adjustable Voltage Regulator, 1-35V SEPIC Type
DPCAV Power Supply Filter, L-C Type
Vulcan 400amp distribution board
2 or 4x ZIPPY Compact 5800mAh 5S 25C lipo's

attachment.php
 

Attachments

  • ASM_8287.jpg
    ASM_8287.jpg
    60.3 KB · Views: 529

min0nim

Member
I got the 400amp power board because originally I was considering larger motors. Eventually I decided to go lighter, and 3 blade prop for smoother flight.

The power board is really thick copper. I have a reasonable 48w soldering iron, but soldering this bugger was really hard work. Once about 1/2 the wires were on, it became impossible. To finish the job I went and bought a cheap and cheerful 80w iron. That did the trick, but still - in retrospect, I wish I'd changed my order to the lighter 200amp version.

Sill, it's good quality, and the pads are big enough to take large wires. I've no idea how to seal all the connections though, other than a load of hot glue...

attachment.php
 

Attachments

  • ASM_8278.jpg
    ASM_8278.jpg
    112.3 KB · Views: 663
Last edited by a moderator:

min0nim

Member
As I'm still building, I thought I'd provide some commentary about why I chose certain parts - just to open up the discussion.

I decided against a separate battery for the flight control.

- I wanted some redundancy on the battery, I didn't want to go and undo that by putting a single 3S pack on the flight controller and have it drop out of the air because of an issue there.
- I'll be monitoring the main battery packs with the FrSky lipo sensors...they monitor each cell up to a 6S pack, and provide real time telemetry back to the Taranis. If there's an issue, I want to see it.
- I've added a power filter and voltage regulator to supply power from the main distribution board to the flight control, rx, and lights. First the voltage regulator to step down to 9v - a JST harness for lights and secondary power comes off this. Then the power filter to get clean power to the FC and rx.
- When I look at gimbals, I'll think about a second battery for a vx system...not sure what others have opted for here.

I went for 5S not 6S batteries, and the Zippy Compact 5800's.

- For the price of 2 high capacity (10,000 - 16,000mAh) 6S batteries, I can get about 10 of the Zippy's. If something starts to go wrong with a battery, I don't want to feel financial pressure to keep it running!
- I ordered the 5S by mistake! They have exactly the same specs for 5S and 6S batteries. It was late, I was tired when I ordered, and didn't find out until the package arrived. I was about to try and send them back when I decided to have a look at the difference in eCalc. It turns out that (according to eCalc) I'm getting about 10 seconds less flight time, but the motors run significantly cooler. I've decided to keep them and see how they go.

Ok - more later!


attachment.php
attachment.php
 

Attachments

  • ASM_8279.jpg
    ASM_8279.jpg
    145.4 KB · Views: 532
  • ASM_8275.jpg
    ASM_8275.jpg
    79.9 KB · Views: 492

sk8brd

Member
sweet build!...did you have any trouble mounting the motors on the on the motor plates, did the screws that connect the top and bottom motor plate hit the motors. on my carboncore those screws hit the motors so i need bigger motor plates and was thinking of adapting the vulcan motor plates if they fit the 4012's as the design is similar on carbon core with the 2 motor plates connected w/ each other with standoffs
 

min0nim

Member
Hey, great question, I want to talk about the vulcan frame a bit too, so let me make that the next post.

edit: just incase it gets lost in the text below - yes, i can't use the 2 side stand-off positions, and the end position JUST fits. The bolt head and the motor do scrape each other - it's very tight. I used 3 stand-offs to connect the two arm plates - 2 at the back of the motor and 1 at the front. I think it will be almost as stiff as the 'proper' configuration though.
 
Last edited by a moderator:

min0nim

Member
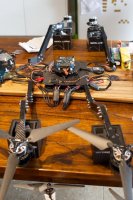
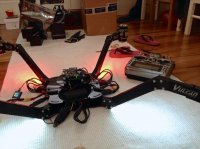
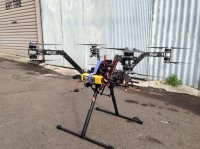
So, the Vulcan frame.

Very simple, no frills, but well thought out. There are pre-drilled holes in the carbon plates for almost every fixing configuration imaginable.

I have some small gripes:

- my package arrived with some key pieces missing...bolt kits, stand-off, arm patch plates. It's pretty simple to get some of these things wrong when packaging kits, so no real harm done. They came about 2 weeks later. But I am still a few stand-off down, because I didn't inventory every single thing.

- some of the parts aren't perfect, hole alignments between carbon fibre plates and aluminium components aren't perfect, and so a bit of drilling is required. Also one of my aluminium arms had a corner sheared off. Only a small visual defect.

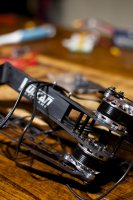
- the motor arm plates have 6 radial slots, so you can rotate the motors to find the best way to fix them. There was only one orientation that let me mount the KDE 4012's (which also have holes drilled all over the place) AND get a stand-off fixed to the end of the plate. Even then, it's a super tight fit to fix the stand-offs joining the two motor plates, like metal on metal tight fit. The KDE mounting adaptors were too big for the arm plates to use. Rather than 4 stand-offs on each pair of arm plates, I found a way to use 3 which fit better. Although I could have re-drilled everything, I guess!

- the hole pattern on the top plate almost, but not quite entirely fit the hole pattern of the Hoverfly Pro boards, so re-drilling them all out is necessary. So close, yet so far....!

The last two points aren't really Vulcan's fault, but it would be good to see some kind of standardisation on fixing spacings amongst the component manufacturers. One of the advantages of the Vulcan frame is the adaptability - but that only goes so far if I need to re-drill holes for everything.
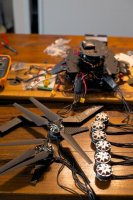
Mantis arms:

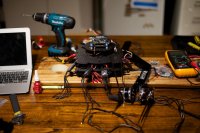
The X8 configuration is a tight fit in this frame. The mantis arms are quite slim, and fitting the motor wires down them is a challenge. I used a paperclip on the end of a string to pull the 6 motor cables through. A bit of force is needed to overcome the friction of the silicone wire sheath on the aluminium.

All the arm fixings - motor mounts, arm plates, and fixing to the top and bottom plates go through the arms. So you've got to dodge the wires inside. It would be impossible to fix the arms first and then pull the wires through, so this bit is a tedious and time consuming task. It is probably much easier if you only used 1 motor per arm.

There was a construction order that worked best for me.

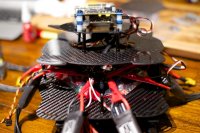
1. Fix the motors to the arm plates.
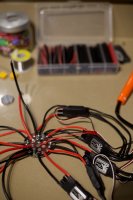
2. Fix the stand-offs to the top motor arm plate only. This is so you can remember which motor is which for connecting to the ESC's.
3. Feed the motor cables through the arms. Remember to colour code the top and bottom motor wire ends (I used different colour heat shrink on the bullet connectors), or you'll mix them up when plugging into the ESC's.
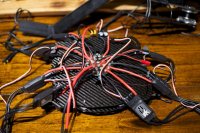
4. Fix the motor arm plates through the arm. This is the first juggling act, especially if you have heavy motors. You're probing cables out of the way, feeding bolts through, trying not to drop washers off...you get the idea.
5. Finish fixing the arms plates together with the stand-offs.
6. Bolt the arm patch plates through. You'll need to probe to push wires out of the way. This can take some time.
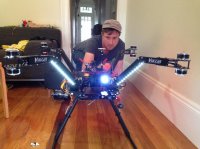
7. Connect wires to the ESC and test the direction of spin before fixing the arms onto the top & bottom plates.

This is the last part I got to, because I cannot get my Hoverfly Pro to connect to the setup software. So I'll post some more when I can go further!

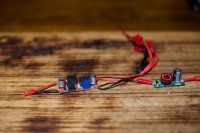
On a side note, this is a really noisy beast, even when not flying. The KDE ESC's and the Hoverfly Pro all beep constantly when on the ground but not armed. Don't test this machine late at night in a house full of light sleepers.


attachment.php
attachment.php
 

Attachments

  • ASM_8289.jpg
    ASM_8289.jpg
    66.3 KB · Views: 514
  • ASM_8280.jpg
    ASM_8280.jpg
    131.4 KB · Views: 523
Last edited by a moderator:

min0nim

Member
I also got some self-adhesive LED strip lights, and attached them to the underside of the mantis arms.

They look pretty cool, and should make it nice and visible. They're 12v, but seem to be happy and bright enough with the 9v from the regulator.

attachment.php
 

Attachments

  • photo 2.jpg
    photo 2.jpg
    103.6 KB · Views: 478

min0nim

Member
Here's an up-skirt shot - you can see the voltage regulator and filter in clear heat shrink on the bottom plate with the power distribution board.

Then on the first layer of the wedding cake has the Hoverfly Pro and GPS board on top, with the x8r stuck to the underside.

attachment.php
attachment.php
 

Attachments

  • ASM_8281.jpg
    ASM_8281.jpg
    117.8 KB · Views: 467
  • ASM_8283.jpg
    ASM_8283.jpg
    110.9 KB · Views: 488


min0nim

Member
Ok guys - very quick update tonight sorry.

All the rest of my components finally arrived in 5 separate packages on Friday. I spent Saturday re-wiring, soldering, and bolting things together.

The guys at Hoverfly sent me a replacement board. It seemed to work fine connected to USB. Then I made the fatal mistake of connecting the Rx to a 9v source rather than a 5v BEC, which passed that through to the Hoverfly pro. The result - I think I've fried the ESC control side of the board. I really can't believe it, after all that. If anyone has successfully repaired this (seems to be a common mistake from the internet threads), then I'd love to know.

Anyway, I took the Naza off the F550 and set that up on the new X8. Opinions seemed to be mixed for using a Naza to run a heavy and large craft. I've got no evidence, but I suspect the Naza 2 is simply a repackaged slightly crippled Wookong. I though it would be worth testing anyway. Motors and ESC's fired up fine. I had it mounted on the first stand-off tray.

Started it up in the back yard for a quick low hover and 1st test. Very hard to control, but I though it might be just the prop wash - it's fierce. So I took it out to the back lane, and put it into a hover. It freaked out and started chopping the trees. Dropped it out into a hard lading. Hit the ground on the side and lost about 8 blades.

OK, so, that wasn't fun, but I put it down to trying to control an unfamiliar craft in manual mode.

I replaced the props and took it out to the park to try it out. Lucky it was almost night and threatening rain so no one was around - it was VERY hard to control, not wobbling, but tilting fiercely. After about a minute of this and fiddling with gains, I was about to give up and land it, when it went out of control and flew right suddenly - did not respond to stick commands at all. It crashed into bushes after about 30m. It was all over in seconds. Lost another load of props, and snapped the cross-bar of the landing gear.

I was pretty distraught after this, and not sure how to proceed. I thought I was wrong about the Naza, and was glumly looking at my options...A2, a second hand Hoverfly board (again...). This morning when I woke up, for some reason I went to test the balance of the X8. It is very very top heavy. When I was planning and building it over the past month couple of months, I could only find a few images of the Black Widow, and all of these had the IMU/FC mounted on the top plate of the arms or the first tier of stand-offs. I just followed this without questioning really.

With the 4012 motors, this X8 wants to tip over when trying to balance on any thing other than the top tier of the stand-off wedding cake layers. It even want to be a bit higher really, but mounting batteries, camera and landing gear low would help counteract it. I unwired everything and re-mounted the Naza to the very top of the frame plates.

I'm happy to say that after all this, it flies great. It is super stable, and dialled in superbly on the default Naza gains. I made two very tentative test flights - hover, slow flight, simple manoeuvres, about 20 minutes total on two sets of batteries.

It's been a pretty harrowing weekend, but I'm fairly stoked now. With all the issues, I didn't really consider recording it all properly, but managed some really rubbish iPhone footage - link below. I'll try and capture some better footage next week.

I'm pretty impressed with the Naza on the big craft, it was rock steady. It hasn't been put through anything challenging yet. I'll test more, but also look to get (yet) another Hoverfly board.

Just a final BIG warning for anyone contemplating the Black Widow - really be sure of your z-axis balance, and put the FC as close to the centre of gravity as possible. I'd err on the HIGHER side if anything - it seems to work better trying to correct a 'pendulum' rather than a weight above it. In my case, a shift of 40mm has made a world of difference. This goes especially for the heavier motors - imagine 5xxx series or bigger! I think Vulcan should be providing taller stand-offs to make this possible - I will try to write to them about it.

http://youtu.be/HB1SmEcgwDM

 
Last edited by a moderator:

cootertwo

Member
Pretty neat monster there! Glad you're getting it sorted out. A lot of people want to bash Naza, but I'm a fan of the Lites, especially when price is considered. (Naza Lite w/GPS, $169). I can't believe the price of some of the other MC's. I've wondered what the actual "real" cost of some of these tiny circuit boards is. And I still hold to the theory that all this tech is coming from a crashed or captured alien space craft! Ha!:tennis:
 

min0nim

Member
Alien craft is about right. Here's a picture of it before it decided to take up being an arborist.

attachment.php
 

Attachments

  • Vulcan 01 (1).jpg
    Vulcan 01 (1).jpg
    135.7 KB · Views: 421

min0nim

Member
Here's one of the motor first test.

You can just see the orange tell-tale of the Naza on the 1st tier of stand-offs. This is the problem position - it's now mounted on the very top, where the Rx is in this photo.

attachment.php


P.S. wiring is all over the place from modifying it mount the Naza, although I really do need some tips for better wiring.
 

Attachments

  • Vulcan 02.jpg
    Vulcan 02.jpg
    92.7 KB · Views: 341

Motopreserve

Drone Enthusiast
Wow. Hell of a tale. Glad to see you got it working ok.

I've been working on a VulcanUAV skyhook hex (non-foldable) with a single Z arm (hex I formation) and have been really happy with the frame so far. All my parts were intact from addictiveRC, and the build was fairly straight forward. Same motors as yours, and I filed a hair off the areas where the motor hit the screws. Had to be careful not to allow shavings into the motor.

I have been told it's probably best to leave the motor wires on the outside of the arms for quick change if needed. I routed mine inside like you, and dodging the screws and the bends in the arm was a bit annoying. Next time I'll leave them outside.

What props will you be running?

Looking forward to seeing how you make out.
 

min0nim

Member
Wow. Hell of a tale. Glad to see you got it working ok.

I have been told it's probably best to leave the motor wires on the outside of the arms for quick change if needed. I routed mine inside like you, and dodging the screws and the bends in the arm was a bit annoying. Next time I'll leave them outside.

What props will you be running?

Thanks Moto.

I agree with leaving the wires outside the arms. I'm already wondering about a 'flat-Z hex' setup - alternating flat and z arms - to use much bigger props. It'll be quite an undertaking to disassemble everything. I'll leave it for the moment and get some use out of it first.

I'm running the DJI S1000 1552 prop blades on the KDE triple adapter. The 15" clears the bottom of the Z arm with a little bit of room to spare. It looks like you could push to 16" props...just.
 

min0nim

Member
DJI folding prop tightness

One thing that I have realised is that there is an easy way to tell if your folding props are at the right tightness -- after you spin the motors up and back down, the ones that are too loose (or tight I guess) aren't perfectly straight/normal to the motor.

I'll try and take a photo to demonstrate.

For anyone not running them, you don't tighten the props right up. They should be able to fold freely. DJI's official line is "not too tight, not too loose".

What I've been doing is tightening with an allen key until just locked, then releasing about 1/8 of a turn - the tiniest amount really. There's still some friction, but the prop folds easily. This seems to work well.
 

Motopreserve

Drone Enthusiast
I thought about running the folding props - but even with 2-blade I have plenty of lift - so I'll save the cash for now :)

im going to run the 15" t-motor style props - should give me a hover right at 50% once the gimbal is on. To test the flight controller (superx), I put 13" wood props on that I had lying around and the rig worked well.

Im wrestling with alexmos gimbal controller at the moment - but hopefully this week I'll fire it up with the full gimbal and do some testing.

with something as important as props, I wish they'd provide a torque spec!
 

min0nim

Member
I think the difference between them is pretty even in terms of cost! Local suppliers here sell the 15" Tigers for $85 - $100 in pairs, the S1000's clock in at $125 for a complete set. When one of two props need replacing, the S1000 blades start to work out fairly economical.

How do you find the SuperX on it?
 

Motopreserve

Drone Enthusiast
I think the difference between them is pretty even in terms of cost! Local suppliers here sell the 15" Tigers for $85 - $100 in pairs, the S1000's clock in at $125 for a complete set. When one of two props need replacing, the S1000 blades start to work out fairly economical.

How do you find the SuperX on it?

i was was talking about the adapters. Those things are pricey!!!! And I actually have some t-motor knock-offs, so big savings there.

I like the superx. Had some issues with arming early on, but I've used it on several different builds at this point and it's handled them all pretty well. Seems to me that once it's dialed in you just think about it less than the Naza. I've never tried any of the high end DJI FCs.
 

min0nim

Member
Ah yeah, $36 for some machined aluminium! Having said that, they are really really beautifully designed and made pieces, and come with an array of washers and bolts.

One other thing worth mentioning is it does yaw slightly clockwise after manoeuvring - just slight twist which puts it out of alignment by about 5-10deg from your heading. It stops after that and then sits there like a rock (a flying rock? not the best analogy).

I've read that custom motor mixes or more aggressive pitch bottom props counteract this.
 

Top