Planning V Tail Quad Build Opinions Please.....

Borneoben

Member
WooHoo!!

Annnnnnnd were off!

I have ordered most of teh parts i need for my V Tail Quad

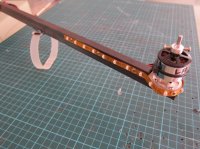
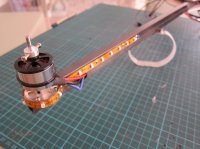
These will be used for the front motors. 750Kv
http://www.rctimer.com/index.php?gOo=goods_details.dwt&goodsid=523&productname=

Swinging 10 inch Props
http://www.rctimer.com/index.php?gOo=goods_details.dwt&goodsid=513&productname=

These will be used for the Rear Motors 1000Kv
http://www.rctimer.com/index.php?gOo=goods_details.dwt&goodsid=554&productname=

Swinging 8 inch Props
I intend to order teh Gaui 8 inch props from the 330X

ESC's will be these, 30amp
http://www.rctimer.com/index.php?gOo=goods_details.dwt&goodsid=146&productname=

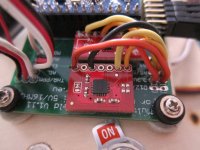
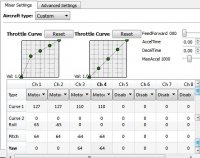
and it will all be controlled by a Open Pilot CopterControl courtesy of Mr Crash.

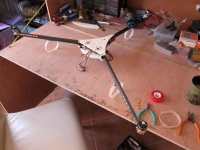
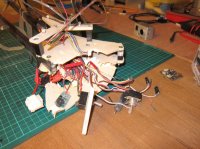
Now I just have to finish my Tricopter and build a frame for the VTQ.

Cheers all

Ben


Crash

Defies Psychics
@ Kirk
That Virivent tutorial you sent is very interesting. I need to get some more copper clad welding wire and some more SMA pigtails and i will experiment.
Last night i managed to break one of the "leaves" off my cloverleaf and I have run out of flux so am having a real nightmare getting it soldered back together. So I may build another one from scratch with some new wire.

Arrgh, I didn't see this until today. I could have sent you that stuff too. :(

I had trouble with MIG wire also. The copper plate would strip clean off the steel core and leave the wire free to rotate in the solder hole. Electronics solder doesn't stick to steel very well but I believe silver solder will if the steel is clean and wire brushed.

I'm wondering if you can tin the ends of the MIG wire with silver solder and a torch then followup with regular solder and an iron. Or maybe a torch isn't necessary? I've never used silver solder.

Gold plated memory wire seems to hold up better but it's harder to work with.
 

Bartman

Welcome to MultiRotorForums.com!!
Arrgh, I didn't see this until today. I could have sent you that stuff too. :(

I had trouble with MIG wire also. The copper plate would strip clean off the steel core and leave the wire free to rotate in the solder hole. Electronics solder doesn't stick to steel very well but I believe silver solder will if the steel is clean and wire brushed.

I'm wondering if you can tin the ends of the MIG wire with silver solder and a torch then followup with regular solder and an iron. Or maybe a torch isn't necessary? I've never used silver solder.

Gold plated memory wire seems to hold up better but it's harder to work with.

crash,
silver solder sticks to steel and is commonly used in RC to hold steel landing gear together that has been wrapped with copper wire first. it also holds steel clevises on steel wire rod very well. when doing this i first file a small notch in the wire rod to add an additional mechanical hold point of sorts.
regards,
bart
 

Borneoben

Member
Arrgh, I didn't see this until today. I could have sent you that stuff too. :(

I had trouble with MIG wire also. The copper plate would strip clean off the steel core and leave the wire free to rotate in the solder hole. Electronics solder doesn't stick to steel very well but I believe silver solder will if the steel is clean and wire brushed.

I'm wondering if you can tin the ends of the MIG wire with silver solder and a torch then followup with regular solder and an iron. Or maybe a torch isn't necessary? I've never used silver solder.

Gold plated memory wire seems to hold up better but it's harder to work with.

Oh No!

Never mind that would have been very useful!!

One big draw back living in Qatar is its very difficult to get some of these types of things.

I could not find and SMA RF connectors here in Doha i had to buy a load of them whilst i was in the states last time.

I have a friend with a fabrication shop so i was gonna ask him if he would let me borrow his TIG welder.
That should make a very nice strong joint. I am using 2mm wire so it shouldnt be too tricky to spot weld to gether.
I am also making a new Jig to hold the leaves of the clover in the correct positions.

I will keep an eye out to see if i can find any silver solder.
 

Borneoben

Member
Hi Guys

Just a little update.

Here are some pictures of my Tri Copter nearing completion.
It is relevant to this thread as the VTQ will be built using an almost identicle method.;)

I love the carbon arms and the hidden wiring but i am afraid of what the all up weight will be.

As you see it in the pictures it already weighs 750grams.
I still have to add the Battery mount, Battery and FPV gear.
The FPV camera will be a GoPro so its a little porky!

The additional captive nuts on the lower frame are for the Camer/Battery mount.

Jobs still left to do
Finish the Dampened Camera / Battery mount.
Rebuild the Clover leaf FPV Antenna
Finish the antenna mount.
Fabricate new Carbon Tail Fin
Finsih Wiring the FC board

Tricopter Main Frame Complete
attachment.php


Mobile workshop
attachment.php


Motor Mounted on carbon arm with LED's
attachment.php


Carbon Arm with Hidden Wires
attachment.php


Tail Motor Mount
attachment.php
 

Attachments

  • Tri with Main Frame Complete.jpg
    Tri with Main Frame Complete.jpg
    134 KB · Views: 450
  • Miniature Home work shop Where the Magic Happens.jpg
    Miniature Home work shop Where the Magic Happens.jpg
    133.5 KB · Views: 303
  • Motor and LEDs mounted on Carbon Arms.jpg
    Motor and LEDs mounted on Carbon Arms.jpg
    135.3 KB · Views: 478
  • Hidden Wiring on Carbon Arms.jpg
    Hidden Wiring on Carbon Arms.jpg
    133.6 KB · Views: 479
  • Tail Servo Mount 2.jpg
    Tail Servo Mount 2.jpg
    129.1 KB · Views: 438
Last edited by a moderator:

Borneoben

Member
A few more Pictures

Heavy Duty Toggle Switches for LED's and FPV system. The Switches are connected to teh harnes with JST connectors
attachment.php


attachment.php


Current FC will be a MultiiWii until my Open Pilot CopterControl arrives from Mr Crash.

attachment.php


Tail motor showing hidden wires in Carbon Tube
attachment.php


attachment.php
 
Last edited by a moderator:

Borneoben

Member
Even More Pictures!

Power Distribution worked better in my mind than in practice but im still happy with it for simplyfing the wiring
attachment.php


Power Distribution soldering looks better in real life but this close up doesnt look that great!
One problem is that i need a very hot iron to solder to the copper bus bars as everything get so hot it all melts and wires come off! For the VTQ i will put this Power Distribution system under the top frame plate as opposed to on the bottom frame plate and the bars will all run front to back instead of left to right as shown here. I think that may make it a lttle easier. You also have to do all the positives first then all the negatives then the ancillaries. You cant solder one ESC at a time as the wires cross over where you want to solder next!
attachment.php


Underside of Main Frame, additional Captive nuts are for Camera/Battery mount
attachment.php


Simple Landing Gear Mount. Landing gear is made from a plastic container i stole from the kitchen and cut into slices. Works Great!
attachment.php
 

Attachments

  • Landing Gear Mount.jpg
    Landing Gear Mount.jpg
    132.3 KB · Views: 469
  • Power Distribution 1.jpg
    Power Distribution 1.jpg
    134.8 KB · Views: 482
  • Power Distribution 2.jpg
    Power Distribution 2.jpg
    135.5 KB · Views: 380
  • Underside Layout showing Captive Nuts.jpg
    Underside Layout showing Captive Nuts.jpg
    140.2 KB · Views: 481
Last edited by a moderator:


Borneoben

Member
Hi Guys here is a short update on my Tricopter build.
(its relevant to this thread as its a test bed before i build the VTQ!!)

Here she is almost ready for teh Maiden flight
just need to tidy the ESC wiring and mount the FPV antenna and Tx
attachment.php


Clover Leaf Antenna goes on this mount with tie wraps.

attachment.php


But first i have to repair my clover leaf antenna so i built Jig to help me get the dimensions and angles just right.
Yeah i know the Jig is not pretty but i was in a rush so i didnt remove all the paper templates before i glued it all together and used it!!

attachment.php

Here is the Rubber Mounted Camera and battery mount. I made the rubber isolators from house hould pencil eraser! It works OK but is quite prone to spliting so i need to find something more suitable.

attachment.php


attachment.php

I also made this carbon tail fin to help with orientation when flying LOS plus i like the look!
I may also add some LEDs up the side for more visibility at night.

attachment.php

TOP TIP for TriCopters
For a tricopter and a normal Quad Copter it is easy to know exactly where the Center of Gravity should be. ie right in teh thrust center of all of the props.
What i liek to do is to drill a small hole exactly on teh CoG and thread a small wire or string through it with anot on the end so you can pick up the tricopter and see how it balances.
A well balanced Copter means less work for the FC to do.
I leave the small wire attached at all times so when i attach the battery i can make sure for every flight that it is balanced correctly.

attachment.php
 

Attachments

  • Arduino Pro Mini with ITG3200 Gyro and BMA180 Accelerometer.jpg
    Arduino Pro Mini with ITG3200 Gyro and BMA180 Accelerometer.jpg
    133.2 KB · Views: 493
  • Camera  Battery Mount.jpg
    Camera Battery Mount.jpg
    129.2 KB · Views: 461
  • Carbon Tail fin to aid orientaion when flying LOS.jpg
    Carbon Tail fin to aid orientaion when flying LOS.jpg
    107.8 KB · Views: 469
  • Clover Leaf Antenna Jig.jpg
    Clover Leaf Antenna Jig.jpg
    144.9 KB · Views: 427
  • Clover leaf Antenna Mount ready for repaired Antenna.jpg
    Clover leaf Antenna Mount ready for repaired Antenna.jpg
    133.8 KB · Views: 482
Last edited by a moderator:

Borneoben

Member
Oh and here is the MultiWii FC ready to go but i have used the ITG3200 Gyro break out and BMA180 Accelerometer break out boards in place of the Wii Motion PLus and NunChuck from Nintendo. Should give a faster responding system. We will see.
I will then do a back to back comaprison with the Copter Control Board i have recently recieved from Crash. Should be interesting.

attachment.php


Maiden flight is on Friday!!
(my one and only day off in the week!)

Wish Me Luck!!
 

Attachments

  • Rubber Vibration Isolatros.jpg
    Rubber Vibration Isolatros.jpg
    100.4 KB · Views: 417
  • Simple COG balancing.jpg
    Simple COG balancing.jpg
    133.7 KB · Views: 421
  • Tricopter almost ready for Maiden Flight.jpg
    Tricopter almost ready for Maiden Flight.jpg
    134.7 KB · Views: 470
Last edited by a moderator:

MombasaFlash

Heli's & Tele's bloke
.... using 2 rubber grommets per corner from a Helicopter Canopy...

Them thar's Raptor canopy grommets.

Very cool looking V-Tail design.

It will be interesting to know how your GoPro performs. In my experience they cannot deal with ANY sort of vibration or quick movement whatsoever. The 'camera isolation block' in your design looks too simple to me to avoid the rolling shutter jellies that GoPro's are prone to, or any other CMOS camera for that matter.

Whilst it was raining on and off a week or two ago I messed with building a mount for a T-Rex 450 to carry a GoPro. The combination of a soft shock at the front and gel pads supporting the actual camera plate pretty much eliminated vibration getting through but could not prevent the camera from swinging pendulum style at a high enough frequency to induce just noticeable 'jellies' at the edge of the frame.

No good.

PS. notice the Raptor grommets!


View attachment 731
 

Attachments

  • T-Rex Mount.jpg
    T-Rex Mount.jpg
    150.8 KB · Views: 385


matwelli

Member
motors out (blades angled in) so the prop wash dosent mix, and when in a fast sideways run, the tail dosent drop

you wont be disapointed :)
 

Borneoben

Member
Them thar's Raptor canopy grommets.

Very cool looking V-Tail design.

It will be interesting to know how your GoPro performs. In my experience they cannot deal with ANY sort of vibration or quick movement whatsoever. The 'camera isolation block' in your design looks too simple to me to avoid the rolling shutter jellies that GoPro's are prone to, or any other CMOS camera for that matter.

Whilst it was raining on and off a week or two ago I messed with building a mount for a T-Rex 450 to carry a GoPro. The combination of a soft shock at the front and gel pads supporting the actual camera plate pretty much eliminated vibration getting through but could not prevent the camera from swinging pendulum style at a high enough frequency to induce just noticeable 'jellies' at the edge of the frame.

No good.

PS. notice the Raptor grommets!


View attachment 1370

Hey Mombasa

I am also looking forward to see how this camera mounts work!!

I Didnt manage to do the Maiden flight yesterday as i had a few technical difficulties with my CopterControl Flight Board.
They seem to be all sorted now so maybe after some more tinkering this evening i will get a test flight in tomorrow morning.

I like you Trex450 Camera mount but it looks like it only dampens the vibrations in 1 axis (up and down) is that correct?
Perhaps you could try attaching 2 more of those small dampers to the lower corners of the GoPro to help with those pendulum movements you metioned?

Cheers

Ben


Borneoben

Member
motors out (blades angled in) so the prop wash dosent mix, and when in a fast sideways run, the tail dosent drop

you wont be disapointed :)

Hey Mat

Can you please share with us the programming / mixing you used in the OpenPilot GCS to work with the V Tail Quad?

A couple of Screen shots would be great if you have the time.

Thanks in advance

Ben
 

Borneoben

Member
So A quick update on the Maiden Flight.... well it didnt happen!

I had a few small technical issues with my CC FC so it has been postponed.
However here are some more pics of the Finished TriCopter waiting tohave its brain fixed.
(pictures show the MultiWii FC still mounted but i grew impatient and installed the CC for teh Maiden flight then ran out if time to re sintall the MultiWii wehne i found teh CC wasnt doing as it should)

All Up Weight turned out to be 1450 Grams inc a 2200 3s lipo and all the FPV gear inc the Large Clover leaf Antenna.
attachment.php


attachment.php

Here is my Temporary FPV Ground Station for using my HeadPlay Goggles.
Both the HP's and the Video Reciver are powered by a 4s3000 lipo runing through a voltage regulator set to 12.1 volts
900mhz Video Reciever is hooked up to a Skew Planer antenna.

attachment.php


Cheers

Ben
 

Attachments

  • Ready to Go 1.jpg
    Ready to Go 1.jpg
    134.6 KB · Views: 436
  • Ready to Go 2.jpg
    Ready to Go 2.jpg
    132.1 KB · Views: 451
  • Temp Ground Station Mounted on Tripod 1.jpg
    Temp Ground Station Mounted on Tripod 1.jpg
    130.3 KB · Views: 453
Last edited by a moderator:


Borneoben

Member
Hi Guys

Another couple of updates on the FPV Tricopter that is teh test bed for the VTQ

Well its good and bad news

God news is it was flying very well i swapped out teh MultiWii and used a CC board
Its a great board i like it very much.
I finally popped my FPV cherry what a great experience!
It was a bit tentative at first but i am slowly getting the hang of it.
this week i spent some time tuning the PID's (must get a Blue Tooth system hooked up) and it was flying very well.
FPV was even better.

Bad news is i was so happy to be flying FPV and got over excited and cocky.
Flew too high out over my compound completely lost video signal and RC signal and it fell nose first from about 50 feet onto hard ground!!

Totalled!

I made so many FPV mistakes its unreal and i paid the price!
I was flying between buildings inside my compound in a tight space.
I had my video Rx ground station too close to a building that i flew above and behind totaly blocking the signal. This resulted in flying to close to a Cell Phone tower.

I cant remember if i lost Video and RC connection at the same time but i do remeber seeing it fall very fast to teh ground but im not very sure.

I have the video clipfrom the GoPro but its corrupted i have to try and save it this evening.

Anyway good news is I think all the hardware apart from the consumables is salvageable and i have recently recieved my BlueSky RC FPV quad frame kit that is great quality and great value so that will be in the air in no time.

enjoy the carnage shots

Ben

attachment.php


attachment.php
 

Attachments

  • IMG_1962.jpg
    IMG_1962.jpg
    136.5 KB · Views: 418
  • IMG_1997.jpg
    IMG_1997.jpg
    145.1 KB · Views: 306
Last edited by a moderator:

Top