Mactadpole
Member
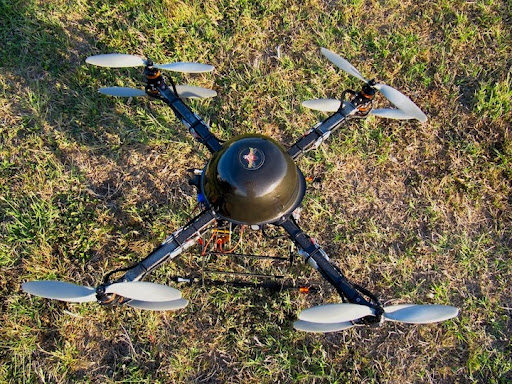
MK FPV Heavy-lift X8 and Futaba TX/RX
I had started a build log on the "other" forum for this copter when it was using the HoverflyPro FC board. Since I am converting to MK I wanted a new build log to document how I set this thing up - primarily for my reference but also to share in hope of helping others just starting out. A lot of the initial info will just be a copy and paste from the initial build but I thought it would be best not to send others somewhere else for the info.
My intended use for this platform is to collect aerial imagery of tropical forest that can then be geo-rectified and used for GIS analyses. I would also like to collect HD video for amateur/scientific and possibly professional presentation of my work. I need a platform that is easily transported because of international travel and in-country transportation such as bus, hiking, canoe, etc. I also desired as small a frame diameter as possible since I will often be launching/landing from trees or canopy towers in forested areas. This is why I have chosen the X8 (coax octo) platform. I also wanted/needed redundancy since I won't have a backup. I am hoping I can get enough flight time out of it so I can shoot several hectares in a flight.
2011-Feb: Finished ordering and receiving everything. I assembled the DW landing gear w/AV130 Pro Mount Mini and the very minimal assembly of the frame.
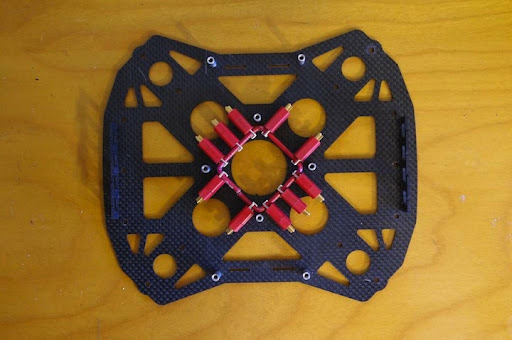
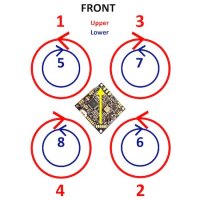
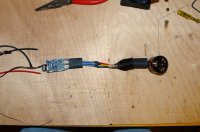
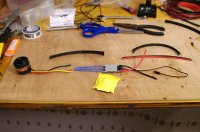
2011-Mar-01-02: (1.) Laid out and began soldering the power distribution ring. It consists of 10 female deans connectors soldered together using 12 gauge solid copper wire. 8 are for the ESC/motors and the other 2 are auxiliary connections. See pic descriptions below for details. (2.) Cut my first motor shaft using my dremel tool and only doing short timed cuts so as not to heat things up too much. (3.) Wired up first ESC/motor to test power distribution ring before sealing it up with liquid electrical tape.
2011-Mar-03: (1.) Drilled holes in frame to mount DW landing gear. (2.) Finished bench test of power distribution ring. No problems found. First coat of liquid electrical tape applied.
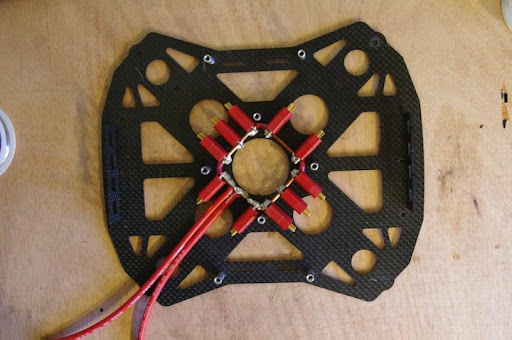
2011-March-05: (1.) All coats of liquid electrical tape on power distribution ring and it was mounted using double-sided tape. (2.) Soldered connections for FPV camera and tx. Bench tested ok. (3.) Did a preliminary mounting of the VTX and antenna. Waiting for comments. (4.) Did a layout for LED navigation lights. (5.) Cut off 4 more motor shafts. Will take some pics of the next ones I do.
2011-March-06: (1.) Finished complete mounting of 1 motor on 1 arm with LED's.
2011-March-13/15: (1.) Finished soldering and dressing all motor/esc combo's. (2.) All top motors mounted. (3.) All LED's mounted and soldered.
2011-March-27/28: (1.) Soldered together harness for 12v power to FC board, LED's, and video transmitter/camera. I used JST connections for everything and added an extra source plug for anything in the future. (2.) Tested FPV setup - works great! (3.) Mounted all motors and screwed frame together. Used loctite all over the place.
2011-March-30/31: (1.) Completed the build! (2.) Not happy with 12V harness for FCB, LEDs, and VTX/Camera. Just too much wiring crammed in there. Going to make a power distribution block from micro-Deans and connect everything that way. (3.) I think I am also going to put a switch between 3s battery and micro-Deans power block so I don't have to be so frantic about getting it plugged in after powering the ESCs and motors with 4s batteries.
2011-April-12: (1.) Added toggle switch for 3s battery which powers board, LED's, and VTX. Makes it easier to power board after plugging in motors. (2.) Worked on ground station.
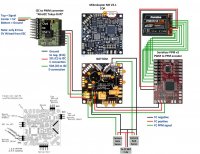
2011-April-15/16: (1.) Added Eagle Tree (ET) eLogger v4, ET OSD Pro, ET GPS v4, ET altimeter v3. (2.) Installed DPCAV 1.3Ghz v-dipole VTX antenna. (3.) Added two fiberglass rods on read to mount VTX and ET GPS, I also plan to add a few LED's to it for orientation assistance. (6.) Completed ground station which includes: 2x Lawmate 1.2/3Ghz receivers, ET EagleEyes ground station for diversity and telemetry, 15" Craig HD LCD, Asus Eee PC 1005HA, EasyCap for recording, and Fat Shark basic goggles.
2011-April-16: Current specifications->
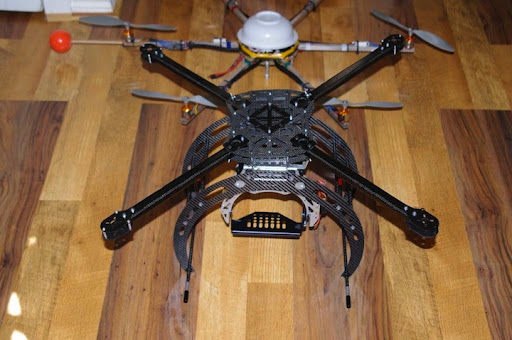
Frame: RCcarbon X4-8
Landing gear: Droidworx's extended
Camera Gimbal: Photohigher AV130
Motors: Pulso 2814/22
ESC's: RCTimer 30A programmable
Props: APC 12x3.8
Batteries: Turnigy Nano-tech 4s 4500mah (single and parallel), Turnigy Nano-tech 4s 6000mah (single and parallel)
Weight (no batteries or camera): 2761 grams
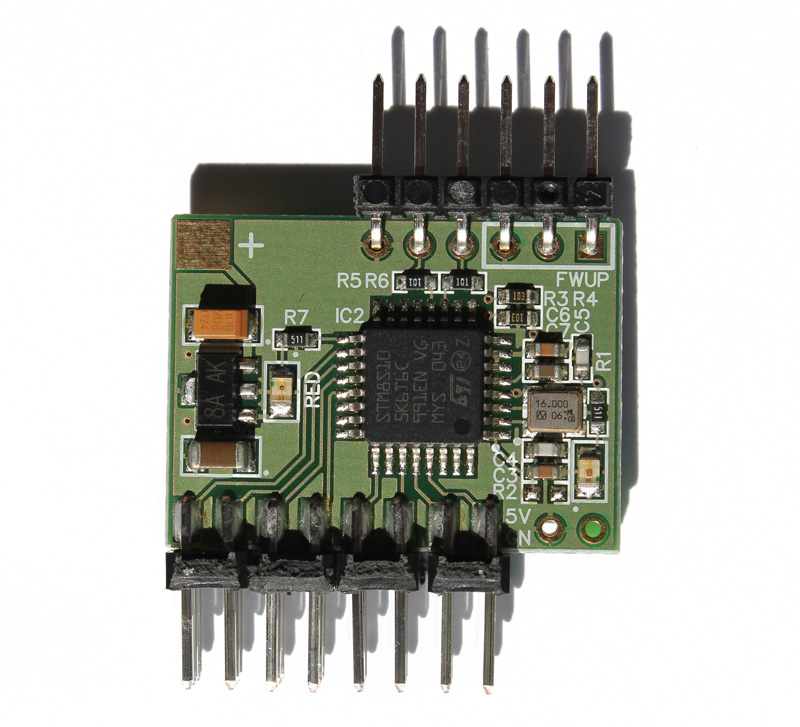
2011-June: (1.) Been ordering parts for conversion to MK electronics. (2.) Also order custom circular polarized antennas from http://videoaerialsystems.com/
2011-June-25: Began creating build log here!
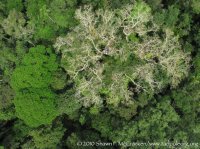
Here is an example of an image I took this past summer in Amazonian Ecuador flying my QP hexacopter from a canopy tower. Look near the upper center of the pic for a white square, that was my launch pad and I am standing just above it. This tower is 150' up in the tree and required about a 20' navigation between tree branches to get in open airspace.

Components - basic
• Frame: RC Carbon X4-8 foldable frame - $410 shipped (note: Sergey has changed the centerplate format, name, and price a bit but basically the same)
I had it extended to 750mm motor to motor distance so I could run up to 13” props with the Droidworx extended landing gear attached. It will also be fitted with an electronics mount for the HoverflyPro board and another for the Quadpowered board, no extra charge for these. Sergey is the designer and builder of these frames and super easy to work with! He even threw together a layout for me so that we knew it could spin up to 13” props with DWX landing gear. I know this is a lot of money but it was much less than my original plan to go with a Droidworx frame. I was originally going to get a Droidworx AD-8 heavy lift frame along with a set of coax motor mounts and hardware to convert to the ADX-4 frame. This would have cost me ~$930 + shipping (that’s minus the cost of the landing gear for sake of direct comparison and I will be using the DWX extended landing gear anyhow). It would have given me the option of flat or coax octo but I really hope to get away with the X8 form because of size and transportation ease. I believe this frame will also be ~100g lighter than the DWX ADX-4 and the arms fold, more bonuses. If for some reason I don’t like it I will sell it and bite the bullet for the DWX frame.

• Landing gear: Droidworx Landing gear assembly extended - $295 + shipping
I went with these because I want to use the PhotoHigher camera gimbal.

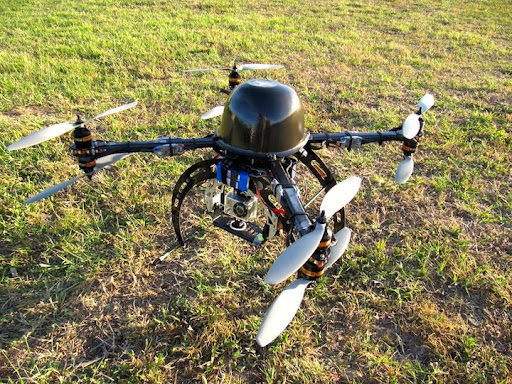
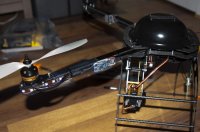
• Electronics Protection cover: Camo Gear Helmet from Hobby Lobby - $3.29
I reinforced from the inside with duct tape and painted it black. I am thinking about using some spray plasti-dip to further reinforce from the inside. I love this thing because it is tall and fits perfect.

• Camera gimbal: Droidworx/PhotoHigher Pro Mount Mini (AV130) - $790 + shipping
I went with the AV130 for now, but I would possibly like to mount two cameras like the Sony Nex-5 or Panasonic GH2 in portrait orientation to get stereo photos. I think they would both fit in the AV200 oriented this way if I built a custom bracket to mount to the plate. I still have several issues to consider, one being weight and the other is camera choice. The AV200 is nearly twice the weight of the AV130 and by the time I add the second camera with custom bracket I have added a lot more weight. Currently, I have a Canon SX200 but its images seem a little soft to me. I just received my Panasonic GH2 but have not flown it yet. Droidworx and PhotoHigher say they are working on a gimbal for mounting two cameras in the future.

• Motors: Pulso 2814/22 - $62/each shipped
I have been happy with these motors on the few flights I have taken. We'll see how they do once I get the X8 flying again. I will probably switch to Avroto or Axi at some point since these are getting very hard to source.


• ESC: RCTimer 30A - $10.99/each shipped

• Batteries: Turnigy Nano-tech 4S 6000mAh - $64.75 + shipping
Turnigy Nano-tech 4S 4500mAh - $52.30 + shipping
I have setup the power system to run these single or in parallel with 2 or 3 of the same batteries.

I had started a build log on the "other" forum for this copter when it was using the HoverflyPro FC board. Since I am converting to MK I wanted a new build log to document how I set this thing up - primarily for my reference but also to share in hope of helping others just starting out. A lot of the initial info will just be a copy and paste from the initial build but I thought it would be best not to send others somewhere else for the info.
My intended use for this platform is to collect aerial imagery of tropical forest that can then be geo-rectified and used for GIS analyses. I would also like to collect HD video for amateur/scientific and possibly professional presentation of my work. I need a platform that is easily transported because of international travel and in-country transportation such as bus, hiking, canoe, etc. I also desired as small a frame diameter as possible since I will often be launching/landing from trees or canopy towers in forested areas. This is why I have chosen the X8 (coax octo) platform. I also wanted/needed redundancy since I won't have a backup. I am hoping I can get enough flight time out of it so I can shoot several hectares in a flight.
2011-Feb: Finished ordering and receiving everything. I assembled the DW landing gear w/AV130 Pro Mount Mini and the very minimal assembly of the frame.
2011-Mar-01-02: (1.) Laid out and began soldering the power distribution ring. It consists of 10 female deans connectors soldered together using 12 gauge solid copper wire. 8 are for the ESC/motors and the other 2 are auxiliary connections. See pic descriptions below for details. (2.) Cut my first motor shaft using my dremel tool and only doing short timed cuts so as not to heat things up too much. (3.) Wired up first ESC/motor to test power distribution ring before sealing it up with liquid electrical tape.
2011-Mar-03: (1.) Drilled holes in frame to mount DW landing gear. (2.) Finished bench test of power distribution ring. No problems found. First coat of liquid electrical tape applied.
2011-March-05: (1.) All coats of liquid electrical tape on power distribution ring and it was mounted using double-sided tape. (2.) Soldered connections for FPV camera and tx. Bench tested ok. (3.) Did a preliminary mounting of the VTX and antenna. Waiting for comments. (4.) Did a layout for LED navigation lights. (5.) Cut off 4 more motor shafts. Will take some pics of the next ones I do.
2011-March-06: (1.) Finished complete mounting of 1 motor on 1 arm with LED's.
2011-March-13/15: (1.) Finished soldering and dressing all motor/esc combo's. (2.) All top motors mounted. (3.) All LED's mounted and soldered.
2011-March-27/28: (1.) Soldered together harness for 12v power to FC board, LED's, and video transmitter/camera. I used JST connections for everything and added an extra source plug for anything in the future. (2.) Tested FPV setup - works great! (3.) Mounted all motors and screwed frame together. Used loctite all over the place.
2011-March-30/31: (1.) Completed the build! (2.) Not happy with 12V harness for FCB, LEDs, and VTX/Camera. Just too much wiring crammed in there. Going to make a power distribution block from micro-Deans and connect everything that way. (3.) I think I am also going to put a switch between 3s battery and micro-Deans power block so I don't have to be so frantic about getting it plugged in after powering the ESCs and motors with 4s batteries.
2011-April-12: (1.) Added toggle switch for 3s battery which powers board, LED's, and VTX. Makes it easier to power board after plugging in motors. (2.) Worked on ground station.
2011-April-15/16: (1.) Added Eagle Tree (ET) eLogger v4, ET OSD Pro, ET GPS v4, ET altimeter v3. (2.) Installed DPCAV 1.3Ghz v-dipole VTX antenna. (3.) Added two fiberglass rods on read to mount VTX and ET GPS, I also plan to add a few LED's to it for orientation assistance. (6.) Completed ground station which includes: 2x Lawmate 1.2/3Ghz receivers, ET EagleEyes ground station for diversity and telemetry, 15" Craig HD LCD, Asus Eee PC 1005HA, EasyCap for recording, and Fat Shark basic goggles.
2011-April-16: Current specifications->
Frame: RCcarbon X4-8
Landing gear: Droidworx's extended
Camera Gimbal: Photohigher AV130
Motors: Pulso 2814/22
ESC's: RCTimer 30A programmable
Props: APC 12x3.8
Batteries: Turnigy Nano-tech 4s 4500mah (single and parallel), Turnigy Nano-tech 4s 6000mah (single and parallel)
Weight (no batteries or camera): 2761 grams
2011-June: (1.) Been ordering parts for conversion to MK electronics. (2.) Also order custom circular polarized antennas from http://videoaerialsystems.com/
2011-June-25: Began creating build log here!
Here is an example of an image I took this past summer in Amazonian Ecuador flying my QP hexacopter from a canopy tower. Look near the upper center of the pic for a white square, that was my launch pad and I am standing just above it. This tower is 150' up in the tree and required about a 20' navigation between tree branches to get in open airspace.
Components - basic
• Frame: RC Carbon X4-8 foldable frame - $410 shipped (note: Sergey has changed the centerplate format, name, and price a bit but basically the same)
I had it extended to 750mm motor to motor distance so I could run up to 13” props with the Droidworx extended landing gear attached. It will also be fitted with an electronics mount for the HoverflyPro board and another for the Quadpowered board, no extra charge for these. Sergey is the designer and builder of these frames and super easy to work with! He even threw together a layout for me so that we knew it could spin up to 13” props with DWX landing gear. I know this is a lot of money but it was much less than my original plan to go with a Droidworx frame. I was originally going to get a Droidworx AD-8 heavy lift frame along with a set of coax motor mounts and hardware to convert to the ADX-4 frame. This would have cost me ~$930 + shipping (that’s minus the cost of the landing gear for sake of direct comparison and I will be using the DWX extended landing gear anyhow). It would have given me the option of flat or coax octo but I really hope to get away with the X8 form because of size and transportation ease. I believe this frame will also be ~100g lighter than the DWX ADX-4 and the arms fold, more bonuses. If for some reason I don’t like it I will sell it and bite the bullet for the DWX frame.
• Landing gear: Droidworx Landing gear assembly extended - $295 + shipping
I went with these because I want to use the PhotoHigher camera gimbal.
• Electronics Protection cover: Camo Gear Helmet from Hobby Lobby - $3.29
I reinforced from the inside with duct tape and painted it black. I am thinking about using some spray plasti-dip to further reinforce from the inside. I love this thing because it is tall and fits perfect.
• Camera gimbal: Droidworx/PhotoHigher Pro Mount Mini (AV130) - $790 + shipping
I went with the AV130 for now, but I would possibly like to mount two cameras like the Sony Nex-5 or Panasonic GH2 in portrait orientation to get stereo photos. I think they would both fit in the AV200 oriented this way if I built a custom bracket to mount to the plate. I still have several issues to consider, one being weight and the other is camera choice. The AV200 is nearly twice the weight of the AV130 and by the time I add the second camera with custom bracket I have added a lot more weight. Currently, I have a Canon SX200 but its images seem a little soft to me. I just received my Panasonic GH2 but have not flown it yet. Droidworx and PhotoHigher say they are working on a gimbal for mounting two cameras in the future.
• Motors: Pulso 2814/22 - $62/each shipped
I have been happy with these motors on the few flights I have taken. We'll see how they do once I get the X8 flying again. I will probably switch to Avroto or Axi at some point since these are getting very hard to source.
• ESC: RCTimer 30A - $10.99/each shipped
• Batteries: Turnigy Nano-tech 4S 6000mAh - $64.75 + shipping
Turnigy Nano-tech 4S 4500mAh - $52.30 + shipping
I have setup the power system to run these single or in parallel with 2 or 3 of the same batteries.
Attachments
Last edited by a moderator: