My brushless gimbal result

GotHeliRC

http://gothelirc.com
http://www.simplebgc.com/eng/downloads/

2.0b3 is published.

WARNING! this GUI is completely different AND will required full re-tune of the system, so unless you know what you're doing and ready to spend a lot of time with it... don't expect to get it going in a few minutes and go shoot.

From my experience, with 2.0b3, it seem you have to increase at least 3-5 points on the D in order for it to be close to 1.3b.


SMP

Member
Hey Guys, when doing an advanced calibration, do you need to click "write" or "calib_acc" or both after each face change?
 

DennyR

Active Member
ADVANCED Calib. needs to be done in the right order finishing with the level. No need to write each one just hit calib. All other changes should be written after the change. You will know if the calib. was not successful because you will see cross axis mixing. i.e. your roll will change with a pitch or pan movement.
 
Last edited by a moderator:

Fredasss

Member
Since upgrade version 2, my Bluetooth module is not working anymore.
With alexmos software upgrade tells me upgrade failed but when you go to GUi with USB it works, and say it's v2 firmware.
Any idea or same problems ???
Regards.
 

Fredasss

Member
ADVANCED Calib. needs to be done in the right order finishing with the level. No need to write each one just hit calib. All other changes should be written after the change. You will know if the calib. was not successful because you will see cross axis mixing. i.e. your roll will change with a pitch or pan movement.

Please what you mean about this advanced calib ? Have you a process ?? Thanks
 

SMP

Member
ADVANCED Calib. needs to be done in the right order finishing with the level. No need to write each one just hit calib. All other changes should be written after the change. You will know if the calib. was not successful because you will see cross axis mixing. i.e. your roll will change with a pitch or pan movement.

Bloody hell, now I'm really confused. Had an RCG answer saying yes, click Calib_acc and write after each face change...

I THINK this is what is supposed to happen. Looking at the front of the camera lens mounted on tray with the heli behind it.

Do a Basic first, level out tray, lens pointed forward and hit calib_acc and then write.
View attachment 11877

Then go to Position 1 (P1) Lens pointed back, and hit calib_acc and then write.
View attachment 11878

Then go to P2 - Lens pointed down, and hit calib_acc and then write.
View attachment 11879

Then go to P3 - Lens pointed forward - PICK UP HELI , TILT ALL THE WAY TO THE RIGHT, (Then rotate Heli till Camera faces Left - wtf), and hit calib_acc and then write.
View attachment 11880

Then go to P4 - Lens pointed forward - PICK UP HELI Flat - Rotate Heli 180 till you are at the back and camera is pointing towards where you are looking AND now tilt camera and heli pointing up at the ceiling, and hit calib_acc and then write.
View attachment 11881

Then go to P5 - Lens pointed forward - PICK UP HELI Flat - Tilt heli to the left - Now rotate heli till camera points to the right, and hit calib_acc and then write.
View attachment 11882


Now I'm pretty sure either I'm an idiot, this guy shot the pictures wrong, this is just the flat wrong process or D. All of the above.

I would think it would be
Calib_acc
Cam Forward
Cam Back
Cam Down
Cam Left
Cam Right
Write

WTF???????????:dejection:


EDIT - STARTED NEW THREAD http://www.multirotorforums.com/sho...ced-Calibration-Procedure&p=108799#post108799 Sorry for the hijack!
 

Attachments

  • thumb-Basic.jpg
    thumb-Basic.jpg
    7.8 KB · Views: 270
  • thumb-Position one.jpg
    thumb-Position one.jpg
    6.6 KB · Views: 234
  • thumb-Pos. two (left).jpg
    thumb-Pos. two (left).jpg
    9.2 KB · Views: 425
  • thumb-three (top).jpg
    thumb-three (top).jpg
    9.3 KB · Views: 249
  • thumb-Four (right).jpg
    thumb-Four (right).jpg
    8.3 KB · Views: 222
  • thumb-Five (bottom).jpg
    thumb-Five (bottom).jpg
    9 KB · Views: 260
Last edited by a moderator:

Icke84

Member
anyone have some "standart" settings for the nex5 which i can use a a starting point with the new alexmos v2 software?
 

GotHeliRC

http://gothelirc.com
anyone have some "standart" settings for the nex5 which i can use a a starting point with the new alexmos v2 software?

Can't remembered exactly, but with 18-55mm..

18-20-16 Power 200 (if you're using silence mode)
18-20-13 Power 120 (if you're using silence mode)
 

SMP

Member
Still no confirmation on advanced calibration procedure?? No one?? Is anybody doing advanced calibrations???
 

Tomstoy2

Member
Spent the time this afternoon doing,,, guess what? Yep, that's right, working on my new gimbal! It's an Arris cm-200 from Hobby Wing.

My first impressions.

It comes completely assembled and set up, tested by them.

It is balanced, I assume for a GP3. My GP2 with my lens protector mounted would not balance, even after loosening the roll bolts and adjusting it all the way out on the slots.
I removed the roll plate from the mount and filed the slots longer. It's not perfect yet, but I'm willing to do a test flight first to see how it behaves.
I'm positive it would balance just fine without the lens protector, but I'm not willing to fly without it.

Fit was good, well assembled.
However, she definitely will not survive an impact! I suspected that going in.

There is no slop in the frame design, so that is good.

To mount the gimbal I removed the top plate, marked and drilled the holes to mount to my load rail mounts.
I , also, drilled out a hole in the center plate to accept my fpv camera mount.
All went exceptionally well.

I then hooked up power to my regulator, before my lc filter running my fpv system, to supply 12 vdc power.

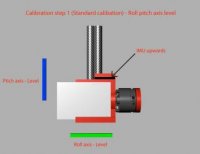
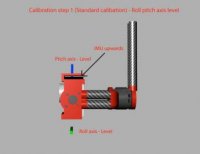
The manual and other necessary software to tune, ( not recommended for beginners ), all comes on a dvd.
The manual is pretty simple.
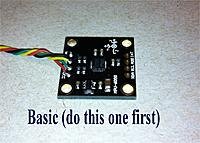
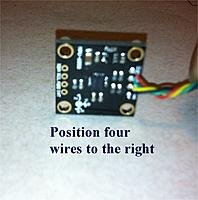
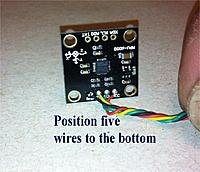
The board is all open source and has a usb port installed to easily update as firmware upgrades.

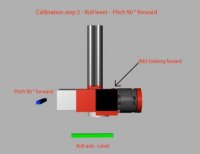
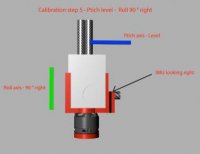
Powering up the system, it sits there for a few seconds as it does it's thing, then everything moved to perfect level on both roll and tilt.

It does come with a cable to hook up manual roll and tilt control, but I removed this as I am using s-bus on my Futaba receiver.
Going to have to figure out how I can manually control the tilt.


So far, so good, I'm pleased with the purchase!


attachment.php


attachment.php
 

Tomstoy2

Member
Here is the vid of my first test flight with the new bl gimbal, in less than idea conditions, I might add.
Wind was at 22 mph, with higher gusts, as a storm was moving in!
Normally, I don't even attempt to fly in these conditions, but curiosity overrode common sense.
Besides the high winds, there was a hell of a lot of electrical interference in the air. Scared the crap out of me, really! Thus the short flight.

A little jello, but before I can address that I really need to do this in better conditions.
Still, I'm pretty pleased. The Hexa was bouncing around in all kinds of directions! So much so that I was extremely concerned to get her back on the ground.
So, considering that, I have to admit, I'm pleased as punch!
http://www.youtube.com/watch?v=oNWCxO9GKs4&feature=player_embedded
 

BorisS

Drone Enthusiast
SMP I dont agree with the procedure from above ! I seen that on rcgroups:

wait is will write something together !

Boris
 

BorisS

Drone Enthusiast
Still no confirmation on advanced calibration procedure?? No one?? Is anybody doing advanced calibrations???


Motors are connected and the gimbal is fully operational. The only thing i do for the calibration procedure is turn the power to 0 for the roll and pitch motor. Than move the gimbal/IMU in the positions shown in the pics below as level as possible and hit calibration. Remeber the first calibration set deletes all the other gather data from the other calibration steps.

Following pics should explain :

View attachment 11958View attachment 11959View attachment 11960View attachment 11961View attachment 11962View attachment 11963

If you check the manual. He states the following for advanced:

Extended mode (preferred): first of all, make calibration in simple mode. Then, rotate sensor board by 90degree, to make every of 5 faces “looking up” (total 5 positions excluding “base”). Fix sensor in everyposition, press CALIBRATE_ACC and wait about 3 second. Repeat this step 5 times (the sequence of rotation is no matter). Remember, that calibration in simple mode will cancel results of extended calibration,so make it first.

Precise ACC calibration is very important to keep horizon stable in case of aggressive flight

Its a little contradicting but I personally think the 5 faces upwards include the first step of the IMU facing upwards. There is no step for the IMU looking downwards in the whole procedure. Hitting calibrate should be enough considering that in a normal calibration hitting calibrate is enough to actually calibrate and hitting write is not needed !

Boris

(edit) i showed this procedure to a friend of mine here in vienna who was one of the first to compare the brushless boad alexmoss martinez etc. and he agreed to this procedure ! So i am pretty sure its right. All the different procedures though including this one were stated in the viacopter alexmos thread, but were never confirmed by any of the guys behind it !
 

Attachments

  • Start1Cal.jpg
    Start1Cal.jpg
    7.8 KB · Views: 332
  • Start2Cal.jpg
    Start2Cal.jpg
    7.5 KB · Views: 333
  • Positiononecal.jpg
    Positiononecal.jpg
    7.6 KB · Views: 314
  • PositiontwoCal.jpg
    PositiontwoCal.jpg
    7.5 KB · Views: 320
  • PositionthreeCal.jpg
    PositionthreeCal.jpg
    7.6 KB · Views: 298
  • Positionfourcal.jpg
    Positionfourcal.jpg
    7.5 KB · Views: 280
Last edited by a moderator:


SMP

Member
P1 - Level Tray - Lens Forward - "Calib_acc"
Motors are connected and the gimbal is fully operational. The only thing i do for the calibration procedure is turn the power to 0 for the roll and pitch motor. Than move the gimbal/IMU in the positions shown in the pics below as level as possible and hit calibration. Remeber the first calibration set deletes all the other gather data from the other calibration steps.

Following pics should explain :

View attachment 15213View attachment 15214View attachment 15215View attachment 15216View attachment 15217View attachment 15218

If you check the manual. He states the following for advanced:

Extended mode (preferred): first of all, make calibration in simple mode. Then, rotate sensor board by 90degree, to make every of 5 faces “looking up” (total 5 positions excluding “base”). Fix sensor in everyposition, press CALIBRATE_ACC and wait about 3 second. Repeat this step 5 times (the sequence of rotation is no matter). Remember, that calibration in simple mode will cancel results of extended calibration,so make it first.

Precise ACC calibration is very important to keep horizon stable in case of aggressive flight

Its a little contradicting but I personally think the 5 faces upwards include the first step of the IMU facing upwards. There is no step for the IMU looking downwards in the whole procedure. Hitting calibrate should be enough considering that in a normal calibration hitting calibrate is enough to actually calibrate and hitting write is not needed !

Boris

(edit) i showed this procedure to a friend of mine here in vienna who was one of the first to compare the brushless boad alexmoss martinez etc. and he agreed to this procedure ! So i am pretty sure its right. All the different procedures though including this one were stated in the viacopter alexmos thread, but were never confirmed by any of the guys behind it !

Boris, first and foremost, thank you!! Very much appreciate your time. So lets see if I understand this correctly. Assuming IMU is mounted on on top of camera tray and looking into the lens of the camera.

SO:

P1 - Level Tray - Lens Forward - "Calib_acc"
P2 - 90 Tray - Lens Down - "Calib_acc"
P3 - 90 Tray - Lens Backward - "Calib_acc"
P4 - Pick up Heli and or Roll Left 90 - Lens Forward - "Calib_acc"
P5 - Pick up Heli and or Roll Right 90 - Lens Forward - "Calib_acc"

"Write"
 

RTRyder

Merlin of Multirotors
The easy way to think of it is as though you have a small square cardboard box in front of you. What you want to do is place the sensor board perfectly level on each "face" of the box and then hit calibrate. Start from either the top or bottom depending on where your sensor board is mounted on the gimbal and then progress through the remainder of the 5 positions including fully upside down. The only gotcha to this procedure is the sensor board absolutely must be perfectly parallel to where you calibrated it in the opposite position and exactly 90 degrees to adjacent faces. If you can't do that with 100% precision then just do the basic calibration, it will actually work better that way. Conflicting calibrations, i.e. not parallel or at 90 degrees will cause odd tilts as the sensor rotates throughout the various positions the platform can achieve, better to give it one set of coordinates to work with (basic calibration) and let it figure out where 90, 180, 360 degrees, etc are from there. It may be off a bit but at least it will be off a consistant amount all the way around which you could then compensate for with either mechanical adjustment or by hooking both tilt and roll to TX channels and using subtrim to fine tune the position.

I did the full calibration once and wasn't happy with the results. Since then I've been doing just the basic calibration and making adjustments where necessary and find the end result to be much better IMO. The other thing that has made a significant difference on my Alexmos controller is loading the new 2.0 firmware, best results yet after that upgrade. This is a link to the first test flight on 2.0 while I was also trying to dial in the settings on a new firmware update to the Mk flight controller, you can see the Mk get a bit unstable at altitude while panning as I was adjusting GPS PID settings from the TX, gimbal dealt with the eccentric oscillations quite well considering how much the frame was moving around... http://www.youtube.com/watch?v=0wJxVP9XN3g

Ken
 
Last edited by a moderator:

BorisS

Drone Enthusiast
The easy way to think of it is as though you have a small square cardboard box in front of you. What you want to do is place the sensor board perfectly level on each "face" of the box and then hit calibrate. Start from either the top or bottom depending on where your sensor board is mounted on the gimbal and then progress through the remainder of the 5 positions including fully upside down.

Ken

Thats the problem and i think here the misunderstanding happens. I interpret the instructions as five faces of the cube excluding the base which would be 6 faces. Dont really know which one is write feeling wise it tells me that only five faces excluding the base/bottom. As reason since over 90 degrees on tilt for example the gimabls act out anyways. !

@ SMP yes

P1 - Level Tray - Lens Forward - "Calib_acc"
P2 - 90 Tray - Lens Down - "Calib_acc"
P3 - 90 Tray - Lens Backward - "Calib_acc"
P4 - Pick up Heli and or Roll Left 90 - Lens Forward - "Calib_acc"
P5 - Pick up Heli and or Roll Right 90 - Lens Forward - "Calib_acc"

the order dosent matter only important point is that the one step 1 Level try and lens foward is your first calibration ! If you do that one again if erases all the other info/ calibration steps. !
Dont think write it of inportance even at the end. Calibration already triggers a write. For example set your gimbal 45 of on roll and press calibrate it will think that is level so the info must have been stored !

Boris
 

Is there anybody here with gh2 camera or any bigger camera who has got perfekt results in the wind. In my opinion and experience the stabilization of roll and tilt is perfect and cannot be better but the problem is when the wind suddenly hits the copter the mount itself shakes ( Z axe ) and it causes some shakiness in the video.
I am thinking that the problem is my z axe as it is too flexible and the camera mount with the camera is very wide and when I hit my copter with the hand I can see that axe to be swaying. I would like to hear from you about your experience !!!!!
 

BorisS

Drone Enthusiast
Darkovujasinovis, your explanation is very pausible. The best way to mount your gimbal is to have it a fixed and solidly attach to your copter as possible at the same time though have enough isolation that you dont get any vibrations. Thats the whole game !

If you show some picture of how you mounted it we may be able to help !

Boris
 

Top