Took apart my ebay steal the tarot T810. Check out the pics.

photojunky

Member
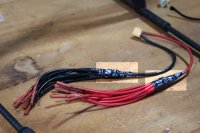
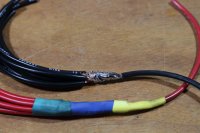
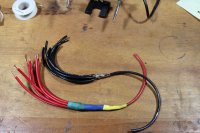
What a pain in the ass it was soldering one 10 gauge wire to eight 12 gauge wires. One issue, I was going to try to not use electrical tape, but after trying to shrink the shrink wrap to fit, I think I know why the original wiring harness used electrical tape at the same solder point. The red (positive) was done with the shrink wrap. As you can see I had to use multiple sizes for a clean look. It wont come undone but it could trap moisture since it is not completely tight. I may remove it and use tape after all.
tarot11.jpg
tarot12.jpg
tarot13.jpg
tarot14.jpg
 

Attachments

  • tarot11.jpg
    tarot11.jpg
    415.9 KB · Views: 731
  • tarot12.jpg
    tarot12.jpg
    403.3 KB · Views: 700
  • tarot13.jpg
    tarot13.jpg
    346.5 KB · Views: 733
  • tarot14.jpg
    tarot14.jpg
    448.5 KB · Views: 680

violetwolf

Member
Being a boat designer and builder I often use marine grade heat shrink that has hot melt glue inside to melt and seal out moisture. But if not on hand I'll hit the solder joint with a bit of hot melt glue, then heat shrink tube over ensuring I re-melt the glue during the shrink procedure with a hot air gun.

And more painful memories of soldering the harness. I use a small butane torch to get the heat & penetration needed for a solid joint.
 
Last edited:


Old Man

Active Member
Another possibility is to use a quantity of of dielectric grease over the soldered portion before applying heat shrink. The heat shrink Violetwolf mentioned is the better way though
 

violetwolf

Member
Another problem point with this kit is the motor-mount screws that are supplied with it. We found them to be soft, easily stripped, and the sockets are off-size being neither imperial or metric so the heads are easily stripped out as well. (Although you can get a hex wrench to fit, stripping is a serious issue), They seem like they were not tempered correctly, or at all. Aside from stripping I would think they can easily stretch or snap.

The fix for this is to swap them out for DJI (ugh) motor screws that are of the "shoulder" type and match exactly but have the correct temper and the sockets and threads don't strip out easily. The screws that come with the FlameWheel frames are a perfect match. I'll try to remember to get the sizing when I'm at the shop and post that here for you guys.

I found the DJI Shoulder Screws I was referring to here:
http://www.goodluckbuy.com/dji-f330-f450-f550-screw-pack-set-m2-55-dji-flamewheel-spare-part-1.html
http://www.goodluckbuy.com/dji-f330-f450-f550-screw-pack-set-m38-dji-flamewheel-spare-part-1.html

They are M2.5 x 5 and M3 x 8 you need some of each to replace the motor mounts and the actual motor screws.. make sure to order enough. ;)


photojunky

Member
Well, its back together for the most part. Assembly was actually a bit easier than I had anticipated with the exception of trying to run the wires though the tubing and out the small end. It was close to impossible. If I do it just occurred to me I can shove a wire down the small end and tape the leads to it and pull them through. I'm not sure I want to use these motors and esc's for too long since I don't know their history. I may keep the wires outside the tubes for easy removal. I also like being able to monitor the esc temps.


The wiring seems a bit heavy (10 & 12 gauge). I was unable to shrink the shrink wrap enough on the small wire since there are 8 leads mated to just one 10 gauge wire. I ended up using hot glue and electrical tape. I may scrap the wiring all together and do something different.


I am thinking about getting the "Futaba 10JH 10-Channel Heli T-FHSS System" to go with a Naza M V2 flight controller. Hopefully they will be on sale for Amazon Prime Day tomorrow.
tarot15.jpg
tarot16.jpg
tarot17.jpg
 

Attachments

  • tarot15.jpg
    tarot15.jpg
    249 KB · Views: 691
  • tarot16.jpg
    tarot16.jpg
    354.6 KB · Views: 711
  • tarot17.jpg
    tarot17.jpg
    435.2 KB · Views: 707

Old Man

Active Member
"Fishing" is the term that describes the pull wire method you described and it works. it's how I did mine;)

Now that you have the "easy" part done...:)
 
Last edited:


photojunky

Member
One observation, I used 12 gauge wire going to the motors. The motors appear to be 14 gauge wire. I may have gone too thick and am thinking about scrapping the harness and making a lighter one. No reason to go bigger than what came on the motors.
 

I wouldn't worry about the wire gauge too much. I used heavy gauge on my 960 build and I could have gotten away with less. What camera do you want to put on it?
 

photojunky

Member
Eventually I will put a Mirrorless 4K camera on the hexacopter such as the Black Magic or the Sony that was mentioned earlier. For now I plan on putting on two Gopros, one in the front and one in the back (to see where I have been). I already have the Gopros. I am probably about a month away from that. One step at a time.

I am going to the Redwoods for 4 days and will order the flight controller, transmitter and receiver to be at my door when I get back. Will be bringing my Phantom. Can't wait.
 

violetwolf

Member
One observation, I used 12 gauge wire going to the motors. The motors appear to be 14 gauge wire. I may have gone too thick and am thinking about scrapping the harness and making a lighter one. No reason to go bigger than what came on the motors.

14 awg should be fine. That's what I have on mine with 6s batts feeding T-Motor 3515 400kv motors.

One thing I noticed is that you're using standard stranded copper wire. It's better to use Silicone wire as it handles vibration better and is flexible for the folding and unfolding. http://www.hobbyking.com/hobbyking/...Silicone_Wire_14AWG_1m_Red_EU_Warehouse_.html

It's low-oxygen and tinned to resist corrosion too. It comes in all colors and sizes, and is pretty cheap at HobbyKing
 

violetwolf

Member
Oops I notice it's listed as out of stock.. but that link is the international warehouse ... they may have it in the US Warehouse though.

I get mine at a local electronics shop so that may be an option as well.
 

photojunky

Member
Can someone tell me how I mount my GPS module or specifically fasten the top and bottom of the GPS module to the stick? it's slides up and down without the hot glue. Thank you
 

Attachments

  • 1470516594170.jpg
    1470516594170.jpg
    118.3 KB · Views: 236

The GPS puck should be firmly mounted. If it falls out or turns during flight you will most likely crash. I used nuts and bolts to secure the base. I used the two sided tape for the puck and then CA (super glue) for the mast on both ends. I wouldn't use hot glue, They also make a folding mount for the GPS that is pretty handy. The two sided tape for the base of those styles is okay providing it is very secure when mounted.
 

photojunky

Member
I just ordered a folding mount from amazon prime. I also gorilla glued the one that came with the module. I am surprised that DJI sells a kit that makes the builder fasten it their way. You'd think they'd have some sort of clamp or threaded system. No biggie.
 

photojunky

Member
This is the most recent shot. Decided to make a new wire harness with the good wire as suggested. Everything but the GPS module is hooked up. I plugged in the battery and all was good. No fire :) Will calibrate soon with assistant software. I am almost there!

tarot20.jpg
 

Attachments

  • tarot20.jpg
    tarot20.jpg
    523.2 KB · Views: 639

Wiring harness that size are a pain. One thing I have done is limit the number of joints per spot. If you had 8 wires cut four of them maybe an inch or two longer depending on how much room you have to work with. Move up wire and open a section of insulation for the additional 4. Or 2,2,2,2....so on and so forth. Or cut them all the same length and let them branch out as needed as the primary wire moves through the frame. Keeps the blob from getting quite so big but does add a little wire weight depending on how frugal you want to be.


Top