Can I get a little soldering advice?

linter

Member
A wire from an esc on my (pre-built, bought used) f450 came loose today and, having never soldered a damn thing in my life, i'm unsure how to proceed. I guess I'll have to take the top plate off to give myself working room. But ... that little existing blob of solder: can i just resolder using it or do i have to remove it? And if I have to remove it, how do I do that? And, what else should I know before wading in?

Just returned from Radio Snack with a 40 watt pencil iron and some rosin-core solder.

Thanks.
 

Attachments

  • IMG_0171.jpg
    IMG_0171.jpg
    141.6 KB · Views: 441

Efliernz

Pete
Heat up the blob and it will probably stick to your iron - remove so you can start fresh. Re-tin the wire with fresh solder, re-tin the pad with fresh solder. Hold the wire onto the pad and (with some fresh solder on the iron) heat the wire. It will melt the solder on the wire and the pad and they will stick together.

Pete
 

linter

Member
thanks, pete. i don't know if you can see it, but it's a two wire connection. in the pic, you'll see one wire still attached and one wire, to the left, that's loose. so do i solder one on and then do the other on top of it?
 

Bartman

Welcome to MultiRotorForums.com!!
how far from radio shack are you? you can dab some soldering flux on the end of the wire and then dab some more on the blob of solder. when you put them together the flux will boil out and the solder will run nicely. the wire probably broke off because the joint wasn't hot enough when it was first assembled. the possibility does exist that the one wire that is still on there will pop off when everything gets hot so you try to prevent that from happening by clamping it in place somehow.

get the end of the loose wire hot first. hold the iron on it until the solder melts throughout the wire. then hold the wire against the blob with pressure from the soldering iron's tip and keep it there until the wire sets into the blob and the solder, in all it's molten goodness, is shiny and smooth. the flux you're dabbing on everything will make the solder run really loose which is what you want.

have fun. it's a rewarding thing to master the solder blob.


Bartman

Welcome to MultiRotorForums.com!!
good luck with it linter. i asked how far from radio shack you are to see if it's reasonable for you to go back and get a small tin of flux. like pete said, the old stuff might come off onto the soldering iron and any new solder will have more flux already in it to keep things clean and flowing.

don't forget to tin the tip of the iron. let it get nice and hot then melt solder onto the tip. keep doing it until the tip is shiny like molten solder, it shouldn't take more than a minute or two. also keep a wet sponge handy and drag the hot tip in the wet sponge to clean it off when it starts to look anything other than shiny.

have fun.
 

linter

Member
i'll be able to get some flux tomorrow. meanwhile, do i tin the loose wire before pressing it into the blob or do i press the naked wire into the blob? and speaking of the blob that exists there right now: do you think i should try to work with it or try to remove it totally and start fresh? thanks again!
 

flitelab

Member
Be careful not to overheat the pad on the board, some have actually had it come off. I've not had the issue so not sure exactly what caused it but I suspect they overheated it.
 

Hi! All very good advice here but if you never soldered a wire in your life, you really need to have a look at some free soldering videos such as this one: http://www.youtube.com/watch?v=BLfXXRfRIzY

It explains and shows what we are referring to and I think makes the learning process faster, safer and more enjoyable. One bad solder joint can result in a catastrophic crash. I learned the hard way....
 

linter

Member
oh man oh man, how much fun was that? a ton! i took apart some old electronic item and spent a while duplicating what i was going to do on the f450. built up my confidence and went and did it for real in less than a minute. what a weird thrill! plus, i think my joint looks a lot healthier than all the others (see the dull black wire one in the pic). some part of me thinks i ought to go around and redo everything but i'm not sure if that's the right call at the moment.

View attachment 8449

anyway, now that i see how satisfying soldering is, i might have to go buy some kit or other and build a new quad from the ground up.

thanks, all, for your help. invaluable!
 

Attachments

  • IMG_0180b.jpg
    IMG_0180b.jpg
    131.9 KB · Views: 350

Oops...houston...we have a problem!!!

oh man oh man, how much fun was that? a ton! i took apart some old electronic item and spent a while duplicating what i was going to do on the f450. built up my confidence and went and did it for real in less than a minute. what a weird thrill! plus, i think my joint looks a lot healthier than all the others (see the dull black wire one in the pic). some part of me thinks i ought to go around and redo everything but i'm not sure if that's the right call at the moment.

View attachment 10963

anyway, now that i see how satisfying soldering is, i might have to go buy some kit or other and build a new quad from the ground up.

thanks, all, for your help. invaluable!

Happy to see that you enjoyed the video I suggested for you BUT the picture you are showing is a excellent picture of a COLD SOLDER i.e. NO GO!!! do not fly with this, you are exposing yourself to a lot of rebuilding, rather sooner than later. Have a look a the this pic I got on the internet, not the greathest but illustrating the point. With the proper preparation, a bit of flux on the wires to be soldered a soldering gun with a clean tip (use damp sponge and rub tip of gun few times on it before soldering) you must reach a melting temperature so that the solder is drawn to the pad and doesn't bulge around the wires. In the picture, you see that the solder has been absorbed by both wires.

On your picture, there is a lot of solder around the wire that is shiny and it has not blended with the pad underneath. The soldering has merely melted a bit to stick to the pad (gray color). A little vibration will suffice to break this solder.

A good way to verify your soldering is to ensure that your solder bulge inwards towards the pad. That ensures the solder has melted on all components at the same time.

Hoping you understand the difference and do not hesitate to redo all the soldering if not up to par. It will be too late in the air... When in doubt, REDO!

Solder-Joint-Good.jpg


Solder%20Samples%20Plus.jpg
 
Last edited by a moderator:

linter

Member
aw geez you mean i gotta take all those little screws out again? crum. let me ask you this. should i be attempting to remove all the old blob down to the pad and then resolder both wires? it seems to me that's the only way i'm going to get a good connection, right?

p.s. thanks for the emergency alert who knows what would have happened without it!!!
 

DucktileMedia

Drone Enthusiast
In welding we call it "wetting out." it's possible your soldering iron doesnt get hot enough. You want that thing full blast and do things quickly. After tinning both ends you want to hold the soldering iron on there until everything is wetted out with solder. a trick i use is to place a pair of old tweezers and i hold the wire down on the ad as I lift the soldering iron up. This does 2 things, it keeps the molten solder from allowing the wire to pop up before cooling and it prevents the wire from moving while cooling which will yield a dull silver color as to shiny. shiny wetted out joints are what you want. There doesnt have to be an excess of solder. If you see half your wires not coated in solder you have not done it correctly.

also, when you're tinning your pads, put solder over all those pad holes as it makes for a better "bite" in the board.

And it's a good idea to run a small fan in front of your work to suck all those highly toxic fumes away!
 
Last edited by a moderator:

Totally agree with IrisAerial. I think that if you take both our advice and methods, you will have a nice and SAFE soldering job. You want a strong soldering iron (40 W min, I have a 160 W...) and you have to heat up quickly, get wet and pull out with everything in place. For this, the use of flux is very important. If you heat up your solder too long, it will become oxydated (black) and not work properly.

All those little screws as you called them can be easily removed with the proper screwdriver with the proper Allen head. It is indeed a bit of a bummer to remove then with a standard little Allen key. You really have to get a screwdriver for this. All heli guys uses them and you only need one.

If I were you, I would definitely take everything out to access the lower plate and visually inspect/resolder all the connections. Get yourself some soldering removal wick which absorbs the old solder and cut out old wire tips if necessary and start from scratch the right way. It is a little price to pay for peace of mind and safe flying. Nothing is uglier than a crashed quad because of a poor solder joint.
 

ChrisViperM

Active Member
Maybe your 40Watt soldering iron is a bit weak....get at least a 60Watt iron....as Iris mentioned, you need the solder to melt quickly. If the soldering iron is too weak, you heat up the whole surrounding before solder and wire melt together. If your iron is too weak you normally can find out if the tinning is not finished, but you hardly can hold the wire because of the heat with your bare fingers.....

As far as old solder blob goes, try to remove them...either bit by bit with the soldering iron, or with a "sucker" : http://www.ehow.com/video_4435738_remove-solder.html


Chris
 

CopterCop

Member
I'm guessing you're done by now (I signed up yesterday to reply but didn't have access to email to validate my account), but for the benefit of anyone else finding this thread, this fun guide to soldering might prove helpful: http://mightyohm.com/files/soldercomic/FullSolderComic_EN.pdf

For desoldering, you have a couple of options: desoldering wick, which is basically braided copper similar to the screen on coax cables (which can be used as a stand-in at a push), and a "solder sucker" which is like a reverse syringe with an internal spring, released with a push button. Not worth the investment for your one-off job, but handy for more frequent electronics work.

Oh, and please don't use flux! I've seen it mentioned here a few times, but flux is intended for soldering metalwork, such as joining the seams on sheet metal, not for electronics. It's acidic to help clean any oxidation on the metal, as well as acting as a wetting agent for the solder, helping it flow. Being corrosive, flux is unsuitable for electronics work, as it can eventually eat through fine copper pcb traces. Your solder should be rosin cored, which serves the same purpose, but is much gentler on the electronic components you're soldering, and saves manually applying it.

And as for the suggestion to switch from a 40W to 60W soldering iron, STOP! Used correctly, a 15W iron should be ample. This isn't jewelry making class! :shame:
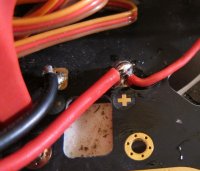
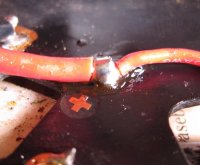
 

linter

Member

Attachments

  • IMG_0193.jpg
    IMG_0193.jpg
    88.9 KB · Views: 457
  • IMG_0195.jpg
    IMG_0195.jpg
    78.5 KB · Views: 375
  • IMG_0196.jpg
    IMG_0196.jpg
    102.9 KB · Views: 375
  • IMG_0197.jpg
    IMG_0197.jpg
    87 KB · Views: 378

CopterCop

Member
Hard to tell with all that flux (how are the silver earrings coming along?) ;) [Lucky for you the board is well masked and the pads are gold plated, so you'll survive], but to my eye, there's too much solder.

Clean her up and go again. No need to put any solder on the pad before you start. The wires can be tinned, but again just barely coated is plenty. Get the wires in place, touch the soldering iron for a second or two to get everything hot, but not too hot, add a touch of solder, then leave the iron for a second to let the solder flow, then remove that keeping everything else perfectly still 'till it cools.
 

linter

Member
well, my problem there is getting the two wires in place on the pad and then touching the iron to them without disturbing the pile o -wires. it'll never happen. so what i did was, i put down a blob, i soldered one wire on one side and the other wire on the other side. how else can you do it, without having the wires flinging themselves all over?
 

CopterCop

Member
Looks like you have a helping hand for one of them, so only one to hold, and you can do "chopsticks" with the iron and solder in the other hand easier with a smaller iron)

. Alternatively if you have a bit of length in the wires, snip off the tinned wire, trim back the insulation, twist the two sets of strands together, tin it up (same procedures soldering, but off the board), then hold both wires and solder as above.
 

Top