I figure I would start this post about my tarot frame I recently got. For Father's Day my wife asked I would like, of course it was multirotor related and since I was not happy with my past F550 conversion to 800mm build, I asked for the Tarot T810. Not that my F550/800 was not a good frame, I was finding it fickle with weight, when I was getting over 4300g's basically it load weight with a Nex5 camera on it, I would then really have to be on top of the prop balances.
I had a post on it and people on there were skeptical about the design and I saw the same flaws in it, but what I found out the frame was good frame and as a copter went it was efficient and had great power but when i got over that 4300g benchmark then the I would have a chance of causing the arms to shutter some when the props were out of balance just the littlest bit.
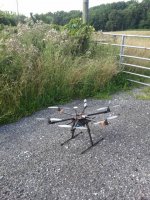
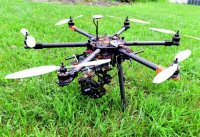
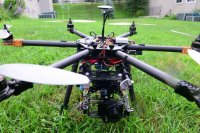
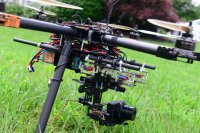
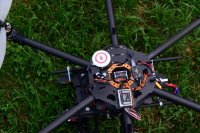
So back to the Tarot, the T810 is what I feel a intuitive design built of a good carbon fiber, it goes together with a few tough elements, like with you are bringing the frame together. However once you have it together the rest is pretty straight forward. when it is done you will have a complete fold-able hexa copter that when erected is solid, and you will not have to worry about any arm vibration cause by flexing. Also the copter is equipped with gimbal mounting bar compatible to the s800, in fact for the battery tray I am using one I got from an s800 and it fits on seamlessly. Unlike the s800 these legs will fold down with just by pulling back a spring loaded pin. to fold it down and put it up takes less then 30 seconds either way.
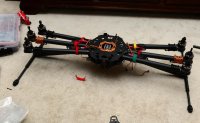
A few things to look out for an this goes with any tarot part that carbon fiber caps off to. Make sure you check them, on this frame there are 4 arms that have these caped off endings mainly to allow the arms to swing in and out as its being folded. 3 out of the 4 caps with a little force, not much, the metal capped bracket came out. It was easily fixed by re-gluing it back into place. In this case I used gorilla glue. I also had the same problem with the leg struts, just double check them.
Another gotta was wiring the 4 arms that fold in, at the end where the booms are capped off, so in that cap there is a hole to the side that feed the motor lead wires out, however it may be better to do it during the assembly stage, and make sure to it after you have checked the arms caps for looseness, other wise you are in danger of serverly damaging your motor lead wire as the cf boom will pinch them as you pull them out.
Another thing that I had to think around was the where to put the esc's what I did there was just make another layer below with a cf center hub from a different frame and that created the space I needed.
I will post photos
cheers
I had a post on it and people on there were skeptical about the design and I saw the same flaws in it, but what I found out the frame was good frame and as a copter went it was efficient and had great power but when i got over that 4300g benchmark then the I would have a chance of causing the arms to shutter some when the props were out of balance just the littlest bit.
So back to the Tarot, the T810 is what I feel a intuitive design built of a good carbon fiber, it goes together with a few tough elements, like with you are bringing the frame together. However once you have it together the rest is pretty straight forward. when it is done you will have a complete fold-able hexa copter that when erected is solid, and you will not have to worry about any arm vibration cause by flexing. Also the copter is equipped with gimbal mounting bar compatible to the s800, in fact for the battery tray I am using one I got from an s800 and it fits on seamlessly. Unlike the s800 these legs will fold down with just by pulling back a spring loaded pin. to fold it down and put it up takes less then 30 seconds either way.
A few things to look out for an this goes with any tarot part that carbon fiber caps off to. Make sure you check them, on this frame there are 4 arms that have these caped off endings mainly to allow the arms to swing in and out as its being folded. 3 out of the 4 caps with a little force, not much, the metal capped bracket came out. It was easily fixed by re-gluing it back into place. In this case I used gorilla glue. I also had the same problem with the leg struts, just double check them.
Another gotta was wiring the 4 arms that fold in, at the end where the booms are capped off, so in that cap there is a hole to the side that feed the motor lead wires out, however it may be better to do it during the assembly stage, and make sure to it after you have checked the arms caps for looseness, other wise you are in danger of serverly damaging your motor lead wire as the cf boom will pinch them as you pull them out.
Another thing that I had to think around was the where to put the esc's what I did there was just make another layer below with a cf center hub from a different frame and that created the space I needed.
I will post photos
cheers