Mikrokopter Hexa 2 to Droidworx ADX3 - build

plingboot

Member
Had a sudden thought in the middle of the night… i was looking at my purchase the wrong way around, an AD6 kit isn't that much more than an ADX3 kit - so why not buy the AD6, build an ADX3 from it and have some spares in the box…

I got confirmation from Droidworx that i could make coaxial motor mounts from the AD6 parts so, money paid v3 kit on the way to me tomorrow.

In an ideal world i'd be having new motors, an AD130 mount and a new radio (i might love my DX8, but i just don't 100% trust it with my MK), but that will all have to wait.

So there are a couple of potential build 'hacks' i can foresee regarding the use of my original hexa 2 motors which might mean the spare booms are required, but more on that once things get moving.
 

plingboot

Member
Build got started this weekend.


Here's the contents of the AD6 box along with the 'donor' hexa 2.
Lots of bags with bits and some nicely finished carbon parts. No instructions though.


View attachment 1188


Saturday evening. First job was to build the landing gear. I was quite surprised (in a good way) at how much bigger it is than the MK one - i had access to the rather odd, super long, single page assembly pdf, but there's nothing about the V3 camera plate in there - not sure whether this is supposed to be glued or what - there are some slots, but no supplied velcro straps to use to hold things together - not sure i want to risk my gopro on four tabs in compression, but i don't really want to be hot glueing or using CA on them either…

A 'constructive' niggle with this plate - which is touted as a gopro mount on the DW website, is that it wouldn't hurt to have included a tripod mount size hole in the centre along with a tripod thumb screw - for the gopro tripod mount.

That might sound like a daft niggle, but this is a premium frame at a very premium price - it's not a problem to drill a hole myself, but…

Could also use some examples of different battery mount options. I have the original (next to useless) 3300mAh flat pack and 2 x 7.2v 5800mAh packs, so need to think about how i'm going to mount my lipos.
No straps included in the kit for this purpose either. :-(

Beginning to think i should try funding this hobby by offering my services as a graphic designer, producing clear instruction pdfs…

View attachment 1189View attachment 1190View attachment 1191
 

Attachments

  • dwb_01.jpg
    dwb_01.jpg
    87.5 KB · Views: 318
  • dwb_02.jpg
    dwb_02.jpg
    77.4 KB · Views: 262
  • dwb_03.jpg
    dwb_03.jpg
    98 KB · Views: 231
  • dwb_04.jpg
    dwb_04.jpg
    84.2 KB · Views: 216

plingboot

Member
Sunday Morning.

View attachment 1192

Planned to get the power distribution and motors sorted today.

I replaced the cross head screws with my own M3 cap heads as i prefer to work with them, however i soon discovered that the booms wouldn't fit with these on the stack standoffs so had to swap those four back to the ones supplied.

View attachment 1193


Had a read up on connectors and decided to use 2mm bullets on the motors as they're rated up to 20amps. The donor motor leads are not long enough to reach the PDB so i'm having to make extension leads for them. To avoid bottle necks in the booms each motor pair has one short and one long set of leads.

View attachment 1194View attachment 1195


Next up were the various pdb connection cables. As shown in the pic:
A - 2mm bullet to each BL-CTRL
B - spare ground
C - Buzzer with jst connector
D - LED wired straight to the pdb
E and G - LEDs via the switching circuit
F - Power supply

View attachment 1196


Attachments

  • dwb_05.jpg
    dwb_05.jpg
    79.6 KB · Views: 262
  • dwb_07.jpg
    dwb_07.jpg
    114 KB · Views: 246
  • dwb_09.jpg
    dwb_09.jpg
    73.1 KB · Views: 358
  • dwb_10.jpg
    dwb_10.jpg
    85 KB · Views: 335
  • dwb_12.jpg
    dwb_12.jpg
    74.3 KB · Views: 282

plingboot

Member
Final Sunday job was to re-foam the pressure sensor on the Flight-CTRL.

I used a piece of foam which i slit, almost in two, down the middle. I slipped this over the sensor and used a band of heatshrink to hold it snugly in place.
The heatshrink band is below the sensor hole. Would appreciate thoughts on this solution.

View attachment 1197


The 18awg silicone wire, new prop mounts and gps shield arrived this morning so should have the motors mounted this evening.


Attachments

  • dwb_13.jpg
    dwb_13.jpg
    136.7 KB · Views: 247

Droider

Drone Enthusiast
There should be a velco strap with the battery mount which you need both plates on ONE side of the gopro mount. The velcor strap is long enough to strop 2 overlander size 5000mah batteries to the mount plates so I am not sure what has happened to yours. The go pro mount should also come with a velco strap that holds it together.. I would go out at take some pics of mine but it raining, my workshop is locked up and I have a stupid o'clock start to drive down to London for a few days work.. grr I hate it down there.

I used a piece of foam which i slit, almost in two, down the middle. I slipped this over the sensor and used a band of heatshrink to hold it snugly in place.
The heatshrink band is below the sensor hole. Would appreciate thoughts on this solution.

What you going to use to wash your car now! nice job..

Dave
 
Last edited by a moderator:


plingboot

Member
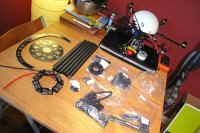
Lady wife out all day so had a full run on the build. By the way, I'm assuming this is of genuine interest to someone out there - the impetus being that i tend to trawl for images of builds etc before i get started, so the detailed pics are supposed to be of use to others planning a build. :tennis:

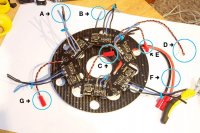
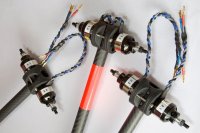
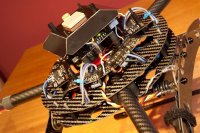
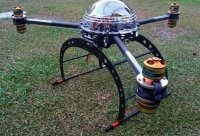
Anyway, here are the motors mounted and leads neatly platted…
View attachment 1298
Next job, which took a yonk, was making up 18 connection leads fro the motors - no pic needed, 18 wires with a bullet at each end.

The original hexa had everything done by the book - with everything hard wired to everything else. I'm determined that this build is going to be much more friendly when it comes to fettling, so trying to have everything as modular as possible - with easy access. Lots of work now for less work later.

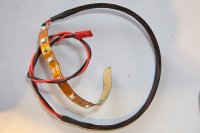
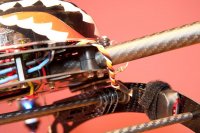
Here is the buzzer and one of the rigger led strips - easily removed/disconnected with jst plugs.
View attachment 1299View attachment 1300
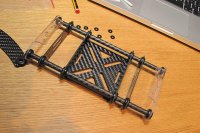
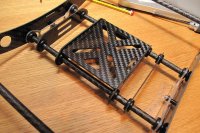
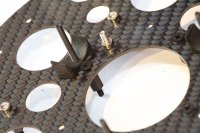
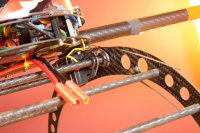
Next up the orange rigger cabling.

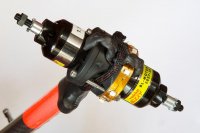
First pic shows the routing of the cable to the rigger LED strip - you can also see that i've wired the motor mount LED's up to the pads in the centre of the LED strip - to reduce cable run. Second pic shows the finished rigger from the other side, showing the buzzer mount and (now) protected motor wires.
View attachment 1301View attachment 1302
You can also see the new 5mm prop mounts and 8mm-5mm reducers on the motors.

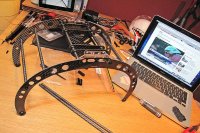
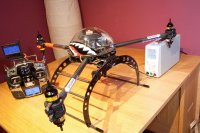
I farted around with this for bloody hours, but it's finally coming together now. It was also a right fiddle to get the finished riggers into the frame without it all flopping around, but that's done.

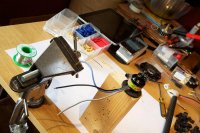
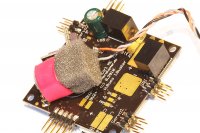
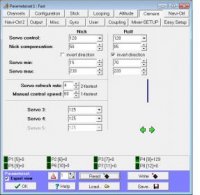
Final job yesterday was to tidy up my FlightCtrl board. I removed the spektrum connection leads, bridged the jeti jumper and cabled it up for the new radio as I'm planning to swap to an MX-20. Would prefer the new Jeti, but it looks like that's not going to appear until next year now and i really don't want to trust this build to my spektrum radio - too many stories of "Mk's going 'odd' for a few seconds while in the air". I'm a big fan of the DX8 and more than confident in it for other models - when using the full receiver/satellite combo, but my flying skills don't need the added risk of radio hijinx.

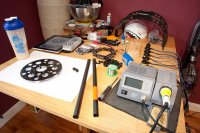
Again, in the original build i was a bit worried about soldering and heat through components, so i used a cooler iron and a fine tip. This was a mistake.

I've subsequently found that a regular size tip, as much heat as my 48w station can throw at it (455º) and being deliberate with each action to be the way forward. This means almost instant, clean joints - touch-and-done.
 

Attachments

  • dw_20.jpg
    dw_20.jpg
    71.4 KB · Views: 211
  • dw_21.jpg
    dw_21.jpg
    139.4 KB · Views: 304
  • dw_22.jpg
    dw_22.jpg
    66.3 KB · Views: 245
  • dw_23.jpg
    dw_23.jpg
    50.9 KB · Views: 357
  • dw_25.jpg
    dw_25.jpg
    59.1 KB · Views: 316

plingboot

Member
Couldn't make it to the meet-up, so spent the day trying to finish the DW conversion.

This was mainly finally installation of parts, making a few custom connection harnesses for LED's etc and configuring the radio, xbee and flightctrl.

The MX-20 definitely isn't a DX8 to look at and the combination of german manual and yards of semi-unfathomable menus and sub menus don't immediately make it super user friendly.

However, with some clear help from the .de wiki (who'd have guessed it) and conversations on the other forum it actually appears to be a very good and comprehensive system and it's growing on me quite quickly… well, that's until the jeti Tx is launched…

I've mounted the receiver against one of the landing gear rails with a couple of zip ties and it and the antennas should be out of harms way there.

View attachment 1361View attachment 1362

The only thing to double check now is the failsafe mode - which may require another firmware upgrade.

Next job was the xbee connection. I had a couple of 2.4Ghz modules which have previously refused to talk, but after about 90mins of wiki/web/previous note searching, conversation happened. Made up a 4 wire lead and heatshrinked the xbee modules to their carrier board to protect them a bit. Using a basic sparkfun regulated board (£7) on the hexa and a sparkfun USB board mac side. The connection is almost perfect, but did see it drop out a once in a while, though it picks up in MKtook within a second or so.

View attachment 1363View attachment 1364

I used the MKM file from another thread on here. Initially i couldn't get it to load so i opened one of the other files, deleted it's content, pasted in the Y6V2 content and saved it as a Y6. This seems to work. The MKtool shows the set up as Y6V2, but there's no Y6 graphic in the set-up windows.
 

Attachments

  • dwb_31.jpg
    dwb_31.jpg
    90.9 KB · Views: 368
  • dwb_30.jpg
    dwb_30.jpg
    83.2 KB · Views: 275
  • dwb_33.jpg
    dwb_33.jpg
    128.7 KB · Views: 275
  • dwb_32.jpg
    dwb_32.jpg
    87.4 KB · Views: 319

plingboot

Member
Final stuff included a few decals i cut for the inside of the dome and the riggers.

Would very much like an AV130 and some torxpower motors but that's going to have to wait for a few months unless i win the lottery.

Generally speaking i'm pretty pleased with how she's turned out - just sh!t scared of stacking her up on the first flight.

View attachment 1365View attachment 1366

QUESTIONs:
1. how do you Y6 chaps secure your props? Single nut and spring washer (those are what came with my 5mm mounts) or two nuts, nyloc nuts, thread lock ??
2. are there any specific Y6 check lists i should follow to double check everything before my first flight attempt?
 

Attachments

  • dwb_29.jpg
    dwb_29.jpg
    102.3 KB · Views: 383
  • dwb_35.jpg
    dwb_35.jpg
    63.8 KB · Views: 317
Last edited by a moderator:

Droider

Drone Enthusiast
Yo Plingboot.. looking good.. I am sure people will have found this interesting.. where did you get your motor config file from?

What are the settings?

Did you work out the gopro mount from the photo I posted?

Props I use regular nut and plain washer thougt I am getting some star washers this weekend. I usually take my props off when transporting but just regular checks on the nuts tightness. I have seen a nice little torque wrench whick I may get but am just trying to find out what the recommended tightness is for my 6mm Axi prop adaptors.


Weekend went brilliant.. Maybe next time.

Dave
 

plingboot

Member
Dave, thanks for the reply.

Would very much have liked to come along to the meet - going to try and make the guildford one this weekend.

Not fully worked out the gopro mount - missing velcro doesn't help, so probably need to cobble something with zip ties, I'll be adding my super simple gopro/tilt/roll mount to it later this week.

Thanks for the info on the props, kinda confirmed what i suspected - I have shimano "pro" brand torque wrench for the moody carbon components on my tt bike - which require just 3 or 4nm - it's a nice bit of kit but pricey at around £90 (cheaper than a wrecking a frame though).

This is the config file i'm using. CLICKY
 

plingboot

Member

Attachments

  • 01.jpg
    01.jpg
    18.6 KB · Views: 296
  • 02.jpg
    02.jpg
    19.1 KB · Views: 335
  • 03.jpg
    03.jpg
    12.4 KB · Views: 261
  • 04.jpg
    04.jpg
    13.5 KB · Views: 231
  • 05.jpg
    05.jpg
    15.4 KB · Views: 136


yeow

Member
Hi Plingboot,

Is a joy to found your thread on Y6 which what I am doing now, Since you thread is almost a year now, may I know how is your Y6 perform compare to hexa2? Or did you convert it back to hexa again?

I am looking for the Y6 mkm file now, can you send me yours?
What motor configuration should I should my motor to BL ring? All up motor to odd number BL on ring and downward number to even number?

Sorry to throw you so much question, I am desperately wish to complete this soon for a job.

Thanks and appreciate and wish you enjoy your DW Y6

View attachment 5009

Yeow
 

Attachments

  • ADX3HL.jpg
    ADX3HL.jpg
    126.1 KB · Views: 250

plingboot

Member
I'm not going to compare the Y6 to anything else as i think that a standard hexa config has plenty of merits and i'd happily have both if money and space permitted.

The Y6 config was driven partly by the need for it taking up less space on my desk when not in use.

It flies superbly, Y6 in my experience is more sedate than hexa.

I ditched all Mikrokopter hardware shortly after the initial build, too many horror stories of unexplained crashes and the vague nature of MK configuration. Every time i went to fly i was absolutely sh!tting myself just waiting for it to drop out of the sky, which completely defeated the object of an enjoyable hobby.

Switched to a WKM and not looked back.


yeow

Member
Plingbot, sorry for your crash.
Is your crash happen to Y6 only as isolated case or it also happen to your other mk? What is the major advantage of MKM over MK on your experience?
 

plingboot

Member
i personally didn't have a crash, but there were plenty of people, at that time who were experiencing fly-aways and sudden falls from the sky - with that in mind i personally couldn't trust my MK gear and therefore didn't enjoy flying with it.

Not a case of better or worse, just my personal preference.

You pay your money and make your choice.
 

Top