Motopreserve
Drone Enthusiast
Review: Flying Cinema CineTank MK. I Frame Kit
By MotoPreserve
Whether you are new to the hobby or you flew at the National Aeromodeling Championships in 1937, many of you will begin your multirotor (MR) build by choosing a frame. The choices are endless and to the uninitiated, the options can be daunting. Among the various multirotor-flying formats, quads often make the most sense. If you're just starting out quads are simpler, less expensive and easier to manage. For more experienced pilots; having a machine with fewer motors, props and less hassle may allow them to think less and simply have more fun.
But with so many quad frame designs out there, how do you choose?
Decisions...Decisions
Most quads fall into two main categories. The most common is designed with a central set of frame plates, arms/booms extending symmetrically from the center, with electronics placement limited to vertical stacking. The second style, gaining popularity in the past few years, is known as the H-Quad (or FPV) frame. These designs are most often asymmetrical (motors not equidistant from the center of the frame), built around a stack of elongated plates stretching fore and aft, allowing more room for extra electronic equipment such as an FPV camera, video transmitter, antennas and extra batteries. Issues have arisen with asymmetrical configurations, with reports of some flight controllers (FC) having a hard time making fine adjustments to the motors.
That’s where the symmetrical H-Quad frame comes in.
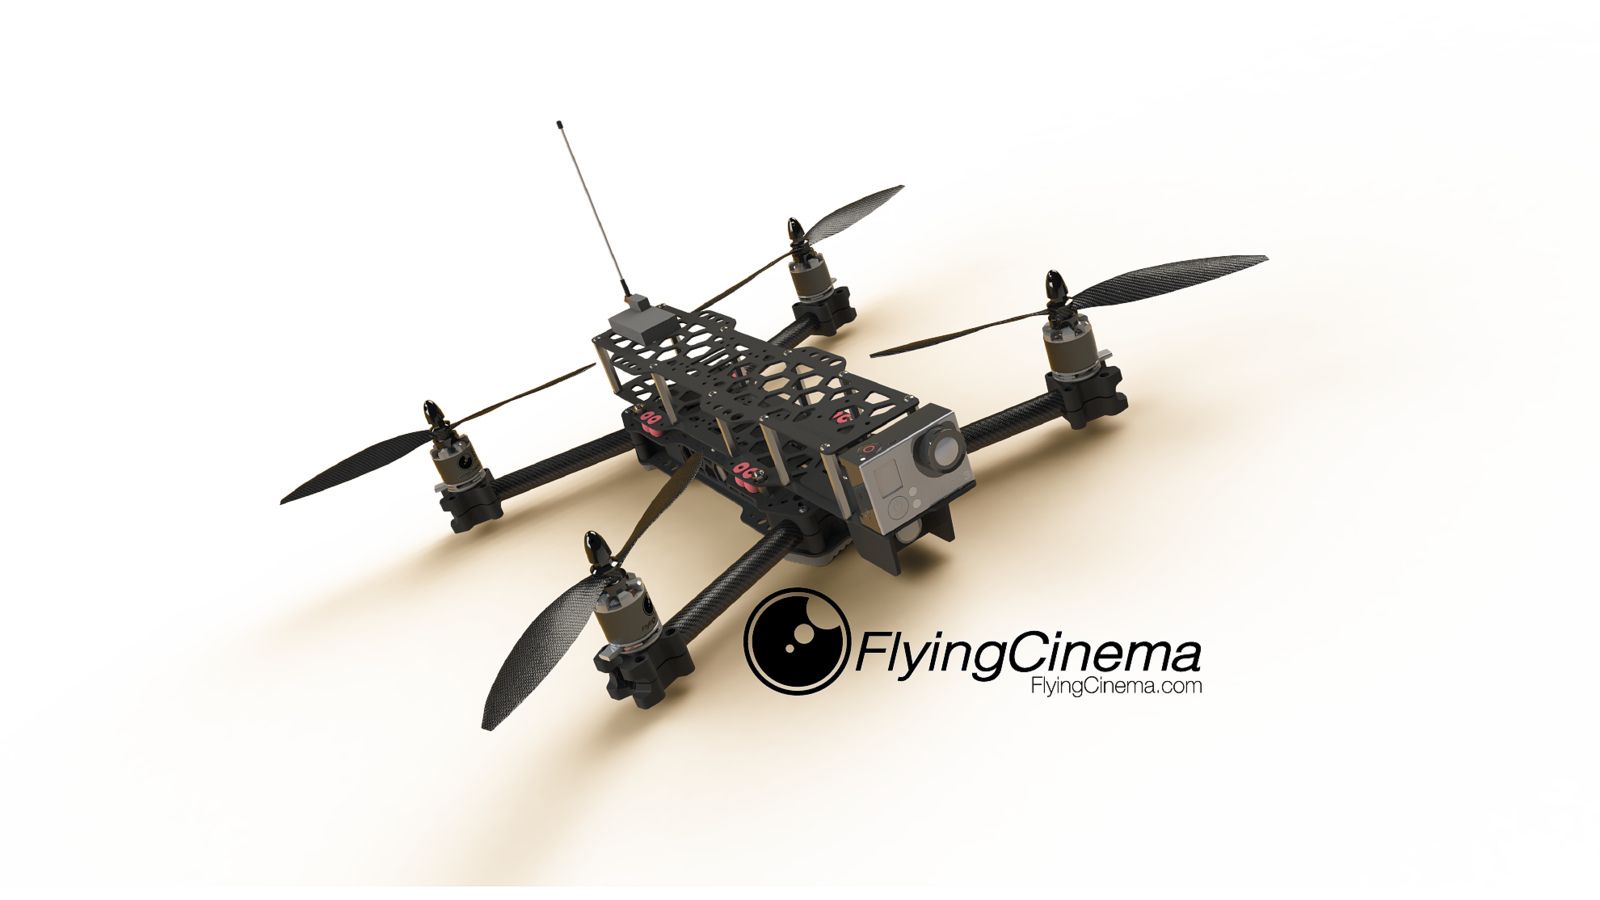
Florida RC start-up Flying Cinema has hit the ground running with their first offering, a symmetrical H-Quad frame kit called the CineTank MK. I. Designed and manufactured in-house, the typical attributes that attract people to the H-Quad format are present, but it utilizes symmetrical motor spacing (423mm diagonally motor to motor) minimizing impact on the FC, making the CineTank an interesting new addition to the market.
I had been looking to get into FPV and amateur aerial video, searching long and hard for an H-Quad frame that fit all my requirements. There are many choices, with one key factor being price. With many options costing under $50, why would I pay $179 USD (free shipping included) for a frame? The more research I did, the more I found myself coming back to the CineTank, eventually realizing quality design and positive customer feedback was what I’d be paying for. Initial flight reports insisted it lived up to its [tank] name, with numerous customer crash videos showing the CineTank smacking the ground hard – only to be picked up and flown again. My ability to find the ground in 1000 feet of clear sky was making this frame more and more attractive.
Features
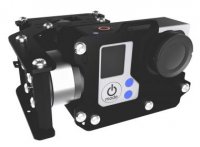
The CineTank has some appealing and unique design features; symmetrical layout, motor spacing which eliminates props in camera view, plates cut with a honeycombed template minimizing mass while maximizing strength, a new take on the clean/dirty plate design (to minimize jello) with travel-stops (to prevent damage to the dampeners), side plates coupled with stand-offs for strength, and an adjustable front camera mount with adjusting slots for securing various cameras. Adding to the appeal was the owners/designers seemingly constant presence on the forums, providing quick customer service, feedback and advice utilizing the online community. When I discovered Flying Cinema manufacturers most of the parts themselves right here in the good ol’ U.S. of A, a decision was made… I pulled the trigger, ordered the CineTank and impatiently awaited delivery.
The CineTank package arrived on my doorstep 3 days later, everything neatly packed into a long, thin box. Upon opening the box you find a complete frame kit tucked into a roll of interconnected, individually sealed vacuum pack compartments. When I let it unravel toward the floor, I felt like the huckster at a carnival, hawking wares. “Watches, fake IDs, how ‘bout a ring for the little lady? What ya’ need, I got it!” I was getting excited about this build.
I spread out the packaging on the workbench to get a good look at the contents. It was comforting to see all the bits protected in simple, easy to access containers. Someone was meticulous when putting this packaging together…
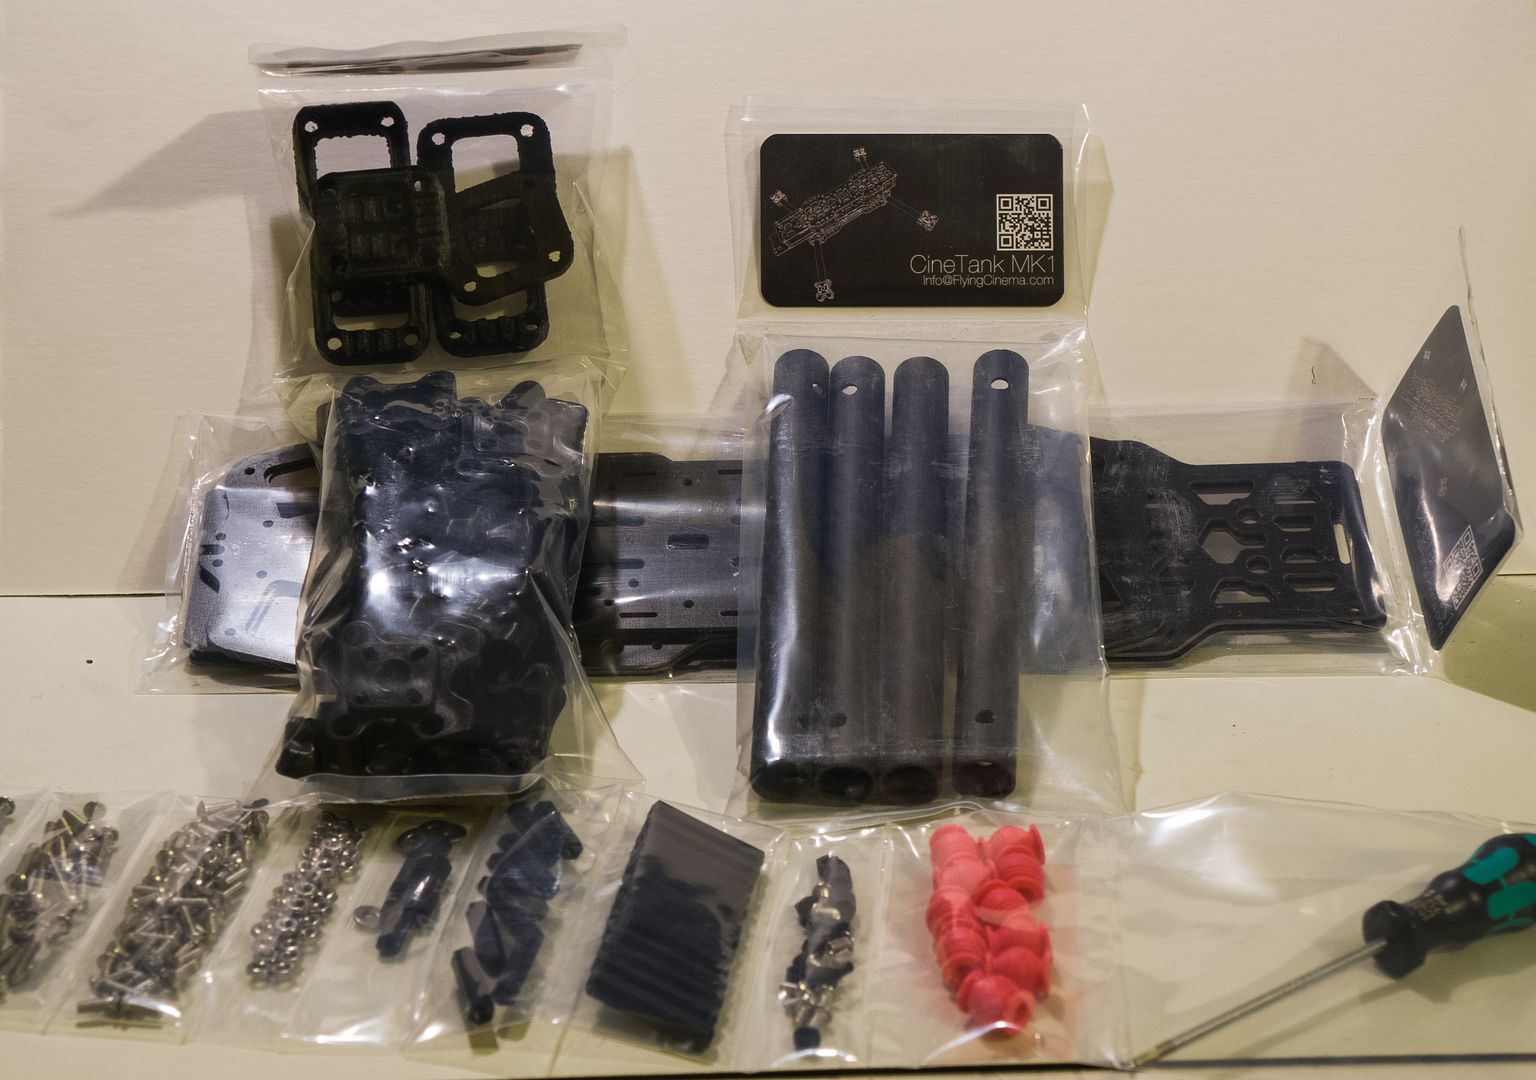
Examining the components reveals the design characteristics of the frame. Included are four CNC honeycombed glass fiber frame plates (two shorter plates for the dirty section, two longer for the clean), carbon-fiber booms, motor/boom mounts (identical), landing gear, nylon stand-offs, dampeners and stainless steel hardware. The included Wera Hex driver, which is the only tool needed to complete the build, was a nice touch. Grab a razor blade and open up the first compartment, it’s time to get this quad built!
Flying Cinema is currently editing a build-video to accompany the CineTank, but as an early adopter, I was relegated to the 3D blow-up diagrams provided on the website. Augmenting the schematics, enthusiastic customers on the forums have supplied detailed build-threads. Confidence in a smooth build was further boosted by the fact that prior to the purchase and after it arrived; it never took longer than a couple hours to hear back from one of the owners answering any questions I had.
Getting Started...Dirty Section
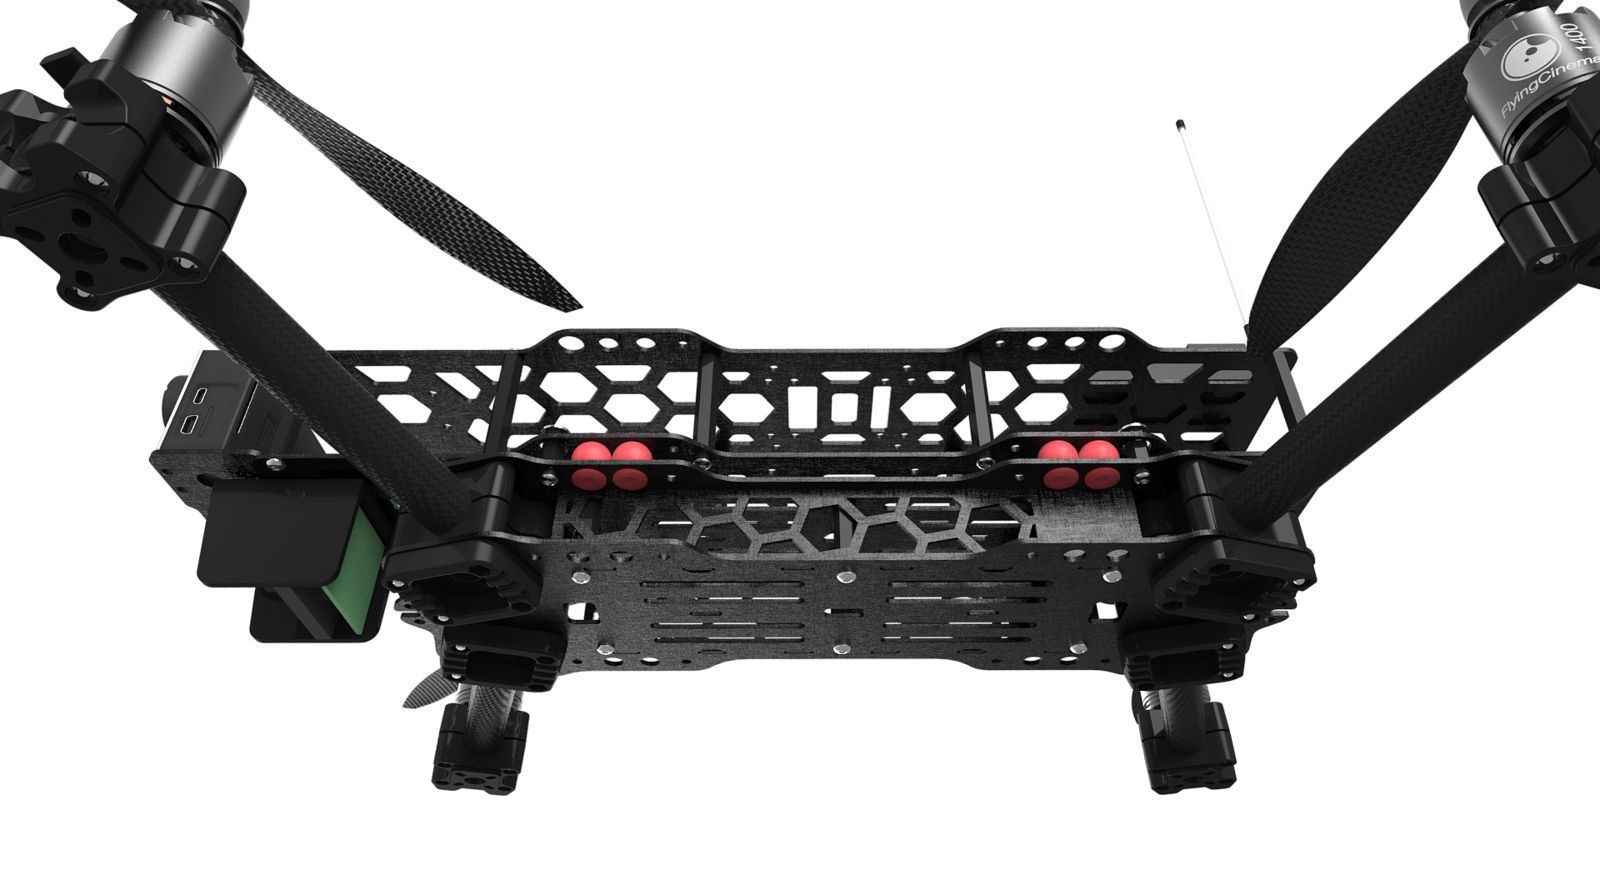
Following an online step-by-step build thread, I quickly had the 260mm long dirty section assembled. This is where the frame derives its strength. Housed between the dirty plates resides the boom mounts, and is the perfect place to tuck away ESCs with the included “cine coin” (a small, sturdy copper buss plate, eliminating the need for a squid or power distribution board). When you first see the plates, various holes and slots seem to be cut into the plates simply to reduce weight, but now reveal themselves as strategically placed, utilitarian features to help secure electronics. For example, there are slots that fit the side plate tabs with an extra bit of room to slip in a zip-tie for securing the ESCs. A simple but well thought out feature. Also, all plates have drilled holes allowing the Wera Hex driver to access bolts layers deep – by providing this access, parts can be removed without complete disassembly. The care and forethought that went into this design is obvious.

One complaint I had about the dirty section design is the use of small 3d printed landing gear (LG) “pads” that attach to the bottom of the frame. With hex-shaped indents, they function as nut holders for the boom mounts, eliminating the need for a wrench. My concern was that the nuts might strip the plastic, which proved to be true. In fairness, this only occurred with one of the sixteen indents, which was quickly fixed by replacing the pad with one of the included spares. Although my CineTank shipped with the first run of this 3D printed LG, I have been assured that a molded version will be shipping soon, which will eliminate this issue completely. Ultimately, I would have preferred a different type of LG altogether, possibly with more lift from the ground. Flying Cinema has recognized this as well, and is currently developing an option for taller LG.
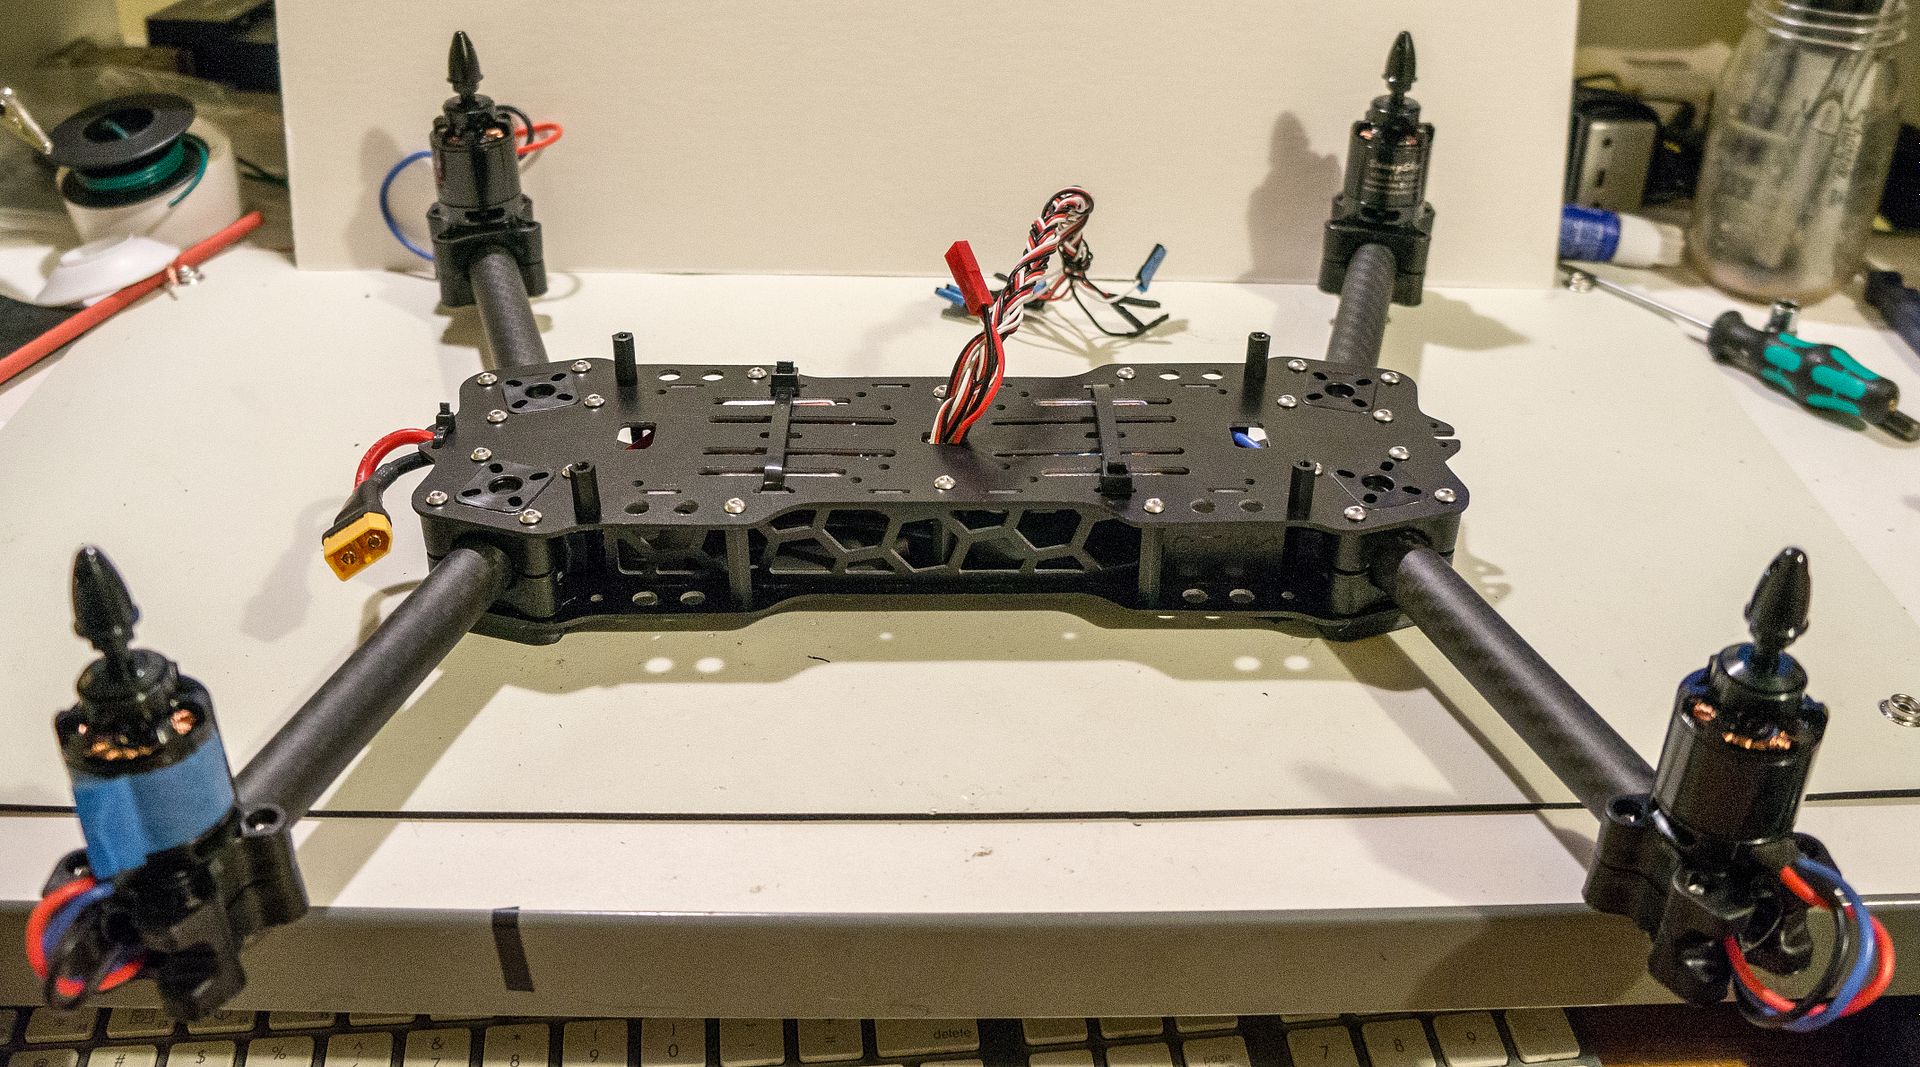
Motor/Mounts
Dirty section finished, it was time to get the booms, motor mounts and motors assembled. For clarification, the eight molded mounts used for both motor and boom are made up of sixteen identical pieces, each mount comprised of two pieces acting as a clamping mechanism. When used as a motor mount, the motors screw directly into the top, eliminating the need for the typical x-brace. The carbon-fiber booms offer perfect routing for wires, and the mounts are designed to allow free access for motor and ESC wires to meet inside the frame. Another key feature are “pegs” on the mounts that line up with pre-drilled holes in the booms. Theoretically, this offers perfect alignment and level mount for the motors. One concern: if the motors end up slightly uneven, adjustment would require disassembly and modification to the mounts. Fortunately my mounts required no such adjustment, a testament to manufacturing quality control.

Clean Section
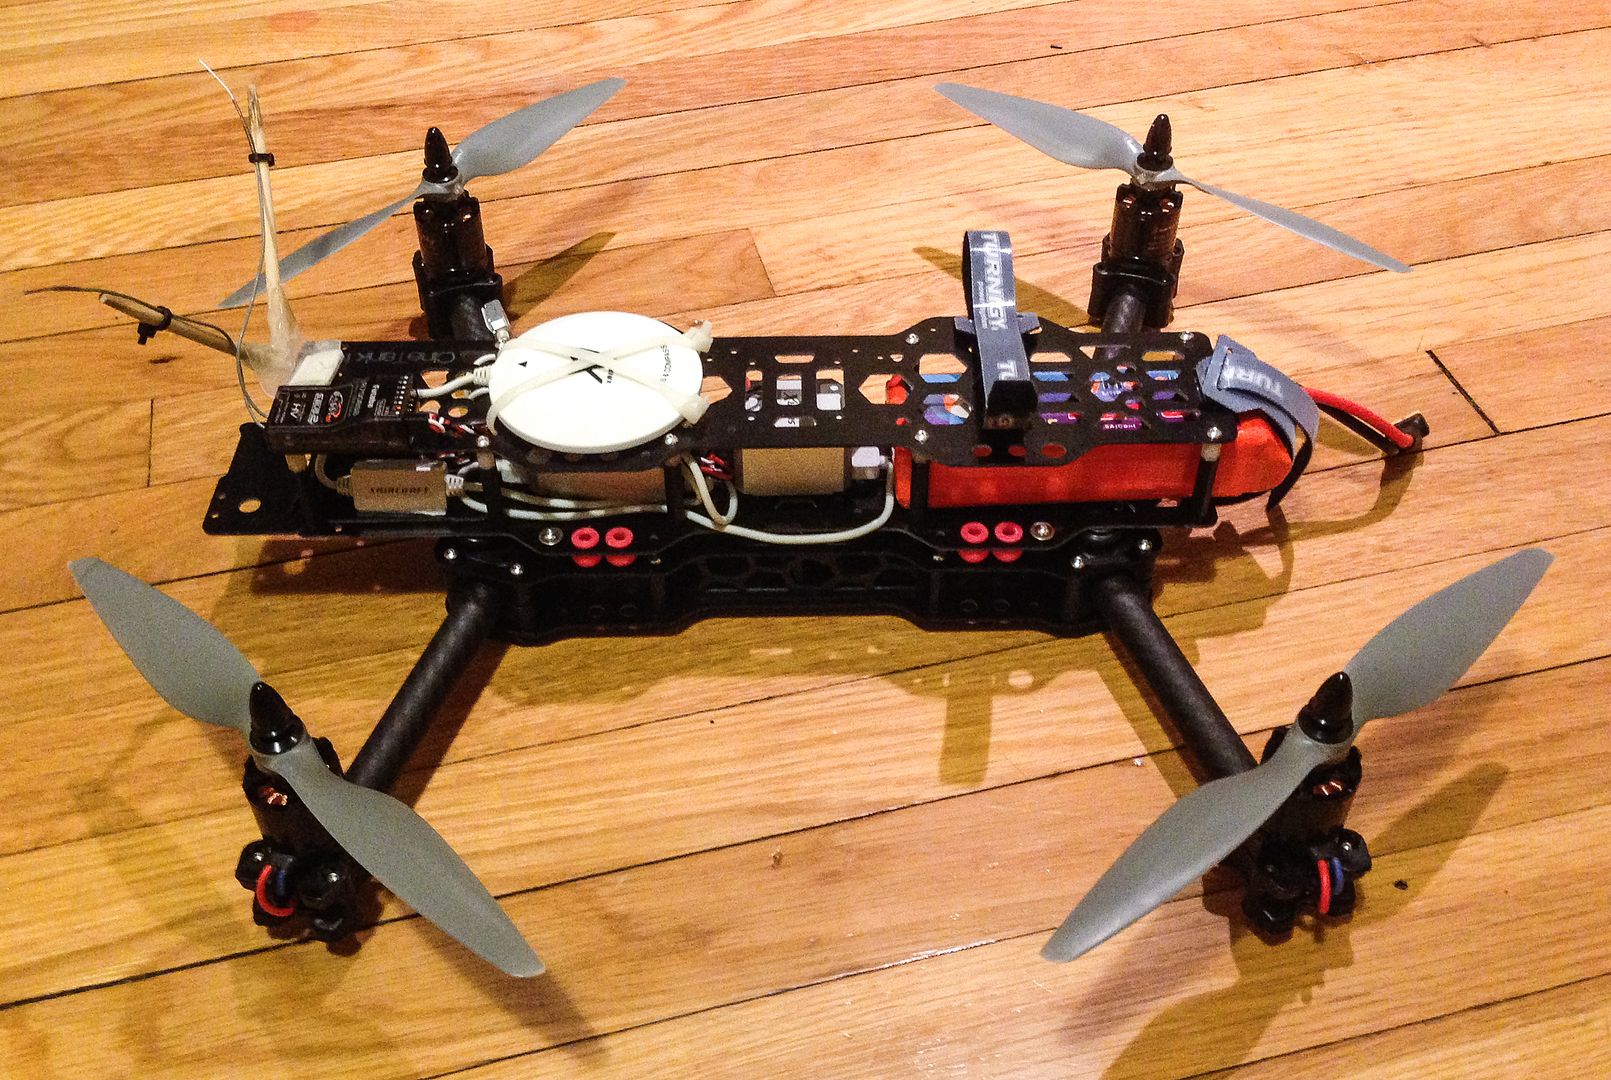
Finally it was time for the clean section assembly. Early online posts complained of difficulty with installing the 8 silicon dampeners, which provide isolation of motor vibrations between the dirty and clean sections. Luckily one builder posted a video with a simple trick to get it done without hassle. The offset between the dirty and clean sections is about 10mm, a space that can be utilized for cable routing, keeping the overall build neat and organized. With the lower clean plate resting on the installed dampeners, it’s time to get the main electronic components in place. At approximately 330mm long by 30mm tall with a top plate for protection, the clean section offers much appreciated spaciousness. Using a multi-part FC (separate I/O) for this build, I absolutely needed the room. The recommended uses for this inner clean section are for the FC, battery (which can be adjusted to balance center of gravity), and any other fragile electronic gear, with the top-most plate offering protection for critical components.
Summary...
Now complete, the total build time was just a couple hours. With so many options for placement, I have quickly and easily rearranged the electronics several times, a simple task due to the well-placed slots and holes in the plates.
For me, one of the most appealing aspects to dealing with a small company like Flying Cinema is the fact that the core teams are not only designers, but also personally test fly the products. With over 200 test-flights and five design revisions under their belt, this frame had been put through its paces before ever hitting the market. Flying Cinema also has a detailed list of compatible components on their website, all tested and reported with real-world results. Choosing the parts for this build can be as easy as following their shopping list, complete with links to suppliers.
Fully assembled, the frame weighs in at approximately 450g. Not the lightest frame, but not bad for the strength and abuse it can withstand. With electronics installed, my CineTank comes in at 1680 grams including the 4S 4200mah battery. The suggested SunnySky V2216 1250Kv motors are spinning 8” or 9” props. Flying Cinema has sample settings for 6 FCs, offering a comfortable starting point for those who want to follow the suggested component list.
Overall, I am extremely happy with the fit and finish of the Flying Cinema CineTank. Most importantly, the more time I spend with it – the more I grow to appreciate the level of thought and care that went into the design of this frame. The few minor complaints I had are overshadowed by a great base platform with which to fly FPV/Aerial Video in stock form, and endless room for modifications to get creative in the future. With distributors in North America, Europe and Australia, it looks like the CineTank is going to be getting some much-deserved exposure. Flying Cinema has imminent plans for releasing several new products and options including: brushless gimbal, taller landing gear, longer booms for bigger props, mini-quad frame and a hexacopter frame. The rest is hush-hush…
More Info:
By MotoPreserve

Whether you are new to the hobby or you flew at the National Aeromodeling Championships in 1937, many of you will begin your multirotor (MR) build by choosing a frame. The choices are endless and to the uninitiated, the options can be daunting. Among the various multirotor-flying formats, quads often make the most sense. If you're just starting out quads are simpler, less expensive and easier to manage. For more experienced pilots; having a machine with fewer motors, props and less hassle may allow them to think less and simply have more fun.
But with so many quad frame designs out there, how do you choose?
Decisions...Decisions
Most quads fall into two main categories. The most common is designed with a central set of frame plates, arms/booms extending symmetrically from the center, with electronics placement limited to vertical stacking. The second style, gaining popularity in the past few years, is known as the H-Quad (or FPV) frame. These designs are most often asymmetrical (motors not equidistant from the center of the frame), built around a stack of elongated plates stretching fore and aft, allowing more room for extra electronic equipment such as an FPV camera, video transmitter, antennas and extra batteries. Issues have arisen with asymmetrical configurations, with reports of some flight controllers (FC) having a hard time making fine adjustments to the motors.
That’s where the symmetrical H-Quad frame comes in.
Florida RC start-up Flying Cinema has hit the ground running with their first offering, a symmetrical H-Quad frame kit called the CineTank MK. I. Designed and manufactured in-house, the typical attributes that attract people to the H-Quad format are present, but it utilizes symmetrical motor spacing (423mm diagonally motor to motor) minimizing impact on the FC, making the CineTank an interesting new addition to the market.
I had been looking to get into FPV and amateur aerial video, searching long and hard for an H-Quad frame that fit all my requirements. There are many choices, with one key factor being price. With many options costing under $50, why would I pay $179 USD (free shipping included) for a frame? The more research I did, the more I found myself coming back to the CineTank, eventually realizing quality design and positive customer feedback was what I’d be paying for. Initial flight reports insisted it lived up to its [tank] name, with numerous customer crash videos showing the CineTank smacking the ground hard – only to be picked up and flown again. My ability to find the ground in 1000 feet of clear sky was making this frame more and more attractive.

Features
The CineTank has some appealing and unique design features; symmetrical layout, motor spacing which eliminates props in camera view, plates cut with a honeycombed template minimizing mass while maximizing strength, a new take on the clean/dirty plate design (to minimize jello) with travel-stops (to prevent damage to the dampeners), side plates coupled with stand-offs for strength, and an adjustable front camera mount with adjusting slots for securing various cameras. Adding to the appeal was the owners/designers seemingly constant presence on the forums, providing quick customer service, feedback and advice utilizing the online community. When I discovered Flying Cinema manufacturers most of the parts themselves right here in the good ol’ U.S. of A, a decision was made… I pulled the trigger, ordered the CineTank and impatiently awaited delivery.
The CineTank package arrived on my doorstep 3 days later, everything neatly packed into a long, thin box. Upon opening the box you find a complete frame kit tucked into a roll of interconnected, individually sealed vacuum pack compartments. When I let it unravel toward the floor, I felt like the huckster at a carnival, hawking wares. “Watches, fake IDs, how ‘bout a ring for the little lady? What ya’ need, I got it!” I was getting excited about this build.
I spread out the packaging on the workbench to get a good look at the contents. It was comforting to see all the bits protected in simple, easy to access containers. Someone was meticulous when putting this packaging together…

Examining the components reveals the design characteristics of the frame. Included are four CNC honeycombed glass fiber frame plates (two shorter plates for the dirty section, two longer for the clean), carbon-fiber booms, motor/boom mounts (identical), landing gear, nylon stand-offs, dampeners and stainless steel hardware. The included Wera Hex driver, which is the only tool needed to complete the build, was a nice touch. Grab a razor blade and open up the first compartment, it’s time to get this quad built!
Flying Cinema is currently editing a build-video to accompany the CineTank, but as an early adopter, I was relegated to the 3D blow-up diagrams provided on the website. Augmenting the schematics, enthusiastic customers on the forums have supplied detailed build-threads. Confidence in a smooth build was further boosted by the fact that prior to the purchase and after it arrived; it never took longer than a couple hours to hear back from one of the owners answering any questions I had.
Getting Started...Dirty Section
Following an online step-by-step build thread, I quickly had the 260mm long dirty section assembled. This is where the frame derives its strength. Housed between the dirty plates resides the boom mounts, and is the perfect place to tuck away ESCs with the included “cine coin” (a small, sturdy copper buss plate, eliminating the need for a squid or power distribution board). When you first see the plates, various holes and slots seem to be cut into the plates simply to reduce weight, but now reveal themselves as strategically placed, utilitarian features to help secure electronics. For example, there are slots that fit the side plate tabs with an extra bit of room to slip in a zip-tie for securing the ESCs. A simple but well thought out feature. Also, all plates have drilled holes allowing the Wera Hex driver to access bolts layers deep – by providing this access, parts can be removed without complete disassembly. The care and forethought that went into this design is obvious.

One complaint I had about the dirty section design is the use of small 3d printed landing gear (LG) “pads” that attach to the bottom of the frame. With hex-shaped indents, they function as nut holders for the boom mounts, eliminating the need for a wrench. My concern was that the nuts might strip the plastic, which proved to be true. In fairness, this only occurred with one of the sixteen indents, which was quickly fixed by replacing the pad with one of the included spares. Although my CineTank shipped with the first run of this 3D printed LG, I have been assured that a molded version will be shipping soon, which will eliminate this issue completely. Ultimately, I would have preferred a different type of LG altogether, possibly with more lift from the ground. Flying Cinema has recognized this as well, and is currently developing an option for taller LG.

Motor/Mounts
Dirty section finished, it was time to get the booms, motor mounts and motors assembled. For clarification, the eight molded mounts used for both motor and boom are made up of sixteen identical pieces, each mount comprised of two pieces acting as a clamping mechanism. When used as a motor mount, the motors screw directly into the top, eliminating the need for the typical x-brace. The carbon-fiber booms offer perfect routing for wires, and the mounts are designed to allow free access for motor and ESC wires to meet inside the frame. Another key feature are “pegs” on the mounts that line up with pre-drilled holes in the booms. Theoretically, this offers perfect alignment and level mount for the motors. One concern: if the motors end up slightly uneven, adjustment would require disassembly and modification to the mounts. Fortunately my mounts required no such adjustment, a testament to manufacturing quality control.

Clean Section
Finally it was time for the clean section assembly. Early online posts complained of difficulty with installing the 8 silicon dampeners, which provide isolation of motor vibrations between the dirty and clean sections. Luckily one builder posted a video with a simple trick to get it done without hassle. The offset between the dirty and clean sections is about 10mm, a space that can be utilized for cable routing, keeping the overall build neat and organized. With the lower clean plate resting on the installed dampeners, it’s time to get the main electronic components in place. At approximately 330mm long by 30mm tall with a top plate for protection, the clean section offers much appreciated spaciousness. Using a multi-part FC (separate I/O) for this build, I absolutely needed the room. The recommended uses for this inner clean section are for the FC, battery (which can be adjusted to balance center of gravity), and any other fragile electronic gear, with the top-most plate offering protection for critical components.

Summary...
Now complete, the total build time was just a couple hours. With so many options for placement, I have quickly and easily rearranged the electronics several times, a simple task due to the well-placed slots and holes in the plates.
For me, one of the most appealing aspects to dealing with a small company like Flying Cinema is the fact that the core teams are not only designers, but also personally test fly the products. With over 200 test-flights and five design revisions under their belt, this frame had been put through its paces before ever hitting the market. Flying Cinema also has a detailed list of compatible components on their website, all tested and reported with real-world results. Choosing the parts for this build can be as easy as following their shopping list, complete with links to suppliers.
Fully assembled, the frame weighs in at approximately 450g. Not the lightest frame, but not bad for the strength and abuse it can withstand. With electronics installed, my CineTank comes in at 1680 grams including the 4S 4200mah battery. The suggested SunnySky V2216 1250Kv motors are spinning 8” or 9” props. Flying Cinema has sample settings for 6 FCs, offering a comfortable starting point for those who want to follow the suggested component list.
Overall, I am extremely happy with the fit and finish of the Flying Cinema CineTank. Most importantly, the more time I spend with it – the more I grow to appreciate the level of thought and care that went into the design of this frame. The few minor complaints I had are overshadowed by a great base platform with which to fly FPV/Aerial Video in stock form, and endless room for modifications to get creative in the future. With distributors in North America, Europe and Australia, it looks like the CineTank is going to be getting some much-deserved exposure. Flying Cinema has imminent plans for releasing several new products and options including: brushless gimbal, taller landing gear, longer booms for bigger props, mini-quad frame and a hexacopter frame. The rest is hush-hush…
More Info:
Last edited by a moderator:
")