You are using an out of date browser. It may not display this or other websites correctly.
You should upgrade or use an alternative browser.
You should upgrade or use an alternative browser.
has any one used futaba S-bus
- Thread starter paktazh
- Start date
Louis O'Dwyer
Skydiver
I was using S-Bus with Naza-M and there was no setup, just use one cable to connect the receiver to the Naza box.
However, U on the Naza connects to ch7 on the receiver using S-Bus, and I was unable to setup forced failsafe mode on a transmitter switch, so I changed back to the conventional connections, where U can connect to ch5 (gear)
However, U on the Naza connects to ch7 on the receiver using S-Bus, and I was unable to setup forced failsafe mode on a transmitter switch, so I changed back to the conventional connections, where U can connect to ch5 (gear)
My - Setting the Futaba T10C*G Radio
Setting the Futaba T10C*G Radio using S-BUS
a) Createa new Model, (under Model menu). Give it a name say (DJI F550v2), then goto Parameter set Type to Acrobatic and then Execute a Reset. Enter your Nameif you wish, all other settings in this menu can be left at default.
b) SetAUX channels (under AUX-CH menu) reverse CH6 (under Reverse menu) :-
“CH5” – Gain Adjustment – “VR(A)” Pitch & Role or Yaw or Attitudeadjustment.
“CH6” {reversed} – Intelligent Orientation Control – “SwC” Off, Course Lock, Home Lock.
“CH7” – Flight Mode – “SwE” Manual, Attitude Hold, GPS Position Hold.
“CH8” – Variable Knob – “VR(C)”
“CH9” – Not Assigned – “Sw(B)”
“CH10” – Timer Reset – “SwA” Reset the Radio Timer to Zero.
In NAZA S-Bus:- CH5 = X1, CH6 =X2, CH7 = U - Fail Safe:- CH3throttle = F/S 56%, CH7 Aux1 = +26%
c) Reversechannel 6 (under Reverse menu) :-
“CH6” Flap (SwC) – if not already done, (channel 6) needs to be reversed sothat “Off” is in the switch UP position.
d) SetEND points (under End Point menu) :-
“CH7” Aux1 (SwE) – Set both sides to 60% (highlight each side to adjust settingsby switching “SwE”). Naza activates - Manual, Attitude Hold, GPS Position Hold with these End Point settings.
e) Fail Safe Auto Return to Home Settings (underEnd Point menu) :-1. In “End Point” menu scroll down to select “CH7” (7: AUX1) (SwE)
2. Move (SwE) switch “E” to the Down position to highlight “H”
3. Rotate the Radio wheel to reduce theEnd Point on the right side to 29%
4. Now go to the “F/S” (Fail Safe) menu & select “3: THRO”, adjust throttlestick to just above
centre (55%) & press on the“Push” button, this will change the “3: THRO” setting from
“NOR” to “F/S 55%”.
6. In the same “F/S” menu scroll down and select “CH7” (7: AUX1)
7. Rotate the wheel to change from “NOR” to “F/S” then press on the “Push”button and
“+ 26% should appear.
8. Now go back to “End Points” menu & change “CH7” (7: AUX1) on the rightside back to
60%.
f) Returnto Home on Demand (under Prog. Mix1-8 menu) :-
This will only work if (SwE) (Flight Mode switch) is in the Down position (GPS Position Hold).
To get to this menu highlight MODEL and press the mode button.
1. Press the “Push” button and then select Mix number one, scroll down toMaster-Slave and select “CH7” on both.
2. Go to “SW” (switch) and select “SwD” (switch D) then go to “POSI” and select“Down”.
3. Go to “RATE” “H” and set this to -50% (highlight “H” by moving SwE to Downposition).
g) Bind TX to RX(Transmitter to Receiver) When binding ensure that throttle stick is set above10% most users set the stick to about 40%, I set mine to 50%.
Three Position Switches “E” Flight mode (FM) and “C”Intelligent Orientation Control (IOC)
Two Position Switch “A” Radio Timer reset
Two Position Switch “D” Return to Home on demand (only while “SwE” Flight modeis set to “GPS Position Hold”)
Switch “A” (SwA) is used to reset the Radio Timer.
Switch “C” (SwC) is used to switch to Modes :- Off, Course Lock, Home Lock (IOC).
Switch “D” (SwD) is used to switch to :- Return to Home on Demand
Switch “E” (SwE) is used to switch to Modes :- Manual, Attitude Hold, GPS Position Hold (FM).
Rotating knob “VR(A)” is used to remotely set gains in DJI Naza (Pitch &Yaw only at one time).
In NAZA S-Bus:-CH5 = X1, CH6 = X2, CH7 = U - Fail Safe:- CH3 throttle = F/S 56%, CH7 Aux1 = +26%
*******That is all for Futaba T10C*G Radio setup – Next DJI Assistantsetup *******
Last edited by a moderator:
DJI Assistant Software
a) Mounting
Enter Naza GPS sensor location relative to CG (Centre of Gravity) of Hex CopterX, Y, Z.
Green line = negative value – Red line = positive values
CG for Z should be from the centre of propeller horizontal plain or just belowthis level, to the centre of the Naza sensor. My settings are :- X = 8cm, Y =0cm, Z = -5cm.
Values could be left at zero if desired.
b) MotorMixer
In my case “Hexa Rotor V” orientation.
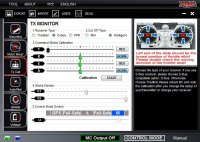
c) TXCalibration
1. Receiver type in my case “D-BUS” same as (S-Bus)
2. Cut off Type “Intelligent”
3. Check throttle, Rudder, Elevon, Aileron – that they function and operate inthe right
direction. Elevon slider shouldmove left when stick is moved down.
4. Command Sticks Calibration if all is correct do a “Calibration” by clickingthe “Start”
button, move both sticks in acircular motion to all four corners several times and when
finished release the sticks and click on the “Finish” button.
5. Control Mode Switch “E” (SwE) check that in “Up” position “Manual” ishighlighted
“Middle”position “Attitude” Hold is highlighted
“Down”position “GPS” position hold is highlighted
6. Sticks Monitor X1 – VR(A) knob check that slider moves left when knob isrotated anti- clockwise& moves right when rotated clockwise.
7. Stick Monitor X2 – SwC switch “C” check that slider positions are as follows:-
Switchis “Up” slider should be on Manual “Right Side”
Switchis “Middle” slider should be on Attitude “Middle” position
Switch is“Down” slider should be on GPS “LeftSide”

d) AutoPilot – settings are as per image below (“Attitude gain” defaults were 140%& 140%)
“Basic Gains” adjust how the craft reacts to environmental agents, wind,movement etc.
“Attitude Gains” have to do with how Naza reacts to stick movement.

Check that (SwC) switch “C” is set as follows :- “Up” = OFF (slider is on right hand side)
“Middle”= Course Lock (slider is in middle)
“Down”= Home Lock (slider on the left side)
e) Gimbal– Not used at this time
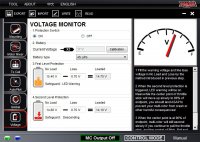
f) Voltage– Select battery type being used & leave voltages set on defaults
 I am using S4 LiPo battries.
g) FailSafe Auto Return Setup
1. Go back to “TX Calibration” screen
2. Move (SwE) switch “E” to the Down position to highlight “GPS”
3. Then go to the Radio “End Points” menu & select “CH7” (7: AUX1)
4. Rotate the Radio wheel to reduce theEnd Point to 29% (Until “Fail-Safe” is highlighted”)
5. Then go to the Radio “F/S” (Fail Safe) menu & select “3: THRO”, adjustthrottle stick to just
above centre (55%) & press on the “Push” button, this will changethe “3: THRO” setting
from “NOR” to “F/S 55%”.
6. In the same “F/S” menu move down and select “CH7” (7: AUX1)
7. Rotate the wheel to change “NOR” to “F/S” then press on the “Push” button& “+ 26%
should appear.
8. Now go back to “End Points” menu & change “CH7” (7: AUX1) back to 60%,this will
highlight “GPS” again.
h) Timerset to start at 5% throttle-up
Timer (1) is set to 6 minutes, “Mode” is “Up”. To enable timer to startswitch “A” must be in the Up position. To reset the timer move (SwA) to Downposition and then back Up.
Timer “On” is set to “St-Thr” (start with throttle stick) when throttle stickis moved above 5% timer will start, if moved below 5% timer will stop.
Reset (Rset) timer set to (SwA) “Down” (move switch lever “A” towards me toreset timer)
(Futaba state that the switch lever settings are:- Up is away from me and Down is towards me).
View attachment 11029View attachment 11030View attachment 11031View attachment 11032
a) Mounting
Enter Naza GPS sensor location relative to CG (Centre of Gravity) of Hex CopterX, Y, Z.
Green line = negative value – Red line = positive values
CG for Z should be from the centre of propeller horizontal plain or just belowthis level, to the centre of the Naza sensor. My settings are :- X = 8cm, Y =0cm, Z = -5cm.
Values could be left at zero if desired.
b) MotorMixer
In my case “Hexa Rotor V” orientation.
c) TXCalibration
1. Receiver type in my case “D-BUS” same as (S-Bus)
2. Cut off Type “Intelligent”
3. Check throttle, Rudder, Elevon, Aileron – that they function and operate inthe right
direction. Elevon slider shouldmove left when stick is moved down.
4. Command Sticks Calibration if all is correct do a “Calibration” by clickingthe “Start”
button, move both sticks in acircular motion to all four corners several times and when
finished release the sticks and click on the “Finish” button.
5. Control Mode Switch “E” (SwE) check that in “Up” position “Manual” ishighlighted
“Middle”position “Attitude” Hold is highlighted
“Down”position “GPS” position hold is highlighted
6. Sticks Monitor X1 – VR(A) knob check that slider moves left when knob isrotated anti- clockwise& moves right when rotated clockwise.
7. Stick Monitor X2 – SwC switch “C” check that slider positions are as follows:-
Switchis “Up” slider should be on Manual “Right Side”
Switchis “Middle” slider should be on Attitude “Middle” position
Switch is“Down” slider should be on GPS “LeftSide”
d) AutoPilot – settings are as per image below (“Attitude gain” defaults were 140%& 140%)
“Basic Gains” adjust how the craft reacts to environmental agents, wind,movement etc.
“Attitude Gains” have to do with how Naza reacts to stick movement.
Check that (SwC) switch “C” is set as follows :- “Up” = OFF (slider is on right hand side)
“Middle”= Course Lock (slider is in middle)
“Down”= Home Lock (slider on the left side)
e) Gimbal– Not used at this time
f) Voltage– Select battery type being used & leave voltages set on defaults
g) FailSafe Auto Return Setup
1. Go back to “TX Calibration” screen
2. Move (SwE) switch “E” to the Down position to highlight “GPS”
3. Then go to the Radio “End Points” menu & select “CH7” (7: AUX1)
4. Rotate the Radio wheel to reduce theEnd Point to 29% (Until “Fail-Safe” is highlighted”)
5. Then go to the Radio “F/S” (Fail Safe) menu & select “3: THRO”, adjustthrottle stick to just
above centre (55%) & press on the “Push” button, this will changethe “3: THRO” setting
from “NOR” to “F/S 55%”.
6. In the same “F/S” menu move down and select “CH7” (7: AUX1)
7. Rotate the wheel to change “NOR” to “F/S” then press on the “Push” button& “+ 26%
should appear.
8. Now go back to “End Points” menu & change “CH7” (7: AUX1) back to 60%,this will
highlight “GPS” again.
h) Timerset to start at 5% throttle-up
Timer (1) is set to 6 minutes, “Mode” is “Up”. To enable timer to startswitch “A” must be in the Up position. To reset the timer move (SwA) to Downposition and then back Up.
Timer “On” is set to “St-Thr” (start with throttle stick) when throttle stickis moved above 5% timer will start, if moved below 5% timer will stop.
Reset (Rset) timer set to (SwA) “Down” (move switch lever “A” towards me toreset timer)
(Futaba state that the switch lever settings are:- Up is away from me and Down is towards me).
Calibration procedure for GPS Allways do calibration with everything intended on being aboard the craft and fully powered. This includes camera, video, battery, lights etc. Remove all other object from your person to do the calibration, mobile, keys, wallet, watch etc. In order to enter compass calibration mode, you must have set in the Nava software “Assistant” at least “MANUAL” & “GPS” modes. |
| STEP1:Enter calibration mode: quickly move the mode switch, “starting with switch set to Manual position”, (Manual, Attitude, GPS, 3 position switch) from Position-1 to Position-3for 6 to 10 times, then stop and LED indicator will turn constantly on in yellow; STEP2:Calibration in horizontal: rotate your multi-rotor along the horizontal surface (sketch on Left) until the green light is constantly on, then go to the next step; |

STEP3:Calibration in vertical: while green light is constantly on, hold your multi-rotor vertically (sketch on Right) and rotate it along with its vertical axis, keep rotating until the green light is off, meaning the calibration is finished. STEP4:After you finished the calibration, LED indicator will show whether the calibration was successful or not: l If calibration succeeds, calibration mode will auto exit; l If red light keeps blinking quickly, the calibration has failed. Move the control mode switch one time to cancel current calibration, and then re-start from step 1 to re-calibrate. |
| Tips: If you keep having calibration failure, it might suggest that there is a very strong magnetic interference around the GPS & Compass module, please avoid flying in this area. |
Attachments

Louis O'Dwyer
Skydiver
Many thanks for all that info!
I think what I might do is re-cable for the S-Bus and using the 3-way switch GPS/ATT/Manual, replace Manual with FailSafe (I don't see myself ever flying in manual!)
I think what I might do is re-cable for the S-Bus and using the 3-way switch GPS/ATT/Manual, replace Manual with FailSafe (I don't see myself ever flying in manual!)
Another suggestion to set-up S-Bus to Naza is to check out both of these videos
& copy everything Jon does step-by-step. Stop the video while performing each
step of the setup.
Both of his videos helped me out a lot, as he explains how to set-up failsafe using a 2-way switch,forced failsafe
using the power switch (either in emergency or loss of signal)
and the mode setup w/ a 3-way switch on your radio.
Even though some people will never use MANUAL,you'll need to have the 3-way switch set for GPS/ATTI/MANUAL
in order to calibrate the GPS.
Part 1
http://www.youtube.com/watch?v=ck3tu-4UVgg
Part 2
http://www.youtube.com/watch?v=SmDehc5PEUQ
and if you have the GPS, here's the best video for the calibration process.
Here,you'll see why you need MANUAL setup on the 3-way switch.
http://www.youtube.com/watch?v=OxMjTjywbYc
-George
Last edited by a moderator: