I've begun work on my first build. I have another thread for asking questions, so I thought I would start a build thread for documenting the process. I also find that being able to share and communicate new knowledge helps me with learning it. I'm also open to feedback as this build progresses. I'll try to make it useful for other new builders by adding photos and maybe even some video. I'm sure some readers will have opinions on better methods, sources and parts...but I will share how I went about mine just to complete the documentation process for anyone who might want to do something similar.
Goals for this build
Frame - Andoer Upgrade Version 250mm Mini FPV Quadcopter Glass Fiber Frame Kit for QAV250
Motors/ESCs - LHI MT1806 2280KV CW CCW Mini Motor +Simonk 12A 2-3s ESC for QAV250 FPV KK 260 RC Quadcopter 4-Axis Aircraft
Battery - 2 Packs Floureon 3S 25C 11.1V 2200mAh Li-Polymer Lipo RC Battery Pack with XT60 Plug Connector for RC Helicopter RC Airplane RC Hobby
Props - Hooshion® 16 pcs 8 pairs GemFan HD HQ 5030 5x3 CW CCW Propeller for Mini QAV250
Quadcopter
FC - IEIK CC3D Openpilot Flight Controller Bent Pin STM32 32bit for Qav250 X-copter Multirotor Fixed Wing
PDB - ARRIS® CC3D Flight Controller Mini Power Distribution Board w/LED (Comes with BEC 5V-12V output) for 250 Multicopter
Charger - Turnigy Accucel-6 50W 6A Balancer Charger LiPo LiFe NiMh NiCd JST-XH w/ MANUAL!
I also picked up some extra T60 plugs and battery monitors/alarms. A few of the parts were recommended parts from the frame seller. Without really understanding the finer details I just searched for many of them on Amazon and bought what seemed reasonable. Sometimes learning the hard way is best for long term knowledge...lol. So I took some risk and just ordered parts!
The Radio
For the radio I really struggled in making a decision. Part of me wanted to keep it minimal and inexpensive, but I have learned over the years with RC that having a quality radio is important. So I skipped the cheap ones and went with a FRSKY Taranis 2.4ghz X9D PLUS, 16CH Digital Telemetry Transmitter Mode 2 US and receiver from gothelirc.com. It was recommended by another forum member and after doing some research it looked like a great option for the multirotor platform. I bought from gothelirc because they are a forum sponsor and their price was good compared to other places I saw it.
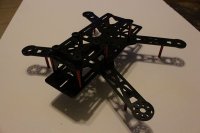
Update 12/30/15 - I have all the major parts in. I put the frame together and mounted a motor to see how it fit. Then I realized I will likely want to pull the top plate off for mounting everything. I also need to work out my wiring and break out the soldering iron. I did a lot of digging around on my FC and how to use it, so I feel better about getting the electronics installed. I'll try to post up some pics tonight and hope to have the electronics done tonight as well.
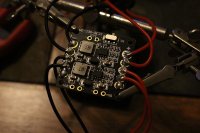
Update 12/31/15 - I soldered up the motors/ESC/PDB last night. I then started looking at the receiver and FC and realized I had an issue! My receiver will need to connect with the SBUS and I don't have the connector to do that on my FC. I'm looking at solutions for that and in the meantime ordered an 8 channel receiver. Sorry I haven't had time to get the pics off my camera and posted...but I will soon!
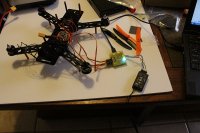
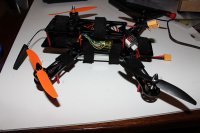
Update 1/2/16 - Finished up the build after getting my 8 channel receiver in today. While doing the setup I realized I needed to move 2 of my motors to get the right hubs in the correct place to support the rotation requirements. I also had to re-solder 2 of my ESC motor connections to correct the rotation. Finally, I used velcro to mount everything (except the FC which is taped in). I put my battery on the bottom to balance it and with all the velcro it makes it a bit too bulky under the frame. After running through the FC setup I flew it a couple times...and it worked right the first time! Woot. I'll reply to the post with more details on the flight. Now to add the pictures.
View attachment 27186 View attachment 27187 View attachment 27188 View attachment 27189
Goals for this build
- Keep costs down, but try to use quality parts.
- Start from scratch and learn all the parts.
- Build a quad that is stable and safe. It should be big enough to fly outdoors on mild days and small enough to safely fly indoor (for testing and fun).
- While I may not ever race it, I'm after a racing type quad.
- It should be a platform that can support FPV, but that is not an initial build requirement.
Frame - Andoer Upgrade Version 250mm Mini FPV Quadcopter Glass Fiber Frame Kit for QAV250
Motors/ESCs - LHI MT1806 2280KV CW CCW Mini Motor +Simonk 12A 2-3s ESC for QAV250 FPV KK 260 RC Quadcopter 4-Axis Aircraft
Battery - 2 Packs Floureon 3S 25C 11.1V 2200mAh Li-Polymer Lipo RC Battery Pack with XT60 Plug Connector for RC Helicopter RC Airplane RC Hobby
Props - Hooshion® 16 pcs 8 pairs GemFan HD HQ 5030 5x3 CW CCW Propeller for Mini QAV250
Quadcopter
FC - IEIK CC3D Openpilot Flight Controller Bent Pin STM32 32bit for Qav250 X-copter Multirotor Fixed Wing
PDB - ARRIS® CC3D Flight Controller Mini Power Distribution Board w/LED (Comes with BEC 5V-12V output) for 250 Multicopter
Charger - Turnigy Accucel-6 50W 6A Balancer Charger LiPo LiFe NiMh NiCd JST-XH w/ MANUAL!
I also picked up some extra T60 plugs and battery monitors/alarms. A few of the parts were recommended parts from the frame seller. Without really understanding the finer details I just searched for many of them on Amazon and bought what seemed reasonable. Sometimes learning the hard way is best for long term knowledge...lol. So I took some risk and just ordered parts!
The Radio
For the radio I really struggled in making a decision. Part of me wanted to keep it minimal and inexpensive, but I have learned over the years with RC that having a quality radio is important. So I skipped the cheap ones and went with a FRSKY Taranis 2.4ghz X9D PLUS, 16CH Digital Telemetry Transmitter Mode 2 US and receiver from gothelirc.com. It was recommended by another forum member and after doing some research it looked like a great option for the multirotor platform. I bought from gothelirc because they are a forum sponsor and their price was good compared to other places I saw it.
Update 12/30/15 - I have all the major parts in. I put the frame together and mounted a motor to see how it fit. Then I realized I will likely want to pull the top plate off for mounting everything. I also need to work out my wiring and break out the soldering iron. I did a lot of digging around on my FC and how to use it, so I feel better about getting the electronics installed. I'll try to post up some pics tonight and hope to have the electronics done tonight as well.
Update 12/31/15 - I soldered up the motors/ESC/PDB last night. I then started looking at the receiver and FC and realized I had an issue! My receiver will need to connect with the SBUS and I don't have the connector to do that on my FC. I'm looking at solutions for that and in the meantime ordered an 8 channel receiver. Sorry I haven't had time to get the pics off my camera and posted...but I will soon!
Update 1/2/16 - Finished up the build after getting my 8 channel receiver in today. While doing the setup I realized I needed to move 2 of my motors to get the right hubs in the correct place to support the rotation requirements. I also had to re-solder 2 of my ESC motor connections to correct the rotation. Finally, I used velcro to mount everything (except the FC which is taped in). I put my battery on the bottom to balance it and with all the velcro it makes it a bit too bulky under the frame. After running through the FC setup I flew it a couple times...and it worked right the first time! Woot. I'll reply to the post with more details on the flight. Now to add the pictures.
View attachment 27186 View attachment 27187 View attachment 27188 View attachment 27189
Attachments
Last edited by a moderator:


