SamaraMedia
Active Member
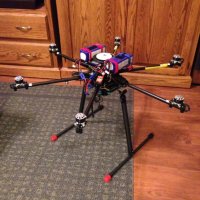
View attachment 22679
For a winter project I decided I going to upgrade my Rusty's UAP1 900 mm hex from GoPro hauled to a 3 axis DSLR machine.
First order was to swap out the NAZA for a Super X. Everything seems to be working as it should electronically but while out trying to do my first GPS calibration I found it to be rather awkward trying to spin something this size in a circle for as long as it takes to go through the three step process. Watching Drew's video makes it look simple with a small quad but grabbing booms and rotating something this size cleanly with out a boom or retract leg catching my jacket or pant leg was difficult and time consuming. I finally decided to stand between the #1 and #2 booms and spin in a circle for each axis. Problem is, after spinning around a half dozen times I'm dizzy and first time I tried that last night I almost fell looking like a dunk sailor or having just running in a bat race, you know, put your forehead on a bat, spin a dozen times then try and run a straight line") Anyways I was able to get a GPS lock after about my sixth try but by then it was too dark to fly. With the NAZA it wasn't too much of an issue since one rotation in each axis usually produced a GPS lock. (After looking at my photo I would say I need to elevate the GPS puck above the batteries to begin with) So my question to all you heavy lift and large diameter flyers out there, how you do the dance with your Super X to get GPS cali?
Anyways I was able to get a GPS lock after about my sixth try but by then it was too dark to fly. With the NAZA it wasn't too much of an issue since one rotation in each axis usually produced a GPS lock. (After looking at my photo I would say I need to elevate the GPS puck above the batteries to begin with) So my question to all you heavy lift and large diameter flyers out there, how you do the dance with your Super X to get GPS cali?
Next is - what to do with gimbal during calibration process? It wasn't an issue with a Zenmuse H3-3D underneath but now that I'm going with something larger wondering what most of you do. I would imagine best situation would be to have it on a quick release plate so that it isn't mounted while spinning the hex inverted for the second and third GPS calibration with the Super X. I'd be interested in any suggestions for QR plates.
I'm finding that trying to make a whole lot of different DIY pieces fit into the puzzle is a real pain. Even making a plate to mount the Tarot retracts was a chore. When a project starts out as a simple thing and advances to a larger project I probably would have been better off going with a "system" like the Vulcan, Hexacrafter, Aerovonics or DJI frames where everything is made to work together. You think that your saving money going the DIY route but in the long run it takes more time and probably as much if not more money than a system.
Any and all suggestions are welcome.
Thanks,
John
For a winter project I decided I going to upgrade my Rusty's UAP1 900 mm hex from GoPro hauled to a 3 axis DSLR machine.
First order was to swap out the NAZA for a Super X. Everything seems to be working as it should electronically but while out trying to do my first GPS calibration I found it to be rather awkward trying to spin something this size in a circle for as long as it takes to go through the three step process. Watching Drew's video makes it look simple with a small quad but grabbing booms and rotating something this size cleanly with out a boom or retract leg catching my jacket or pant leg was difficult and time consuming. I finally decided to stand between the #1 and #2 booms and spin in a circle for each axis. Problem is, after spinning around a half dozen times I'm dizzy and first time I tried that last night I almost fell looking like a dunk sailor or having just running in a bat race, you know, put your forehead on a bat, spin a dozen times then try and run a straight line
Anyways I was able to get a GPS lock after about my sixth try but by then it was too dark to fly. With the NAZA it wasn't too much of an issue since one rotation in each axis usually produced a GPS lock. (After looking at my photo I would say I need to elevate the GPS puck above the batteries to begin with) So my question to all you heavy lift and large diameter flyers out there, how you do the dance with your Super X to get GPS cali? Next is - what to do with gimbal during calibration process? It wasn't an issue with a Zenmuse H3-3D underneath but now that I'm going with something larger wondering what most of you do. I would imagine best situation would be to have it on a quick release plate so that it isn't mounted while spinning the hex inverted for the second and third GPS calibration with the Super X. I'd be interested in any suggestions for QR plates.
I'm finding that trying to make a whole lot of different DIY pieces fit into the puzzle is a real pain. Even making a plate to mount the Tarot retracts was a chore. When a project starts out as a simple thing and advances to a larger project I probably would have been better off going with a "system" like the Vulcan, Hexacrafter, Aerovonics or DJI frames where everything is made to work together. You think that your saving money going the DIY route but in the long run it takes more time and probably as much if not more money than a system.
Any and all suggestions are welcome.
Thanks,
John